In this article, we will guide you through the process of building a 4×8 firewood shed that will keep your firewood dry and organized. This step-by-step plan is designed to be easy to follow, even for those with limited carpentry experience.
| Unit | Qty | Size | Note | |
| Pressure-Treated Lumber 1″x4″ | pcs | 12 | 6′ | Siding |
| Pressure-Treated Lumber 1″x4″ | pcs | 23 | 8′ | Siding |
| Pressure-Treated Lumber 1″x6″ | pcs | 2 | 8′ | Fascia |
| Pressure-Treated Lumber 2″x2″ | pcs | 6 | 6′ | Studs |
| Pressure-Treated Lumber 2″x2″ | pcs | 4 | 8′ | Studs |
| Pressure-Treated Lumber 2″x4″ | pcs | 2 | 6′ | Bottom plate |
| Pressure-Treated Lumber 2″x4″ | pcs | 9 | 8′ | Bottom plate, Diagonal braces |
| Pressure-Treated Lumber 2″x6″ | pcs | 6 | 6′ | Rafters |
| Pressure-Treated Lumber 2″x8″ | pcs | 6 | 8′ | Joists, Rim joists |
| Pressure-Treated Lumber 4″x4″ | pcs | 3 | 6′ | Studs, Top plate |
| Pressure-Treated Lumber 4″x4″ | pcs | 8 | 8′ | Studs, Top plate |
| Concrete Brick Pavers | pcs | 6 | 4″ x 8″ x 16″ | |
| Plywood (9/16″) | pcs | 4 | 4′ x 8′ | Sheathing |
| Building paper (#15) | ft2 | 60 | ||
| Asphalt shingles (250# per sq. min) | ft2 | 60 | ||
| Metal ridge cap 14″ | ft | 32 | ||
| Galvanized nails (2″) | pcs | 260 | ||
| Wood screws (2″) | pcs | 200 | ||
| Wood screws (3″) | pcs | 70 | ||
| Wood screws (5″) | pcs | 200 |
|
Site Preparation |
Unit |
Qty |
Size |
Note |
|
Concrete blocks |
pcs |
6 |
4″ x 8″ x 16″ |
|
|
Shed’s Bottom Frame |
Unit |
Qty |
Size |
Note |
|
Pressure-Treated Lumber (1 1/2″ x 7 1/4″) |
pcs |
7 |
3′-9″ |
Joists |
|
Pressure-Treated Lumber (1 1/2″ x 7 1/4″) |
pcs |
2 |
8′ |
Rim joists |
|
Plywood (9/16″) |
pcs |
1 |
4′ x 8′ |
Floor sheathing |
|
Shed’s Front Wall Frame |
Unit |
Qty |
Size |
Note |
|
Pressure-Treated Lumber (1 1/2″ x 1 1/2″) |
pcs |
4 |
6′-3″ |
Stud |
|
Pressure-Treated Lumber (1 1/2″ x 3 1/2″) |
pcs |
2 |
2′-4″ |
Bottom plate |
|
Pressure-Treated Lumber (3 1/2″ x 3 1/2″) |
pcs |
4 |
6′-3″ |
Studs |
|
Pressure-Treated Lumber (3 1/2″ x 3 1/2″) |
pcs |
1 |
8′ |
Top plate |
|
Shed’s Back Wall Frame |
Unit |
Qty |
Size |
Note |
|
Pressure-Treated Lumber (1 1/2″ x 1 1/2″) |
pcs |
4 |
5′-5″ |
Studs |
|
Pressure-Treated Lumber (1 1/2″ x 3 1/2″) |
pcs |
2 |
6′-5 3/4″ |
Diagonal braces |
|
Pressure-Treated Lumber (1 1/2″ x 3 1/2″) |
pcs |
1 |
8′ |
Bottom plate |
|
Pressure-Treated Lumber (3 1/2″ x 3 1/2″) |
pcs |
3 |
5′-5″ |
Studs |
|
Pressure-Treated Lumber (3 1/2″ x 3 1/2″) |
pcs |
1 |
8′ |
Top plate |
|
Shed’s Side Wall Frame (x2) |
Unit |
Qty |
Size |
Note |
|
Pressure-Treated Lumber (1 1/2″ x 1 1/2″) |
pcs |
2 |
5′-5″ |
Studs |
|
Pressure-Treated Lumber (1 1/2″ x 3 1/2″) |
pcs |
1 |
3′-5″ |
Bottom plate |
|
Pressure-Treated Lumber (1 1/2″ x 3 1/2″) |
pcs |
2 |
3′-1 1/2″ |
Diagonal braces |
|
Pressure-Treated Lumber (1 1/2″ x 3 1/2″) |
pcs |
1 |
6′-4 3/4″ |
Diagonal braces |
|
Pressure-Treated Lumber (3 1/2″ x 3 1/2″) |
pcs |
1 |
3′-5″ |
Top plate |
|
Shed’s Roof |
Unit |
Qty |
Size |
Note |
|
Pressure-Treated Lumber (3/4″ x 5 1/2″) |
pcs |
2 |
8′ |
Fascia |
|
Pressure-Treated Lumber (1 1/2″ x 5 1/2″) |
pcs |
6 |
5′-3 1/2″ |
Rafters |
|
Plywood (9/16″) |
pcs |
1 |
2′ x 5′-7″ |
Roof sheathing |
|
Plywood (9/16″) |
pcs |
1 |
4′ x 5′-7″ |
Roof sheathing |
|
Plywood (9/16″) |
pcs |
1 |
4′ x 6′ |
Roof sheathing |
|
Building paper (#15) |
ft2 |
60 |
||
|
Asphalt shingles (250# per sq. min) |
ft2 |
60 |
||
|
Metal ridge cap 14″ |
ft |
32 |
||
|
Front Wall Exterior Siding |
Unit |
Qty |
Size |
Note |
|
Pressure-Treated Lumber (3/4″ x 3 1/2″) |
pcs |
34 |
1′-9″ |
Siding |
|
Back Wall Exterior Siding |
Unit |
Qty |
Size |
Note |
|
Pressure-Treated Lumber (3/4″ x 3 1/2″) |
pcs |
30 |
3′-6 3/4″ |
Siding |
|
Side Wall Exterior Siding )x2) |
Unit |
Qty |
Size |
Note |
|
Pressure-Treated Lumber (3/4″ x 3 1/2″) |
pcs |
15 |
3′-5″ |
Siding |
|
Fasteners & Hardware |
Unit |
Qty |
Size |
Note |
|
Galvanized nails (2″) |
pcs |
260 |
||
|
Wood screws (2″) |
pcs |
200 |
||
|
Wood screws (3″) |
pcs |
70 |
||
|
Wood screws (5″) |
pcs |
200 |
Step 1: Ground Works
1.1 Clear the area where you want to build the shed and layout for the foundation. Use the below illustration as a guide.

Step 2: Foundation Preparation
2.1 Place 4″x 8″x 16″ solid-concrete foundation blocks around the perimeter of the site, as shown in the drawing below. You will need 6 blocks that are all set level with each other. One way to level up the blocks is to lay a long, straight 2×4 on-edge across the blocks. Then, set a 4-ft. or longer level on top of the 2×4. Adjust the blocks until they are all level and in the same plane.

Step 3: Framing the Floor
3.1 Assemble the shed’s floor frame with pressure-treated 2x8s. Cut two boards to 8′ and two others to 3′-9″ to serve as the perimeter rim joists.
3.2 Fasten together the frame with 3″ screws.
3.3 Using a carpenter’s framing square, check the corners to make sure they are 90°.

Step 4: Framing the Floor
4.1 Cut five floor joists to 3′-9″ out of pressure-treated 2x8s.
4.2 Attach the floor joists to the rim joists with 3″ screws.
4.3 Use a carpenter’s framing square to ensure each floor joist is square to the rim joist.

Step 5: Install the Plywood Floor
5.1 Cover the floor frame with one full sheet of 9/16″ plywood, as shown in the drawing below.
5.2 Secure the plywood with 2″ screws.

Step 6: Assemble Front Wall Frame
6.1 Using pressure-treated 2x2s, 2x4s, and 4x4s, construct the front wall frame using the drawing below as a reference. Cut four 2×2 cleats and four 4×4 wall studs eight to 6′-3″. Then cut two 2x4s to 2′-4″ to serve as the bottom wall plates. And cut a 4×4 to 8′ for the plate.
6.2 Fasten together the frame with 3″ and 5″ screws.
6.3 Using a carpenter’s framing square, check the corners to make sure they are 90°.
6.4. Secure the front wall to the floor deck with 3” screws.

Step 7: Assemble Back Wall Frame
7.1 Using pressure-treated 2x2s, 2x4s, and 4x4s, construct the rear wall frame using the drawing below as a reference. Cut four 2×2 cleats and three 4×4 studs to 5′-5″. Then cut a 2×4 bottom wall plate and 4×4 top wall plate to 8′. And cut two 4x4s to 6′-5 3/4″ to serve as the diagonal braces.
7.2 Fasten together the rear wall frame with 3″ and 5″ screws.
7.3 Using a carpenter’s framing square, check the corners to make sure they are 7.4. Secure the rear wall to the floor deck with 3” screws.90°.

Step 8: Assemble Side Wall Frame
8.1 Using pressure-treated 2x2s, 2x4s, and 4x4s, construct the two side walls, using the drawing below as a reference. For each side wall, cut two 2×2 cleats to 5′-5″, one 2×4 bottom wall plate to 3′-5″, and one 4×4 top wall plate to 3′-5″. Then, cut one 2×4 diagonal brace to 6′-4 3/4″ and two 2×4 diagonal braces to 3′-1 1/2″.
8.2 Join together the parts with 3″ and 5″ screws.
8.3 Using a carpenter’s framing square, check the corners to make sure they are 90°.
8.4. Secure each side wall to the floor deck and to the front and rear walls with 3” screws.

Step 9: Assemble the Roof Frame
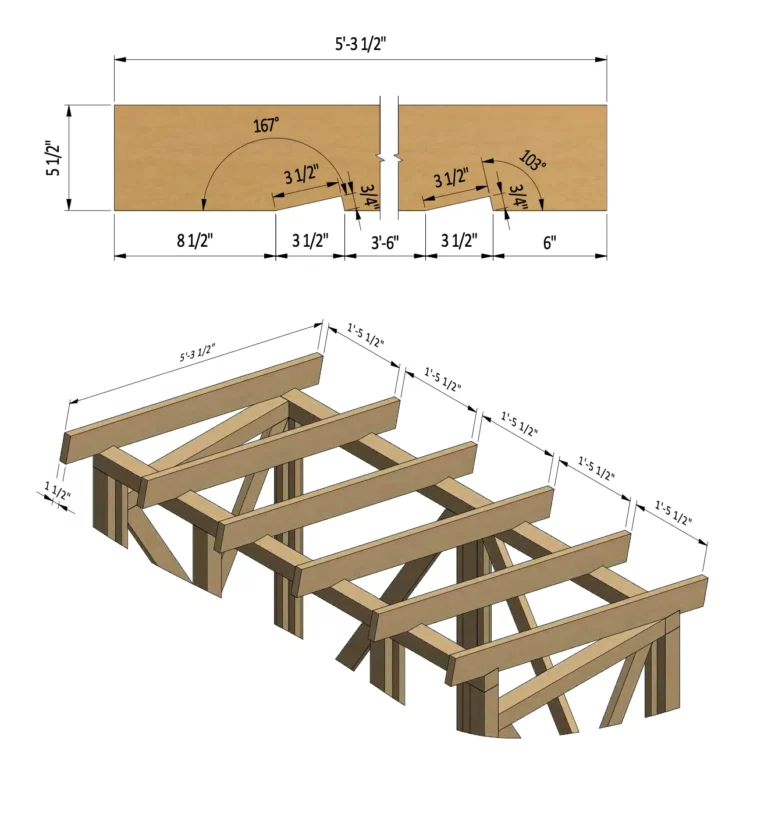
9.1 Cut six roof rafters from pressure-treated 2x6s. Cut each rafter to 5′-3 1/2″ and notch them to sit flat on top of the front and rear walls, as shown in the drawing below.
9.2 Secure the rafters with 3″ screws.

Step 10: Install Plywood for the Roof
10.1 Cut 9/16″ plywood for the roof sheathing, using the drawing below as a guide. Cut one plywood piece to 4′ x 6′, one to 4′ x 5′-7″, and one to 2′ x 5′-7″ sheet.
10.2 Secure the plywood to the rafters with 2″ screws.

Step 11: Assemble the Shed's Roof Fascias
11.1 Using pressure-treated 1x6s, cut two fascia boards to 8′ long. Fasten them to the rafter tails at the front and rear of the roof with 2″ screws.

Step 12: Installing the Exterior Siding to the Front Wall
12.1 The walls of the firewood shed are sided with pressure-treated 1x4s, as shown in the illustration below. You will need 34 boards cut to 1′-9″. Fasten the 1x4s to the 2×2 wall cleats with 2” screws.

Step 13: Installing the Exterior Siding to the Back Wall
13.1 Cut 30 pressure-treated 1x4s to 3′-6 3/4″, as shown in the illustration below. as a reference. Space the 1x4s 1” apart and fasten them to the wall frame with 2” screws. The space between the siding allows air to circulate around the firewood, helping it dry out faster.

Step 14: Installing the Exterior Siding to the Side Walls
14.1 For each side wall, cut 15 pressure-treated 1x4s to 3′-5″.Use the illustration below as a reference.
14.2. Fasten the 1x4s to the side wall frames with 2” screws; be sure to space the boards 1” apart.

Step 15: Roof Sheathing Installation
15.1 For the roof of this firewood shed, you will need 60 sq. ft. of asphalt shingles.
15.2 Nail the metal drip-edge flashing around the perimeter of the roof deck, then cover the roof with building paper.
15.4 Install the asphalt shingles with galvanized roofing nails.

Step 16: Shed Decoration
Now that your shed is all done, apply your favorite paint, stain, or clear wood preservative to all wood surfaces inside and out.


