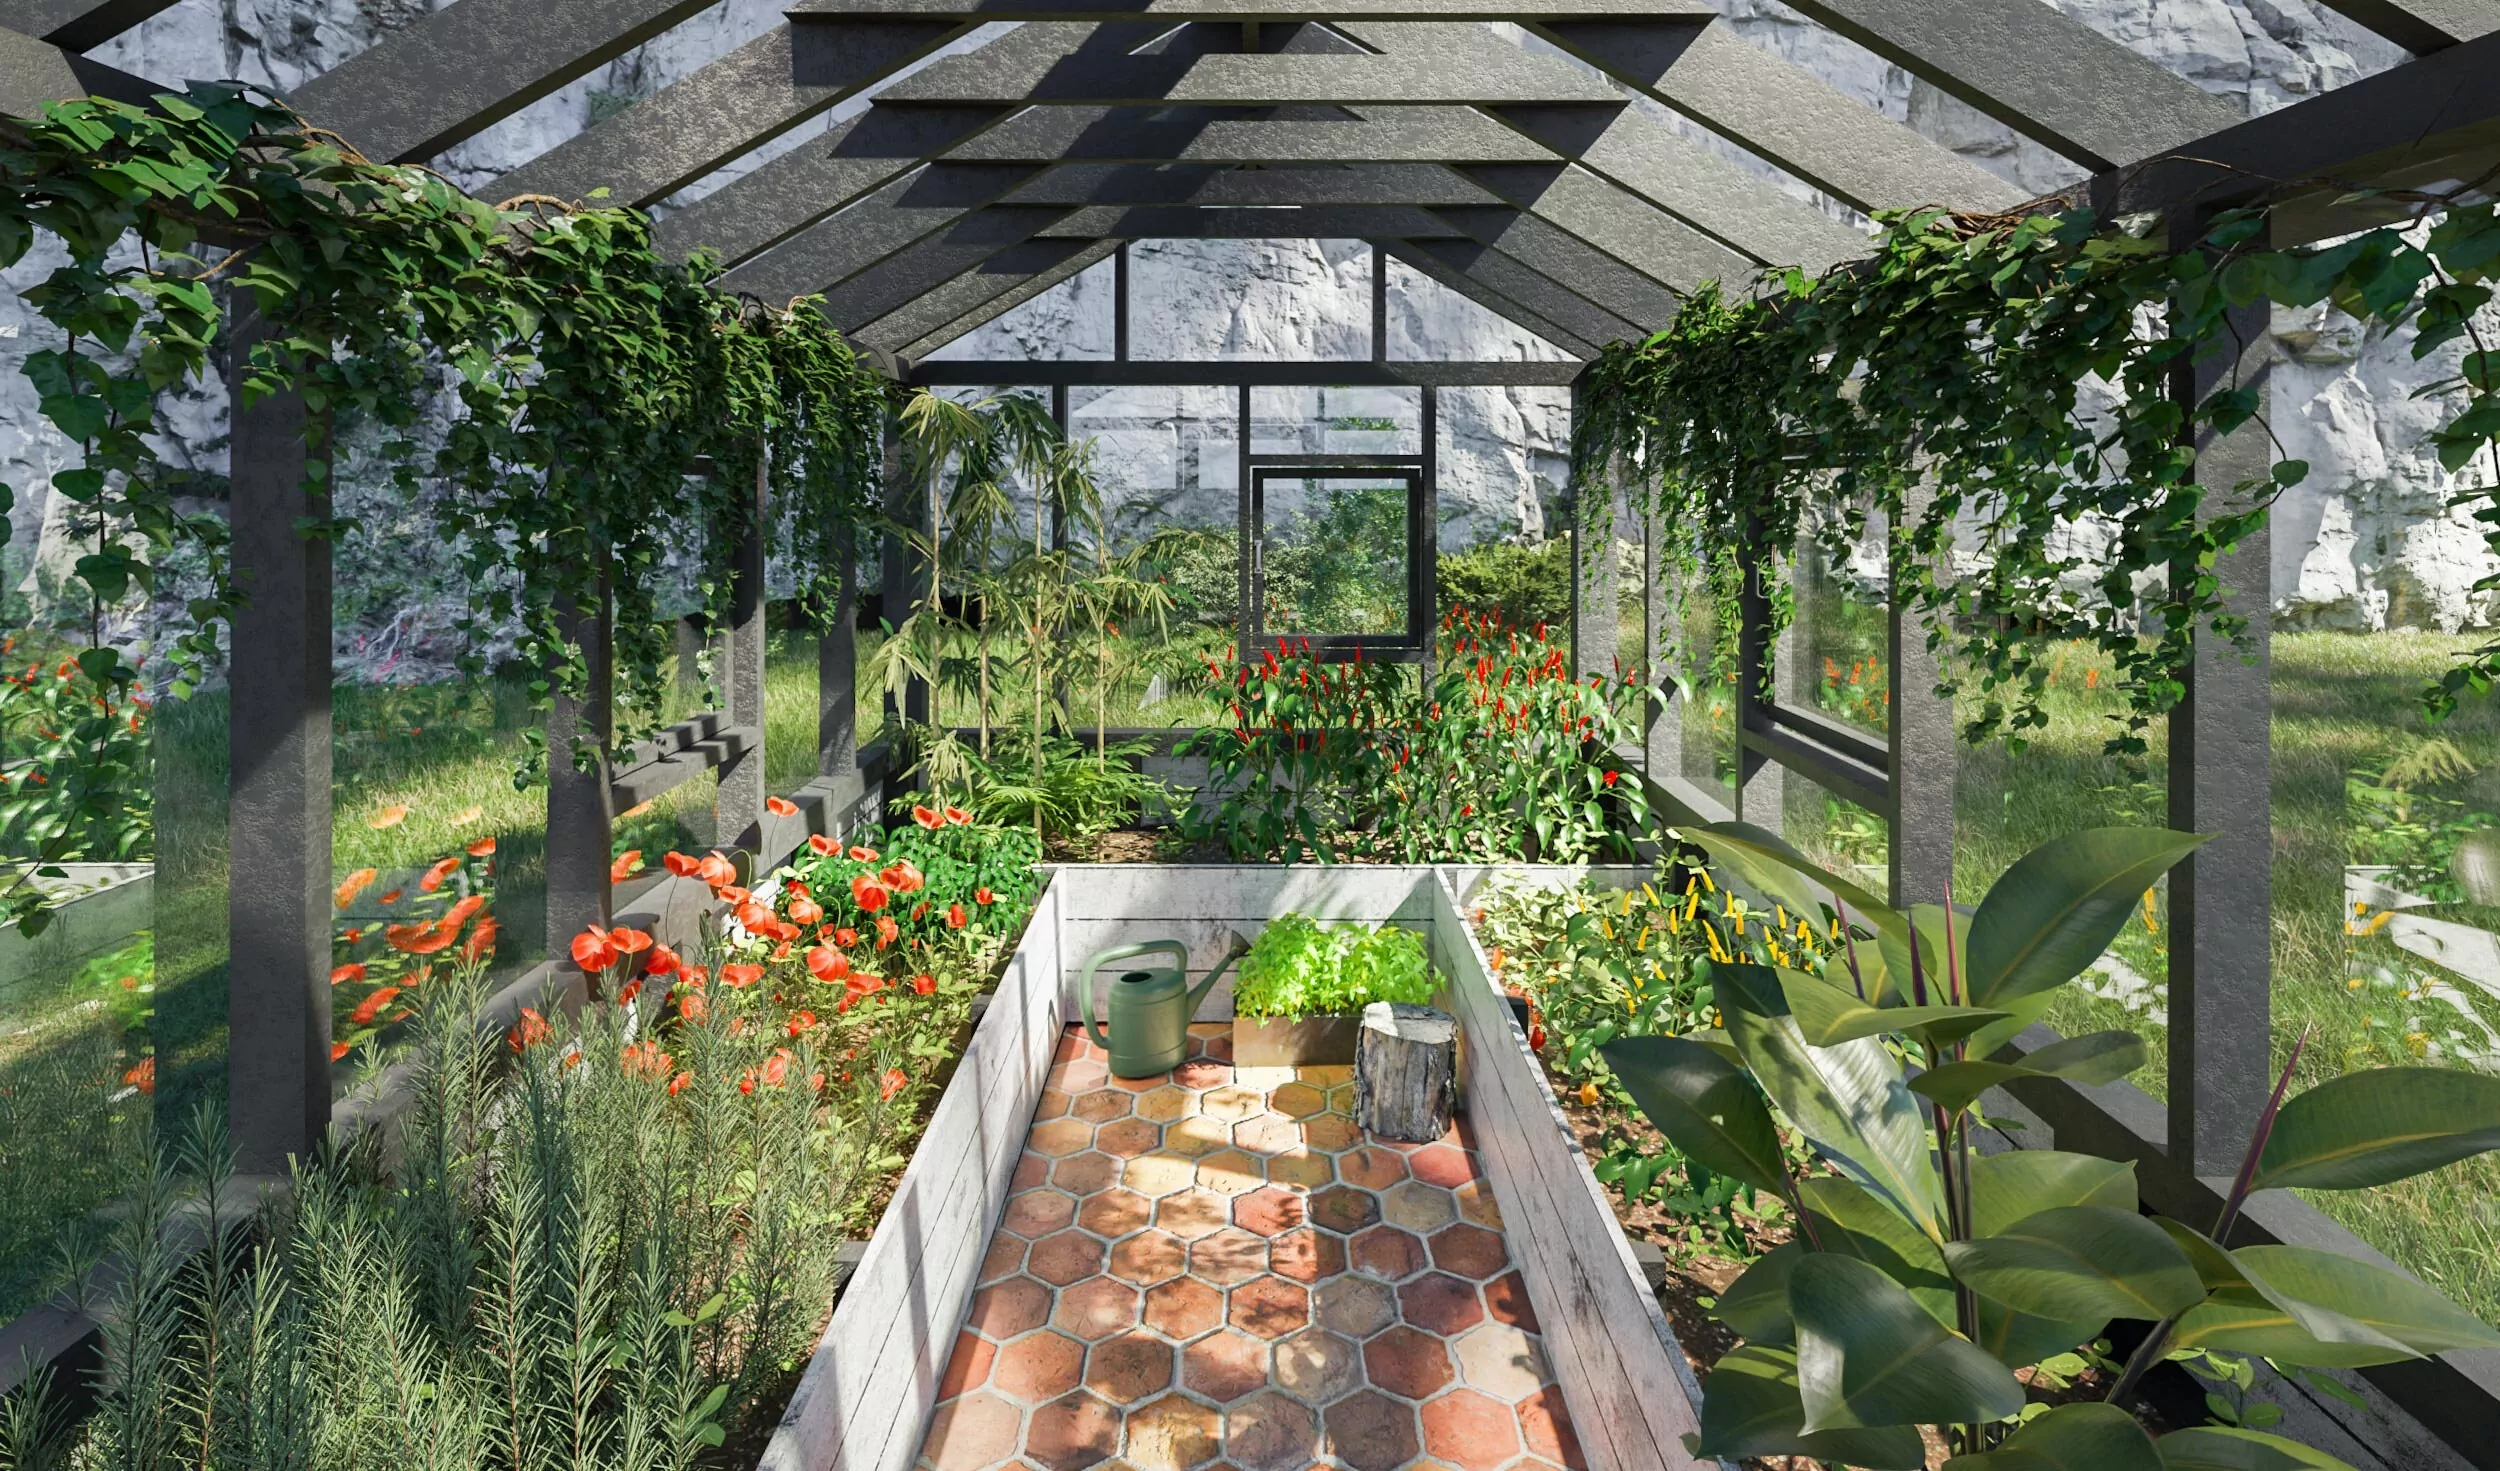
In this article, we are going to teach you how to build an 8×12 lean-to greenhouse, perfect for extending your growing season and providing a controlled environment for your plants. Whether you’re a seasoned gardener or just starting out, this step-by-step guide will walk you through the entire process, from choosing the ideal location to installing the polycarbonate panels and finishing touches.
So, let’s get started and build your very own 8×12 lean-to greenhouse!
| Unit | Qty | Size | Note | |
| Pressure-treated lumber (2˝x 4˝) | pcs | 18 | 12´ | Joists, Rim joists, Studs, Bottom plates, Top plates, Cripple studs, Gable wall studs, Horizontal girts, Vertical girts, Ventilation header |
| Pressure-treated lumber (4˝x 4˝) | pcs | 7 | 12´ | Studs, Door header |
| Pressure-treated lumber (2˝x 6˝) | pcs | 7 | 10´ | Rafters |
| Concrete | cub.ft. | 6,98 | Foundation | |
| Gravel | cub.ft. | 8 | Flooring | |
| Polycarbonate (0.314˝) | pcs | 23 | 4´ x 8´ | Sheathing |
| Screws (1˝) | pcs | 500 | ||
| Screws (2˝) | pcs | 80 | ||
| Wood screws (3˝) | pcs | 120 | ||
| Wood screws (5˝) | pcs | 260 | ||
| Screws (5˝) | pcs | 50 | ||
| 3/8˝ x 7˝ Steel Expansion Anchor | pcs | 75 | ||
| Washers | pcs | 250 | ||
| H-type Connectors (0.314˝-0.4˝) | pcs | 4 | 10´ | |
| U-type Edge cups (0.314˝-0.4˝) | pcs | 5 | 10´ | |
| Hook and Eye (6˝) | pcs | 4 | ||
| Hinges | pcs | 14 | ||
| Door pull | pcs | 2 | ||
| Interior shopping list | Unit | Qty | Size | Note |
| Pressure-treated lumber (2˝x 4˝) | pcs | 16 | 8´ | Legs, Shelf supports, Joists |
| Plywood (5/8˝) | pcs | 2 | 4´ x 8´ | Sheathing |
| Wood screws (2˝) | pcs | 100 | ||
| Wood screws (3˝) | pcs | 20 | ||
| Wood screws (5˝) | pcs | 40 |
| Greenhouse Main Frame | Unit | Qty | Size | Note |
| Concrete | cub.ft. | 6,98 | Concrete posts | |
| Pressure-treated lumber (2˝x 4˝) | pcs | 2 | 8´ | Rim joists |
| Pressure-treated lumber (2˝x 4˝) | pcs | 2 | 12´ | Joists |
| Pressure-treated lumber (2˝x 4˝) | pcs | 2 | 10´-9˝ | Studs |
| Pressure-treated lumber (4˝x 4˝) | pcs | 4 | 10´-9˝ | Studs |
| Pressure-treated lumber (2˝x 4˝) | pcs | 2 | 3´-6˝ | Bottom plates |
| Pressure-treated lumber (2˝x 4˝) | pcs | 2 | 12´ | Top plates |
| Pressure-treated lumber (4˝x 4˝) | pcs | 1 | 5´ | Door header |
| Pressure-treated lumber (2˝x 4˝) | pcs | 1 | 3´-5˝ | Cripple stud |
| Pressure-treated lumber (4˝x 4˝) | pcs | 2 | 6´-9˝ | Studs |
| Pressure-treated lumber (2˝x 4˝) | pcs | 15 | 6´-9˝ | Studs |
| Pressure-treated lumber (2˝x 4˝) | pcs | 1 | 12´ | Bottom plate |
| Pressure-treated lumber (2˝x 4˝) | pcs | 2 | 7´-5˝ | Top plate |
| Pressure-treated lumber (2˝x 4˝) | pcs | 2 | 7´-5˝ | Bottom plate |
| Polycarbonate (0.314˝) | pcs | 2 | 3´-6˝ x 7´-4˝ | Sheathing |
| Polycarbonate (0.314˝) | pcs | 2 | 3´-6˝ x 4´-4 3/4˝ | Sheathing |
| Polycarbonate (0.314˝) | pcs | 1 | 8 3/4˝ x 5´ | Sheathing |
| Polycarbonate (0.314˝) | pcs | 3 | 4´ x 7´-6 3/4˝ | Sheathing |
| Polycarbonate (0.314˝) | pcs | 4 | 4´ x 7´-2˝ | Sheathing |
| Polycarbonate (0.314˝) | pcs | 2 | 2´-7 1/4˝ x 4´ | Sheathing |
| Polycarbonate (0.314˝) | pcs | 2 | 2´-5 3/4˝ x 4´ | Sheathing |
| Gravel | cub.ft. | 8 | Flooring | |
| Greenhouse Roof | Unit | Qty | Size | Note |
| Pressure-treated lumber (2˝x 6˝) | pcs | 7 | 9´-2 1/4˝ | Rafters |
| Pressure-treated lumber (2˝x 4˝) | pcs | 2 | 1´-11 1/2˝ | Gable wall studs |
| Pressure-treated lumber (2˝x 4˝) | pcs | 3 | 1´-1/4˝ | Gable wall studs |
| Pressure-treated lumber (2˝x 4˝) | pcs | 2 | 3´-7 1/2˝ | Ventilation header |
| Polycarbonate (0.314˝) | pcs | 3 | 4´ x 8´ | Sheathing |
| Polycarbonate (0.314˝) | pcs | 2 | 1´-2 1/2˝ x 6´ | Sheathing |
| Greenhouse Door | Unit | Qty | Size | Note |
| Pressure-treated lumber (2˝x 4˝) | pcs | 6 | 2´-2 1/4˝ | Horizontal girts |
| Pressure-treated lumber (2˝x 4˝) | pcs | 4 | 7´-1 3/4˝ | Vertical girts |
| Pressure-treated lumber (2˝x 4˝) | pcs | 4 | 3´-11 1/2˝ | Angled girts |
| Polycarbonate (0.314˝) | pcs | 2 | 2´-5 3/4˝ x 7´-1 3/4˝ | Sheathing |
| Greenhouse Ventilations | Unit | Qty | Size | Note |
| Pressure-treated lumber (2˝x 4˝) | pcs | 4 | 2´-4 3/4˝ | Horizontal girts |
| Pressure-treated lumber (2˝x 4˝) | pcs | 4 | 3´-1/4˝ | Vertical girts |
| Pressure-treated lumber (2˝x 4˝) | pcs | 4 | 3´-3 1/4˝ | Horizontal girts |
| Pressure-treated lumber (2˝x 4˝) | pcs | 4 | 1´-11 1/4˝ | Vertical girts |
| Polycarbonate (0.314˝) | pcs | 2 | 2´-4 3/4˝ x 3´-3 3/4˝ | Sheathing |
| Polycarbonate (0.314˝) | pcs | 2 | 3´-6 3/4˝ x 3´-9 1/2˝ | Sheathing |
| Greenhouse Enterior – Shelves | Unit | Qty | Size | Note |
| Pressure-treated lumber (2˝x 4˝) | pcs | 8 | 4´ | Legs |
| Pressure-treated lumber (2˝x 4˝) | pcs | 8 | 2´ | Joists |
| Pressure-treated lumber (2˝x 4˝) | pcs | 8 | 5´ | Joists |
| Pressure-treated lumber (2˝x 4˝) | pcs | 12 | 1´-9˝ | Shelf support |
| Plywood (5/8˝) | pcs | 4 | 2´ x 5´-3˝ | Sheathing |
| Fasteners & Hardware | Unit | Qty | Size | Note |
| Screws (1˝) | pcs | 500 | ||
| Screws (2˝) | pcs | 80 | ||
| Wood screws (2˝) | pcs | 100 | ||
| Wood screws (3˝) | pcs | 140 | ||
| Wood screws (5˝) | pcs | 300 | ||
| Screws (5˝) | pcs | 50 | ||
| 3/8˝ x 7˝ Steel Expansion Anchor | pcs | 75 | ||
| Washers | pcs | 250 | ||
| H-type Connectors (0.314˝-0.4˝) | ft | 31 | ||
| U-type Edge cups (0.314˝-0.4˝) | ft | 43 | ||
| Hook and Eye (6˝) | pcs | 4 | ||
| Hinges | pcs | 14 | ||
| Door pull | pcs | 2 |
Step 1: Choose and Prepare Location for Greenhouse
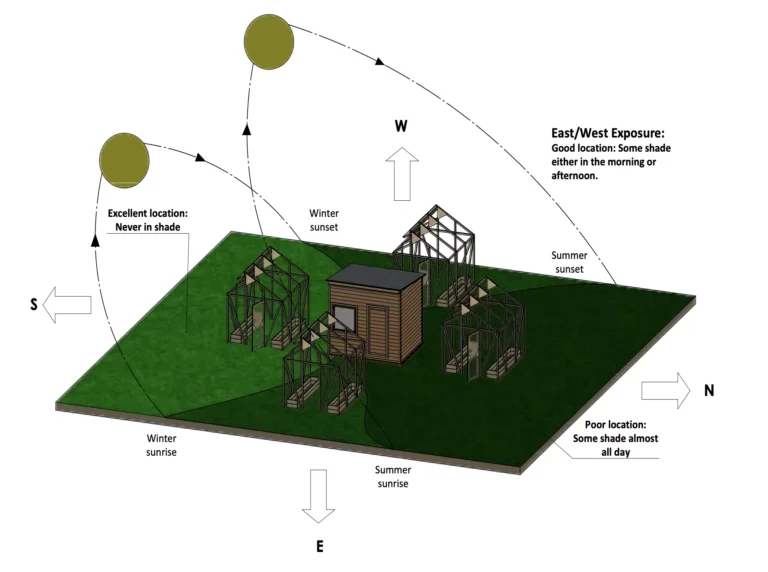
1.1. The best location to build a greenhouse is on the south side of your property where it’ll be exposed to the most amount of sunshine. If that’s not possible, then locate it on the east or west side of your yard, so it’ll get morning or late-afternoon sun. Wherever you choose to place your greenhouse, make sure the area is not too shady. Here are a few other considerations:
- Sun exposure: The location should receive plenty of direct sunlight, as plants need light to grow.
- Easy access: The location should be easily accessible for watering and maintenance.
- Drainage: The location should have good drainage to prevent water from pooling around the greenhouse.
- Wind: The location should be protected from strong winds, which can damage the greenhouse or plants.
- Temperature: Consider the average temperature and climate conditions in the area.
Step 2: Ground Works
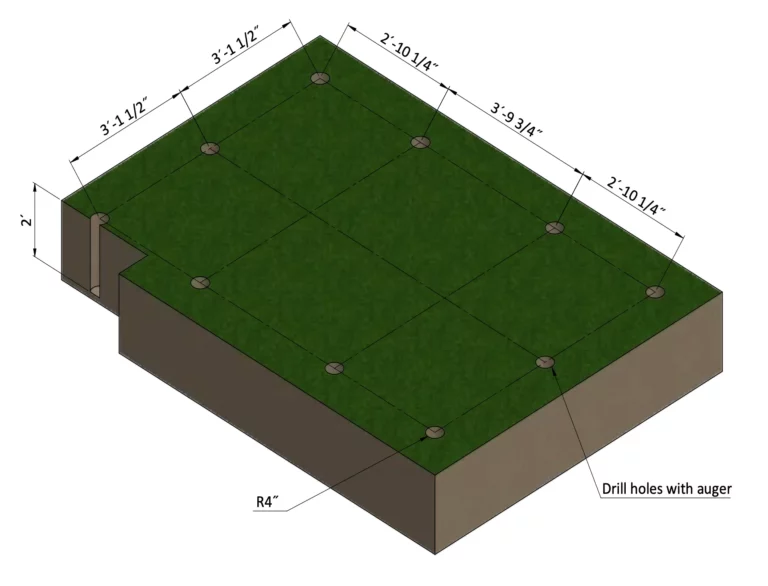
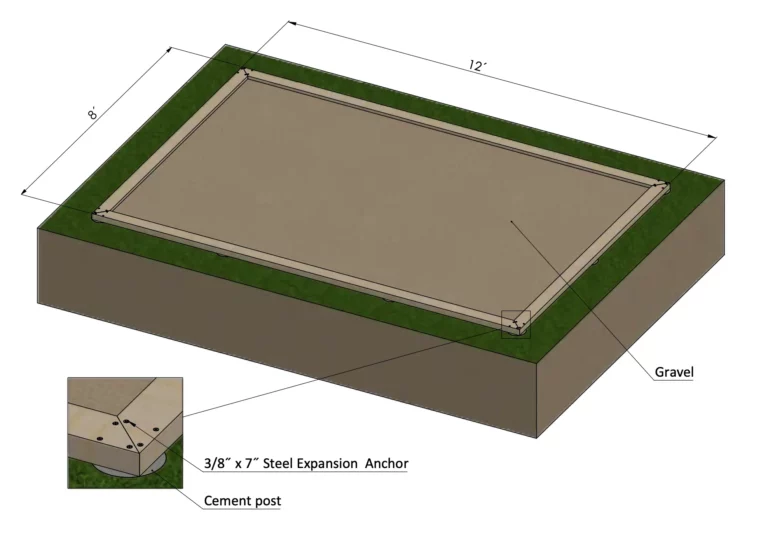
2.1. Clear the area where you want to build the greenhouse and layout for the foundation, using the below illustration as a guide.
2.2. For the foundation, use a power auger to dig ten 8″ diameter holes to a depth of 2′.
Step 3: Foundation Preparation
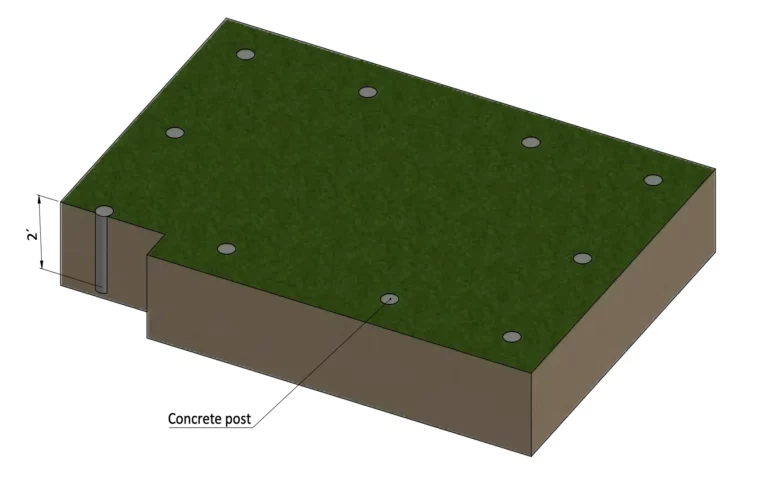
3.1. Mix up a batch of concrete and pour it into the holes, filling each one flush with the surrounding ground. Let the concrete cure overnight.
3.2. Once concrete has cured, foundation is ready for the next step.
Step 4: Foundation Preparation
4.1. Make the foundation base of the greenhouse–called the mudsill–out of pressure-treated 2x4s. Cut two 8′ long 2x4s, and two 12’ long 2x4s; miter-cut both ends of all four boards to 45 degrees, as illustrated below.
4.2. Use a carpenter’s framing square to confirm that the corners of the mudsill are 90°. Then, fasten the mudsill to the concrete footings with 3/8″ x 4″ steel expansion anchors.
4.3. Dig out the grass from within the mudsill, lay down landscape fabric, then fill the area with gravel. You will need about 8 cu. ft. of gravel.
Step 5: Assemble the Front Wall
5.1. Build the frame for the front wall out of pressure-treated 2x4s and 4x4s. Use the drawing below as a reference. Cut four 4x4s and two 2x4s to 10′-9″. Two 4x4s will be used as wall studs at the ends of the wall, and the two other 4x4s will form the trimmer studs on either side of the doorway’s rough opening. The two 2x4s will be used as standard wall studs.
5.2. Next, cut two 2x4s to 3′-6″ for the bottom wall plates, one 2×4 to 12′ to serve as the continuous top wall plate. Also cut one 4×4 to 5′ for the door header and a 2×4 to 3′-5″ for the cripple stud to go between the top plate and header.
5.3. Fasten the frame parts together with 5″ screws.
5.4. Using a carpenter’s framing square, check the corners to make sure they are 90°.

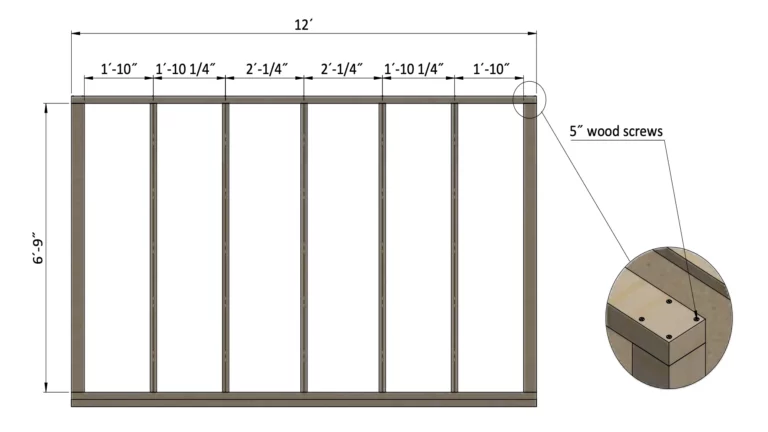
Step 6: Assemble the Back Wall
6.1. Build the rear wall out of pressure-treated 2x4s and 4x4s, using drawing below as a reference. Cut two 4x4s to 6′-9″ to serve as the end wall studs, and five 2x4s to 6′-9″ for the wall studs. Also one two 2x4s to 12′ to form the top and bottom wall plates.
6.2. Fasten the parts together with 5″ screws.
6.3. Using a carpenter’s framing square, check the corner to make sure they are 90°.
Step 7: Assemble the Left Wall
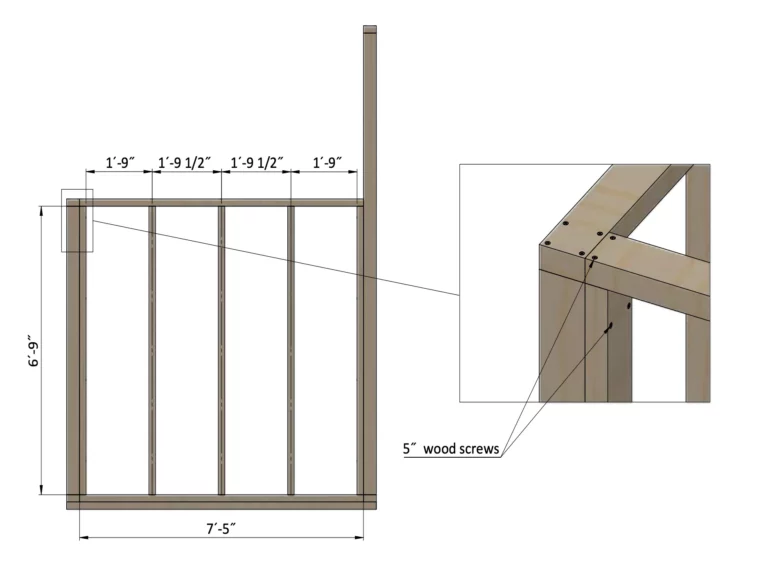
7.1. Build the left wall entirely out of pressure-treated 2x4s, including five wall studs cut to 6′-9″, and the top and bottom wall plates each cut to 7′-5″.
7.2. Attach the parts with 5″ screws.
7.3. Using a carpenter’s framing square, check the corner to make sure they are 90°.
Step 8: Assemble the Right Wall
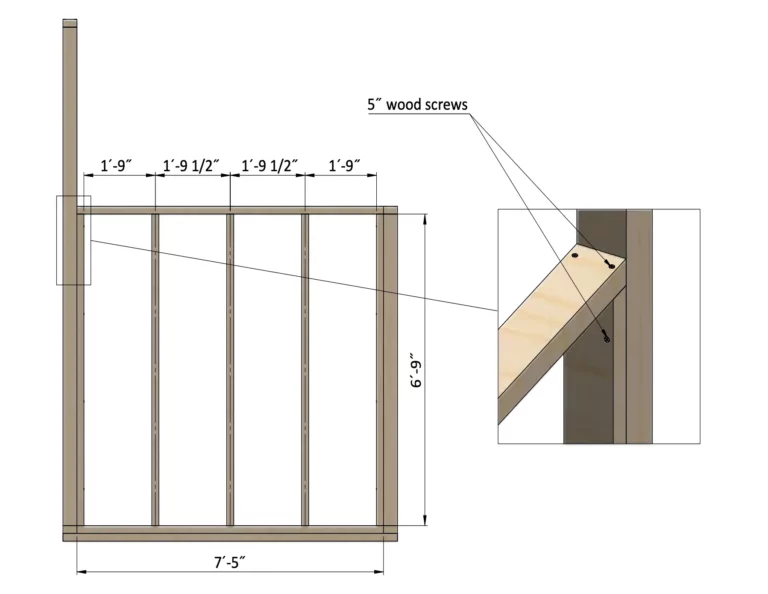
8.1. The right wall is identical to the left wall: Cut five wall studs to 6′-9″, and the top and bottom wall plates to 7′-5″.
8.2. Attach the parts with 5″ screws.
8.3. Using a carpenter’s framing square, check the corner to make sure they are 90°.
Step 9: Assemble the Roof Frame
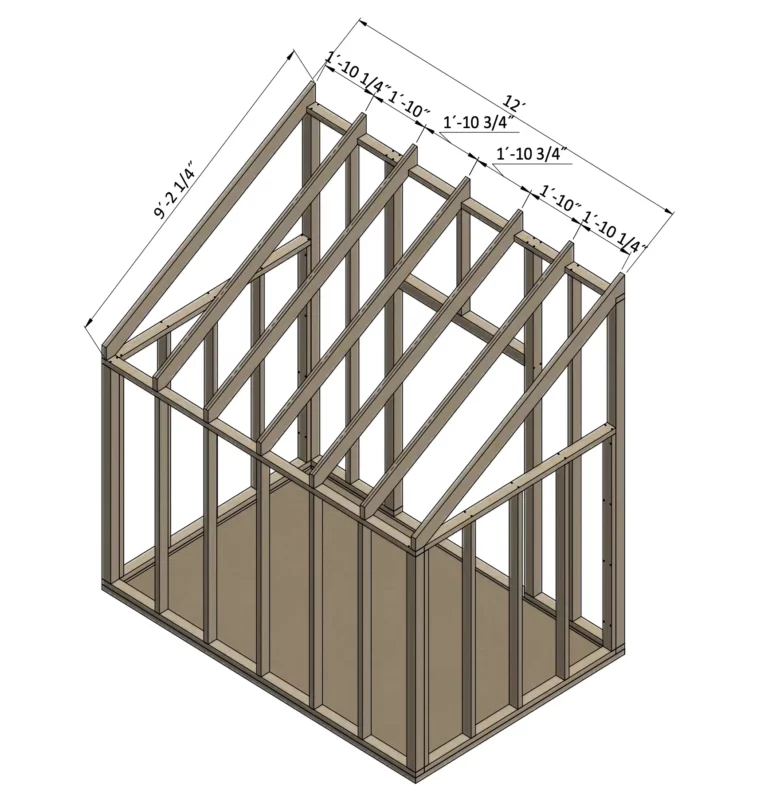
9.1. Cut the seven roof rafters out of pressure-treated 2x6s, as shown in the drawing below. Cut each rafter to 9′-2 1/4″. Trim one end of each rafter to sit flush with the top plate on the rear wall. Then, cut a bird’s mouth notch at the opposite end of the rafters, so they sit flat on the top plate of the front wall.
9.2. Fasten the rafters with 5″ screws.
Step 10: Assemble the Gable Wall Studs
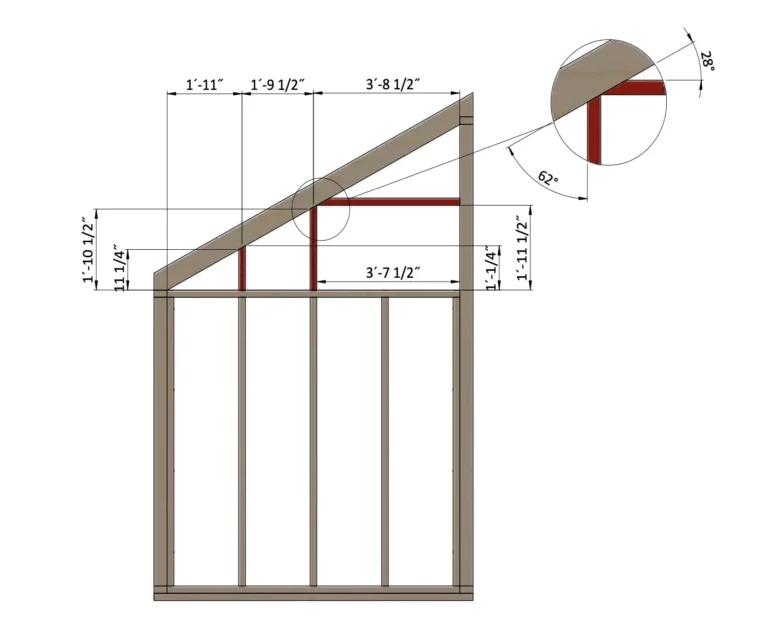
10.1. Cut pressure-treated 2x4s to form the studs in the upper section of the left and right gable-end walls. Using drawing below as a reference, cut two 2×4 studs to 1′-11 1/2″ and two 1′-1/4″. Then cut two 2x4s to 3′-7 1/2″ to frame the rough opening for an air vent.
10.2. Fasten the gable wall studs with 5″ screws.
10.3. Using a carpenter’s framing square, check the corner to make sure they are 90°.
Step 11: Install the Polycarbonate for the Front Wall
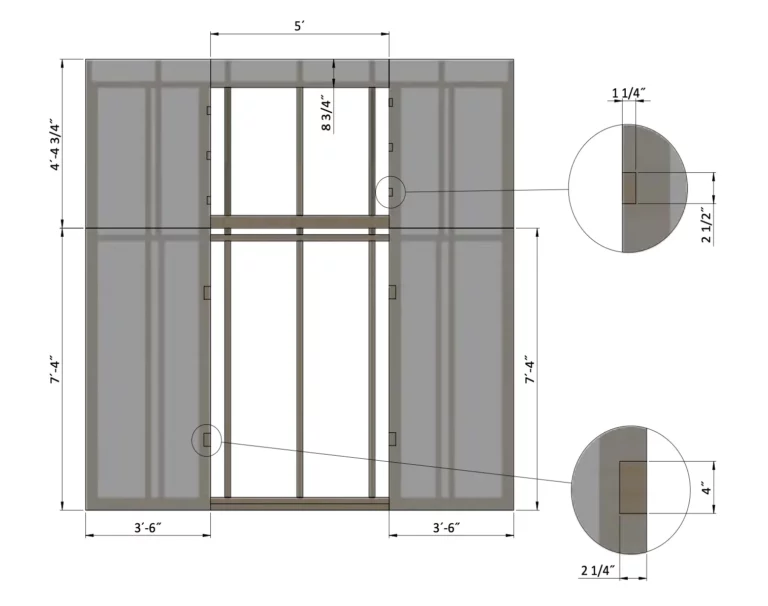
11.1. Cut 5/16″ polycarbonate panels into five pieces for the front wall, using the drawing below as a reference. Cut two pieces to 3′-6″ x 7′-4″, two to 3′-6″ x 4′-4 3/4″, and one to 8 3/4″ x 5′ sheet.
11.2. Secure the polycarbonate with 1″ screws and washers.
Step 12: Install the Polycarbonate for the Back Wall
12.1. Cut 5/16″ polycarbonate for the back wall, using the drawing below as a reference. Cut three pieces to 4′ x 7′-6 3/4″.
12.2. Secure the polycarbonate with 1″ screws and washers.

Step 13: Install the Polycarbonate for the Left Wall
13.1. Cut 5/16″ polycarbonate for the left wall, using drawing below as a reference. Cut two pieces to 4′ x 7′-2″, one to 2′-7 1/4″ x 4′, and one to 2′-5 3/4″ x 4′ sheet.
13.2. Secure the polycarbonate with 1″ screws and washers.
Step 14: Install the Polycarbonate for the Right Wall
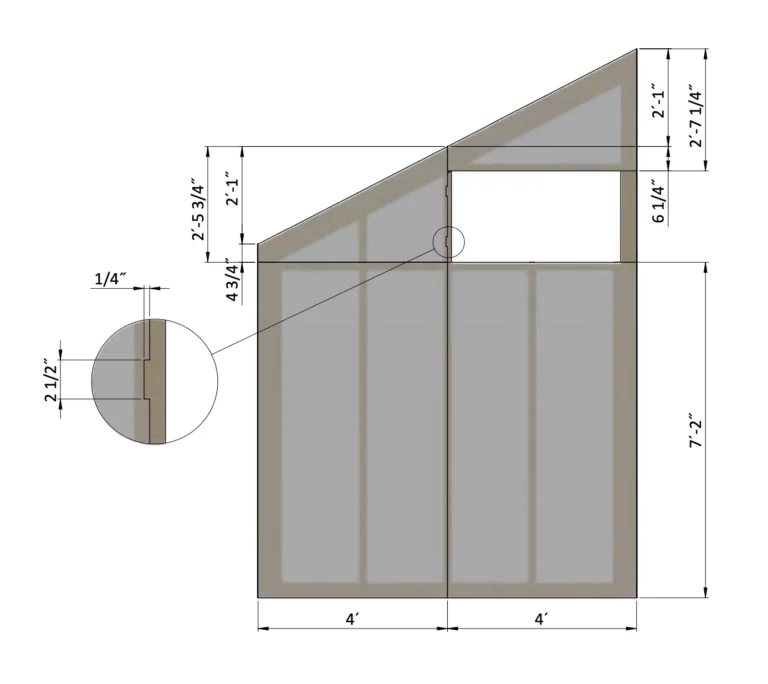
14.1. Cut 5/16″ polycarbonate for the left wall, using drawing below as a reference. Note that these four parts are identical to the parts cut for the left wall.
14.2. Cut two pieces to 4′ x 7′-2″, one to 2′-7 1/4″ x 4′, and one to 2′-5 3/4″ x 4′ sheet.
14.3. Secure the polycarbonate with 1″ screws and washers.
Step 15: Install the Polycarbonate for the Roof
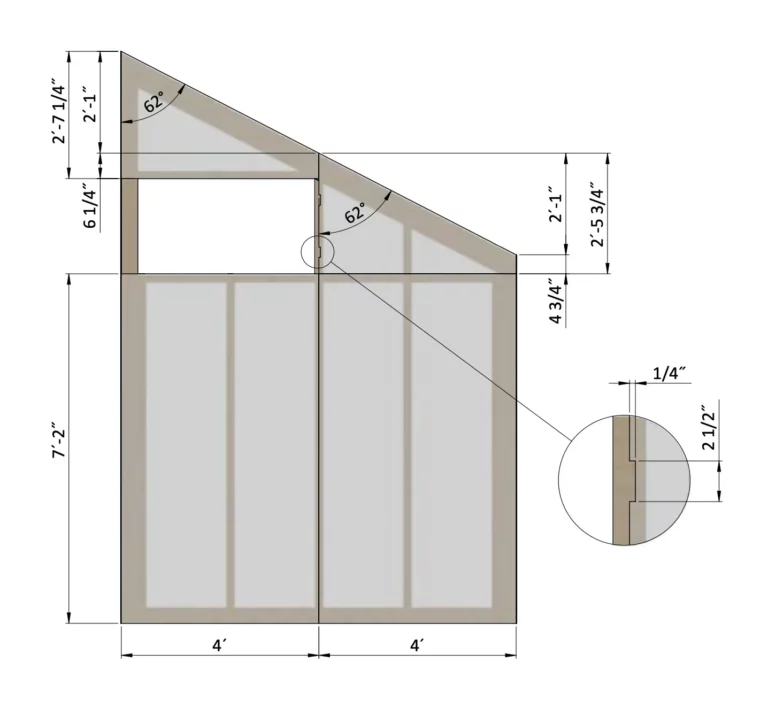
15.1. Cut 5/16″ polycarbonate for the roof sheathing, using the drawing below as a guide. You will need three 4′ x 8′ panels and two pieces cut to 1′-2 1/2″ x 6′.
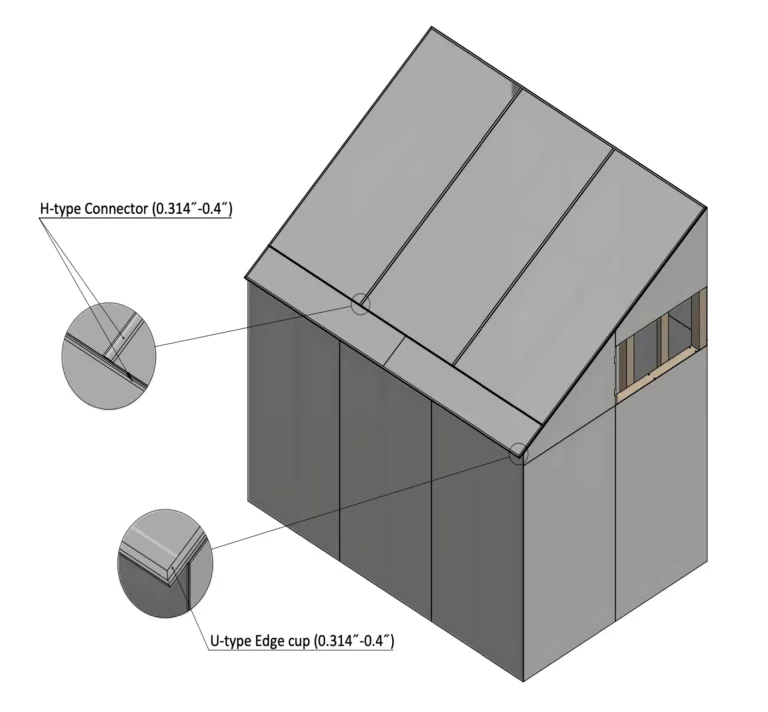
15.2. Use H-type connectors (5/16”) and U-type edge cups (5/16″) to ensure a waterproof roof. You will need 31 linear ft. of H-type connectors and 43 linear ft. of U-type edge cups. Be sure to apply silicone sealant to the joints when installing the connectors and cups to enhance the water tightness of the roof.
15.3. Secure the polycarbonate with 1″ screws and washers.
Step 16: Assemble and Install Greenhouse Doors
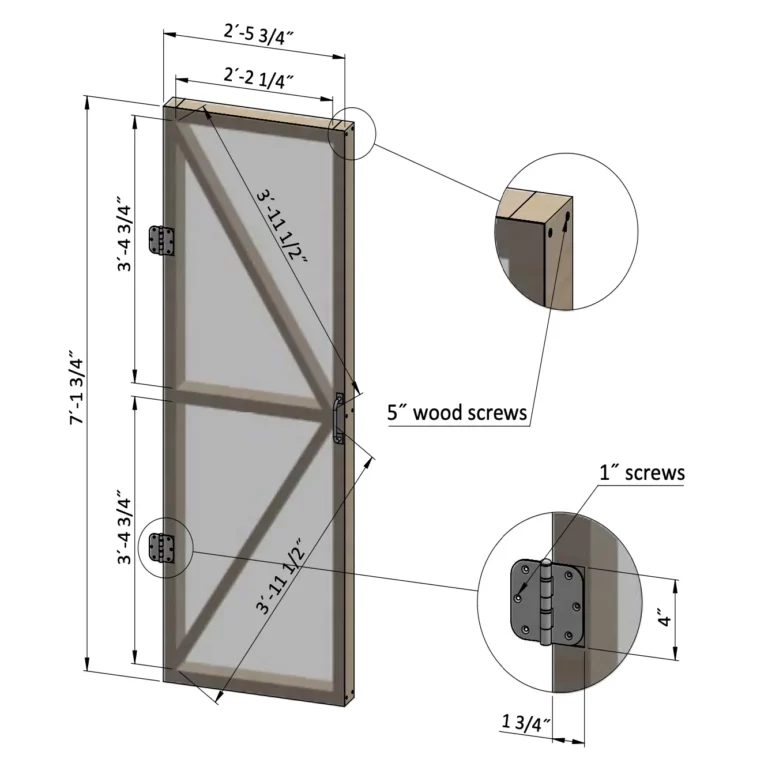
16.1. Build the two hinged greenhouse doors out of pressure-treated 2x4s; join the parts with 5″ screws. Cut six 2x4s to 2′-2 1/4″ for the horizontal rails, four 2x4s to 7′-1 3/4″ for the vertical stiles, and four 2x4s to 3′-11 1/2″ to serve as diagonal braces.
16.2. Cut two 5/16″ polycarbonate sheets to 2′-5 3/4″x 7′-1 3/4″ to cover the doors.
16.3. Secure the polycarbonate with 1″ screws and washers.
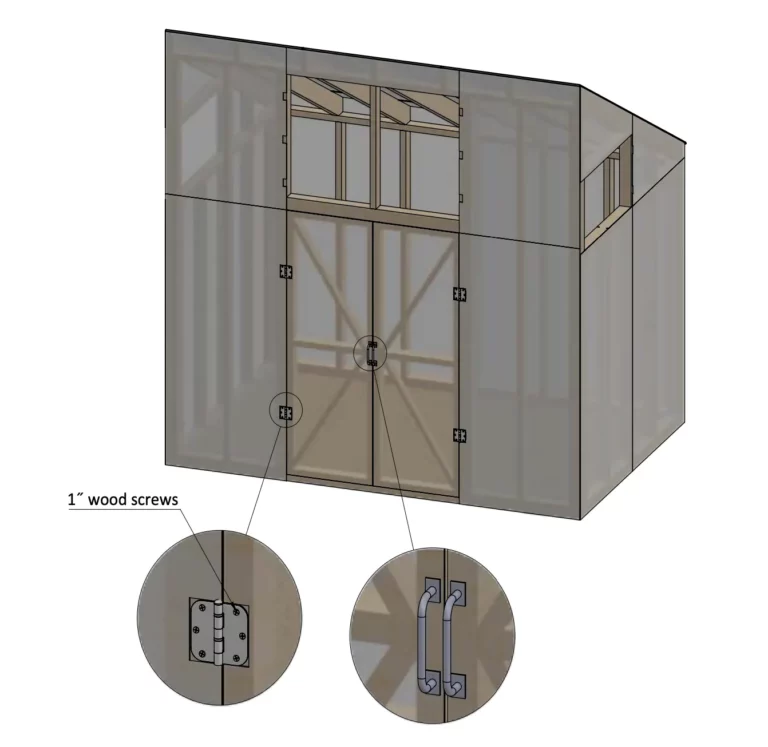
16.4. Attach each door to the front wall with two hinges. Also install a handle to each door.
Step 17: Assemble and Install Greenhouse Ventilations
17.1. Next, make the four air vents for the greenhouse. There are two vents above the doorway and one on each end wall of the greenhouse. The vents are necessary to prevent the interior of the greenhouse from getting too hot.
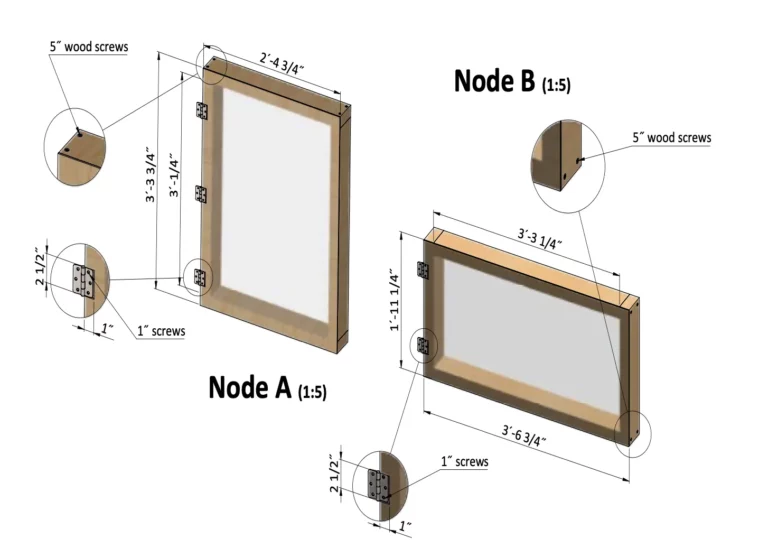
17.2. As shown in Node A (page 28), build the rectangular frame for the vents that go above the doorway out of pressure-treated 2x4s. Cut four 2x4s to 2′-4 3/4″ for the horizontal top and bottom of the frame, and four boards cut to 3′-1/4″ that will be vertical slides of the frame. Fasten the frame together with 3 in. screws.
17.3. Cut two pieces of 5/16″ polycarbonate to 2′-4 3/4″ x 3′-3 3/4″ and secure them to the vent frames with 1 in. screws and washers.
17.4. According to the Node B (page 28), build the ventilation frame for each side wall using pressure-treated 2x4s. Cut four 2x4s to 3′-3 1/4″ and four to 1′-11 1/4″. Fasten the frame together with 3 in. screws.
17.5. Cut two pieces of 5/16″ polycarbonate to 1′-11 1/4″ x 3′-6 3/4″, then secure them to the vent frames with 1″ screws and washers.
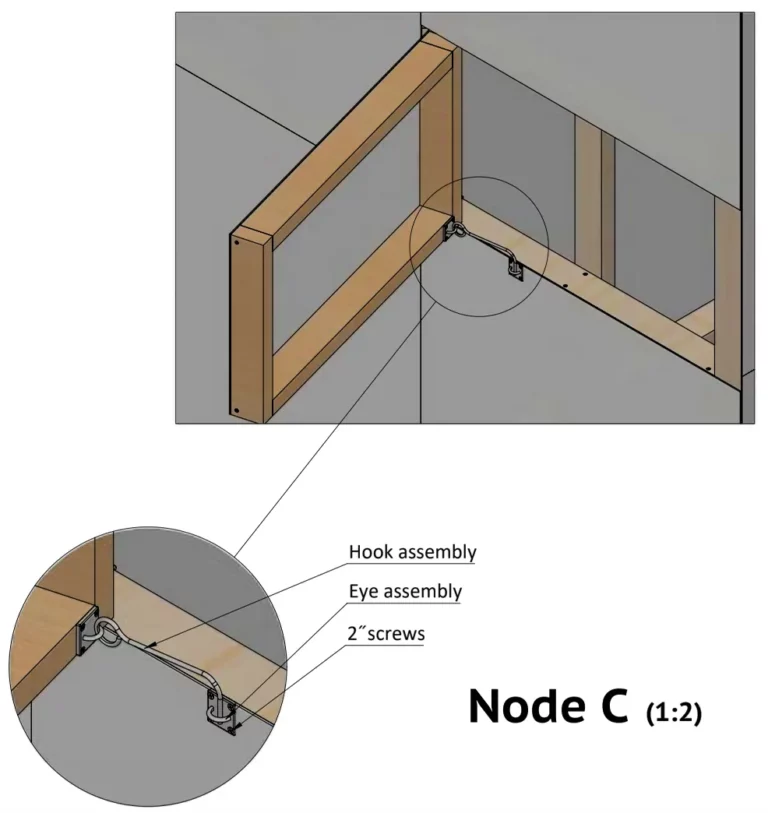
17.6. Fasten the vents to the greenhouse with hinges and 1’ screws. Then, according to the Node C (page 29), install a hook-and-eye closure to each vent.
Step 18: Assemble and Install Greenhouse Interior
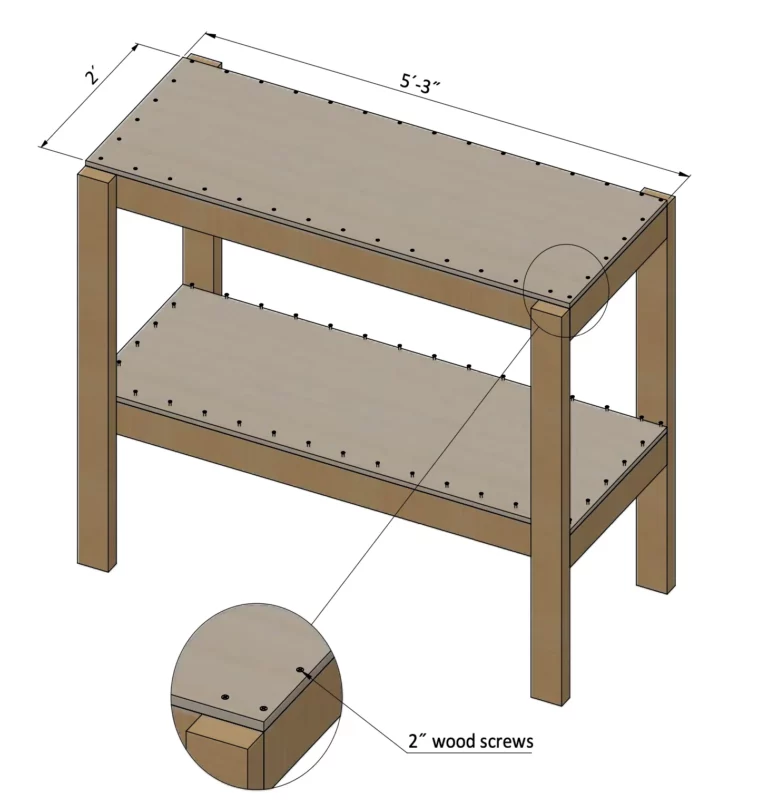
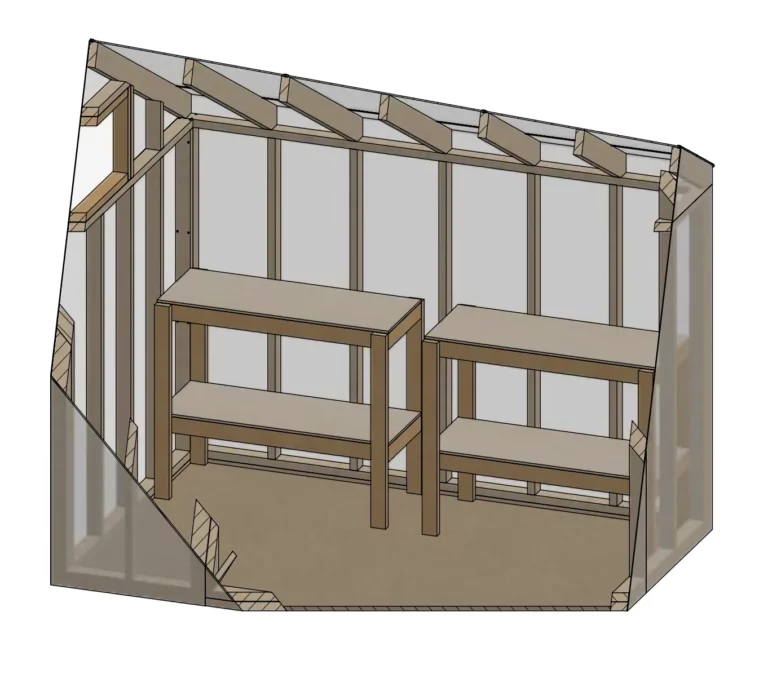
18.1. Build two potting benches for the interior of the greenhouse. The benches provide a convenient work surface for potting and pruning plants, and below the work surface is a handy storage shelf. Here are detailed step-by-step instructions for building the benches:
Step 19: Assemble Main Frame
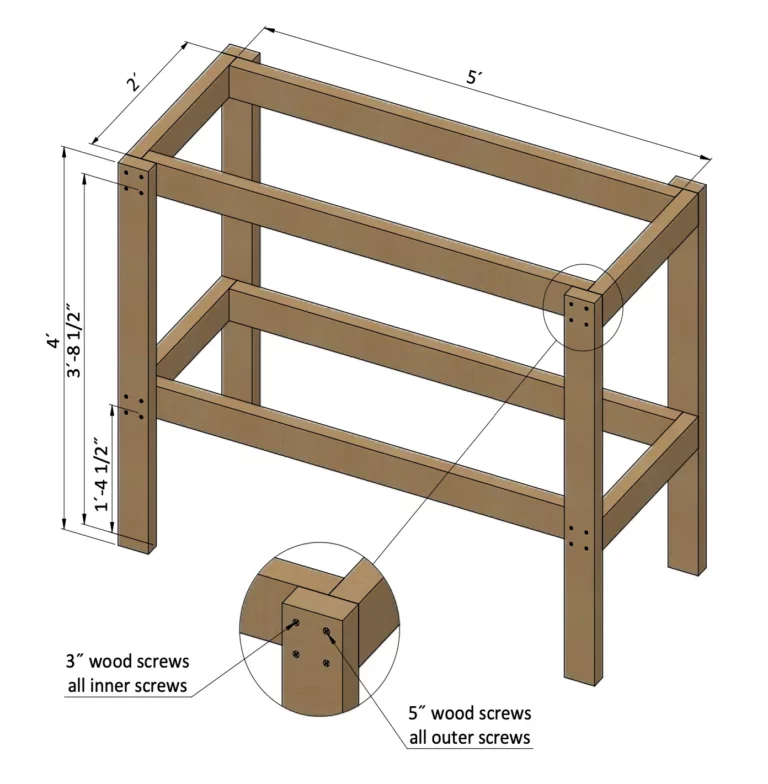
19.1. Build the structural frames of the two potting benches out of pressure-treated 2x4s. Cut the eight 2×4 legs to 4′, and then cut eight 2x4s to 2′ for the horizontal end rails, and eight 2x4s to 5′ for the horizontal rails along the front and rear of the frame.
19.2. Fasten the frame parts together with 3″ screws.
19.3. Using a carpenter’s framing square, check the corner to make sure they are 90°.
Step 20: Assemble the Shelves
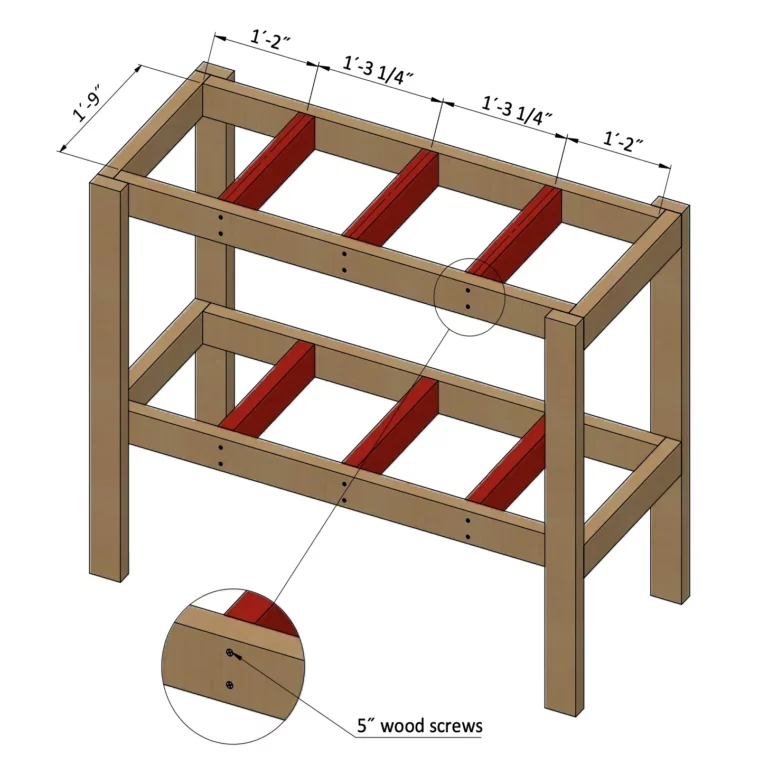
20.1. Cut short lengths of pressure-treated 2x4s to span between the front and rear rails, as shown below. Cut twelve 2x4s to 1′-9” and secure them with 3″ screws.
20.2. Using a carpenter’s framing square, check the corner to make sure they are 90°.
Step 21: Install Shelves with Plywood
21.1. Cover the work surface and storage shelf with 5/8″ plywood. Cut four plywood pieces to 2′ x 5′-3″.
21.2. Fasten plywood to the 2×4 frame with 2″ screws.
21.3. Apply two coats of exterior-grade marine varnish to plywood.
