
In this guide, we will teach you how to build a basic workbench that is both sturdy and functional. Perfect for any workshop or garage, this 6×4 foot workbench plan provides a simple yet durable design that you can construct using readily available materials and basic tools. Follow our detailed shopping list, cut list, and step-by-step instructions to create a reliable workspace suitable for various projects, from small repairs to larger undertakings. For more design options be sure to check our free workbench plans.
| 4´ x 6´ workbench shopping list | ||||
| Unit | Qty | Size | Note | |
| Lumber (2×4) | pcs | 8 | 8´ | Legs, Joists |
| OSB (1/2˝) | pcs | 1 | 4´ x 8´ | Sheathing |
| Wood screws (2˝) | pcs | 170 | ||
| Wood screws (3˝) | pcs | 50 |
| 4´ x 6´ workbench cut list | ||||
| Main Frame | Unit | Qty | Size | Note |
| Lumber (2×4) | pcs | 4 | 3´ | Legs |
| Lumber (2×4) | pcs | 4 | 4´ | Joists |
| Lumber (2×4) | pcs | 4 | 5´-5˝ | Joists |
| OSB (1/2˝) | pcs | 1 | 4´ x 6´-6˝ | Sheathing |
| Fasteners & Hardware | Unit | Qty |
| Wood screws (2˝) | pcs | 170 |
| Wood screws (3˝) | pcs | 50 |
Step 1: Assemble The Main Frame
1.1. Prepare the legs using 2×4 lumber. You will need four boards cut to 3′ that will be the legs.
Provide cuttings on the legs according to the drawing.

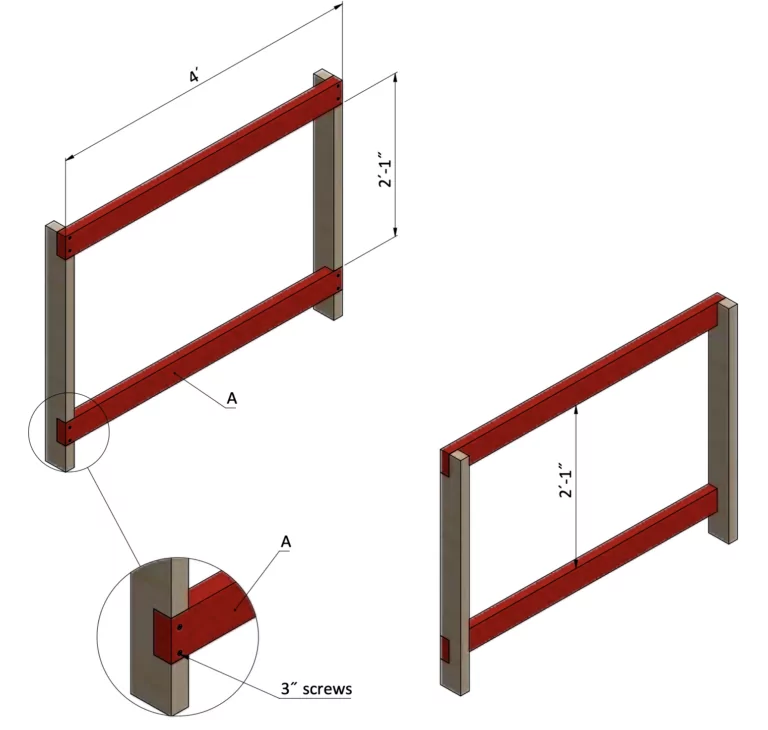
Step 2: Assemble the Main Frame
2.1. Assemble the main frame using 2×4 lumber. You will need four boards cut to 4′ that will be the joists.
2.2. Secure the beams with 3″ screws.
2.3. Using a speed square or carpenter’s square, check the corners to make sure they are 90°.
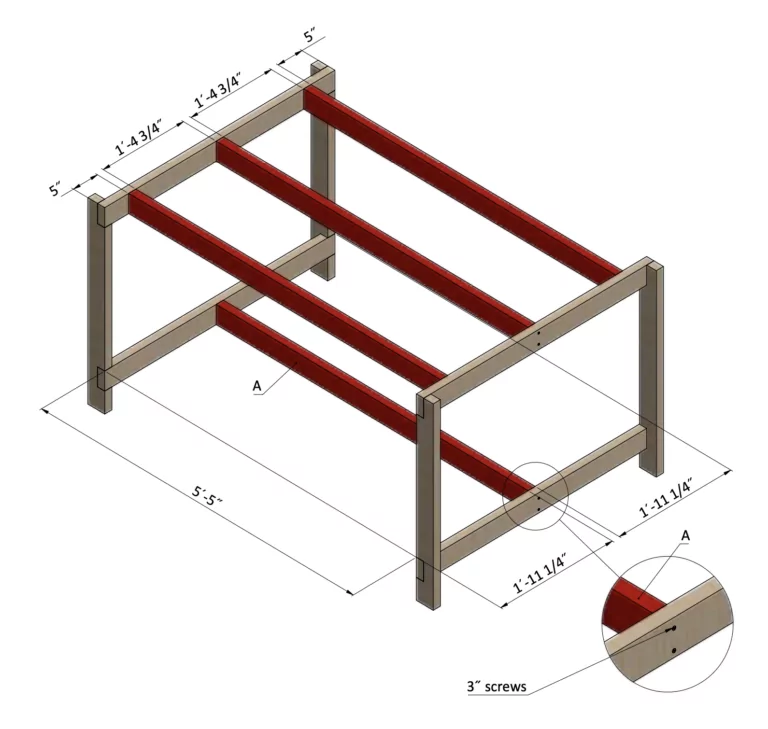
Step 3: Assemble the Main Frame
3.1. Assemble the main frame using 2×4 lumber. You will need four boards cut to 5′-5″ that will be the joists.
3.2. Secure the beams with 3″ screws.
3.3. Using a speed square or carpenter’s square, check the corners to make sure they are 90°.
Step 4: Install the Plywood
4.1. Cover the shelves with 1/2″ OSB. You will need one sheet cut to 4′ x 6′-6″.
4.2. Fasten the plywood with 2″ screws.

Step 5: Final Touches
Now that your workbench is all done, you are ready to decorate it any way you want using your favorite paint, stain, or preservative.
