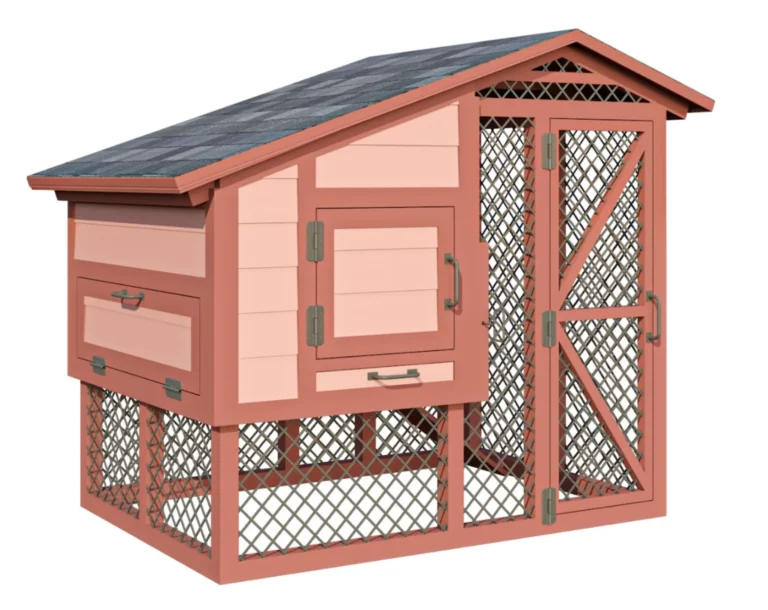
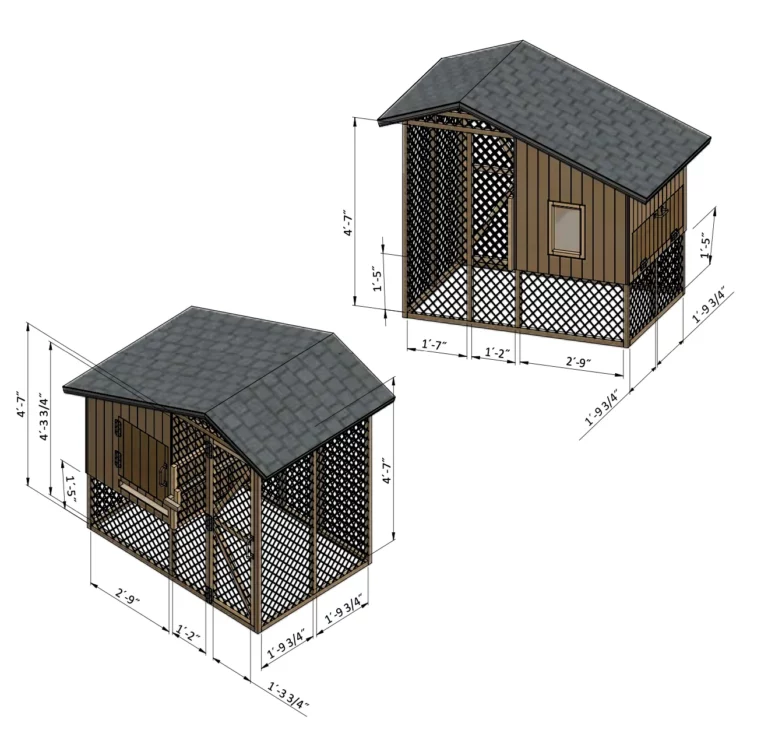
Let’s learn how to build a basic 4×6 chicken coop. This step-by-step guide will walk you through the entire process, from preparing the foundation to installing the roof and finishing touches. By following these detailed instructions, you’ll be able to create a comfortable and secure home for your chickens. For more design options, be sure to check out all our chicken coop plans. Let’s get started!
| 4´ x 6´ chicken coop material list | ||||
| Site preparation | Unit | Qty | Size | Note |
| Clay bricks | pcs | 56 | 3 5/8˝ x 2 1/4˝ x 8˝ | Foundation |
| Concrete | ft3 | 19,5 | Foundation | |
| Chicken Coop Main Frame | Unit | Qty | Size | Note |
| Lumber (2×2) | pcs | 5 | 4´-7˝ | Studs |
| Lumber (2×2) | pcs | 2 | 4´-8 1/2˝ | Studs |
| Lumber (2×2) | pcs | 2 | 3´-8 1/2˝ | Studs |
| Lumber (2×2) | pcs | 1 | 1´-5˝ | Stud |
| Lumber (2×2) | pcs | 2 | 3´-9˝ | Joists |
| Lumber (2×2) | pcs | 2 | 5´-9˝ | Joists |
| Lumber (2×2) | pcs | 3 | 3´-9˝ | Bottom plates |
| Lumber (2×2) | pcs | 2 | 2´-8˝ | Bottom plates |
| Lumber (2×2) | pcs | 2 | 2´-9˝ | Top plates |
| Lumber (2×2) | pcs | 3 | 4´ | Top plates |
| Lumber (2×2) | pcs | 2 | 2´-10 1/2˝ | Top plates |
| Lumber (2×2) | pcs | 5 | 2´ | Studs |
| Lumber (2×2) | pcs | 1 | 1´ | Rough sill |
| Lumber (2×2) | pcs | 1 | 1´ | Window header |
| Lumber (2×2) | pcs | 1 | 10 1/2˝ | Top plate |
| Lumber (2×2) | pcs | 1 | 1´-9 3/4˝ | Chicken Door header |
| Lumber (2×2) | pcs | 1 | 3´ | Stud |
| Lumber (2×2) | pcs | 1 | 9 1/2˝ | Top plate |
| Lumber (2×2) | pcs | 1 | 1´-9˝ | Litter tray header |
| Plywood (5/8˝) | pcs | 1 | 3´ x 4´ | Floor sheathing |
| Plywood siding (11/32˝) | pcs | 2 | 3´ x 3´-5˝ | Wall siding |
| Plywood siding (11/32˝) | pcs | 1 | 2´-3 1/2˝ x 4´-3/4˝ | Wall siding |
| Plywood siding (11/32˝) | pcs | 1 | 3´-3 1/2˝ x 4´-3/4˝ | Wall siding |
| Wire mesh (1/4˝) | ft2 | 60 | ||
| Chicken Coop Roof | Unit | Qty | Size | Note |
| Lumber (1×2) | pcs | 2 | 4´ | Fascia |
| Lumber (2×2) | pcs | 4 | 1´-8˝ | Collar tie |
| Lumber (2×2) | pcs | 4 | 2´ | Rafters |
| Lumber (2×2) | pcs | 4 | 5´ | Rafters |
| Lumber (2×2) | pcs | 3 | 1´-2˝ | Ridge board |
| Plywood (5/8˝) | pcs | 1 | 2´-10 3/4˝ x 5´-3˝ | Roof sheathing |
| Plywood (5/8˝) | pcs | 1 | 1´-7 1/4˝ x 5´-3˝ | Roof sheathing |
| Plywood (5/8˝) | pcs | 1 | 2´-3˝ x 4´-6˝ | Roof sheathing |
| Building paper (#15) | ft2 | 34 | ||
| Asphalt shingles | ft2 | 34 | ||
| Metal drip edge 6˝ | ft | 28 | ||
| Nesting Box | Unit | Qty | Size | Note |
| Lumber (2×2) | pcs | 2 | 10 1/2˝ | Studs |
| Lumber (2×2) | pcs | 3 | 1´-2˝ | Girts |
| Lumber (2×2) | pcs | 2 | 10 1/2˝ | Girts |
| Lumber (2×2) | pcs | 1 | 3´-9˝ | Top plate |
| Plywood (5/8˝) | pcs | 1 | 1´ x 4´ | Wall sheathing |
| Plywood (5/8˝) | pcs | 2 | 1´ x 1´ | Wall sheathing |
| Plywood (5/8˝) | pcs | 1 | 11 3/4˝ x 3´-6 3/4˝ | Door sheathing |
| Plywood siding (11/32˝) | pcs | 1 | 11 3/4˝ x 3´-6 3/4˝ | Door siding |
| Chicken door | Unit | Qty | Size | Note |
| Lumber (2×2) | pcs | 2 | 4´ | Horizontal girts |
| Lumber (2×2) | pcs | 1 | 1´-9 1/4˝ | Vertical girts |
| Lumber (2×2) | pcs | 2 | 9 1/2˝ | Vertical girts |
| Lumber (2×2) | pcs | 1 | 6˝ | Vertical girts |
| Lumber (2×2) | pcs | 1 | 6˝ | Handle |
| Lumber (2×2) | pcs | 1 | 2´-6˝ | Lever |
| Plywood (5/8˝) | pcs | 1 | 1´-7 1/2˝ x 2´ | Chicken Door |
| Chicken Coop Front Wall Door | Unit | Qty | Size | Note |
| Lumber (2×2) | pcs | 2 | 1´-7 1/2˝ | Girts |
| Lumber (2×2) | pcs | 1 | 1´-9 1/2˝ | Cross brace |
| Lumber (2×2) | pcs | 2 | 1´-3 3/4˝ | Girts |
| Plywood siding (11/32˝) | pcs | 1 | 1´-7 1/2˝ x 1´-8 3/4˝ | Siding |
| Foam board insulation (3˝) | pcs | 1 | 1´4 1/2˝ x 1´-5 3/4˝ | Insulation |
| Plywood (5/8˝) | pcs | 1 | 1´-7 1/2˝ x 1´-8 3/4˝ | Door sheathing |
| Window | Unit | Qty | Size | Note |
| Lumber (2×2) | pcs | 2 | 11 1/2˝ | Girts |
| Lumber (2×2) | pcs | 2 | 1´-3 1/2˝ | Girts |
| Window beading | ft | 5 | ||
| Glass (1/8˝) | pcs | 1 | 9 1/4˝ x 1´-1 1/4˝ | |
| Chicken Coop Aviary’s Door | Unit | Qty | Size | Note |
| Lumber (2×2) | pcs | 3 | 1´-3 3/4˝ | Girts |
| Lumber (2×2) | pcs | 2 | 4´-6 3/4˝ | Girts |
| Lumber (2×2) | pcs | 2 | 2´-5 3/4˝ | Cross brace |
| Chicken Litter Tray | Unit | Qty | Size | Note |
| Lumber (2×2) | pcs | 1 | 3´-5 3/4˝ | Guide beam |
| Lumber (1×2) | pcs | 2 | 3´-10˝ | Girt |
| Lumber (1×2) | pcs | 2 | 1´-5 3/4˝ | Girt |
| Plywood siding (11/32˝) | pcs | 1 | 2 1/4˝ x 1´-8 1/4˝ | Siding |
| Plywood (5/8˝) | pcs | 1 | 1´-7 1/4˝ x 3´-10˝ | Floor sheathing |
| Chicken Coop Roost | Unit | Qty | Size | Note |
| Lumber (2×2) | pcs | 4 | 1´-9˝ | Treads |
| Lumber (1×2) | pcs | 2 | 3´-11˝ | Strings |
| Chicken Ladder | Unit | Qty | Size | Note |
| Lumber (2×2) | pcs | 1 | 11˝ | |
| Lumber (2×2) | pcs | 4 | 10 1/2˝ | |
| Lumber (2×4) | pcs | 3 | 3´ | |
| Fasteners & Hardware | Unit | Qty | Size | Note |
| Steel Expansion Anchor, 3/8in. x 7 in | pcs | 10 | ||
| Ventilation louver | pcs | 2 | ||
| Door hinge (5˝) | pcs | 7 | ||
| Door handle | pcs | 3 | ||
| Corner bracket 1 1/2˝ x 1 1/2˝ | pcs | 10 | ||
| Wood screws (1˝) | pcs | 90 | ||
| Wood screws (2˝) | pcs | 340 | ||
| Wood screws (3˝) | pcs | 150 | ||
| Wood screws (5˝) | pcs | 65 | ||
| Galvanized nails (1/2˝) | pcs | 40 | ||
| Galvanized nails (2˝) | pcs | 50 |
| 4´ x 6´ chicken coop shopping list | |||
| Material | Unit | Qty | Size |
| Lumber (1×2) | pcs | 5 | 8´ |
| Lumber (2×2) | pcs | 37 | 8´ |
| Lumber (2×4) | pcs | 1 | 12´ |
| Plywood (5/8˝) | pcs | 6 | 4´ x 8´ |
| Plywood siding (11/32˝) | pcs | 5 | 4´ x 8´ |
| Clay bricks | pcs | 56 | 3 5/8˝ x 2 1/4˝ x 8˝ |
| Concrete | ft3 | 19,5 | |
| Wire mesh (1/4˝) | ft2 | 60 | |
| Building paper (#15) | ft2 | 36 | |
| Asphalt shingles (250# per sq. Min) | ft2 | 34 | |
| Metal drip edge 6˝ | ft | 28 | |
| Window beading | ft | 5 | |
| Glass (1/8˝) | pcs | 1 | 9 1/4˝ x 1´-1 1/4˝ |
| Steel Expansion Anchor, 3/8in. x 7 in | pcs | 10 | |
| Ventilation louver | pcs | 2 | |
| Door hinge (5˝) | pcs | 7 | |
| Door handle | pcs | 3 | |
| Corner bracket 1 1/2˝ x 1 1/2˝ | pcs | 10 | |
| Wood screws (1˝) | pcs | 90 | |
| Wood screws (2˝) | pcs | 340 | |
| Wood screws (3˝) | pcs | 150 | |
| Wood screws (5˝) | pcs | 65 | |
| Galvanized nails (1/2˝) | pcs | 40 | |
| Galvanized nails (2˝) | pcs | 50 |
Step 1: Ground Works
1.1 Clear the area where you want to build the shed and layout for the foundation. Use the below illustration as a guide.
1.2 For the foundation, dig four trenches that are at least 1′ wide and 1′ deep. If you live in a cold-weather region, you might need to dig down to the frostline; check with the local building department for specific requirements.
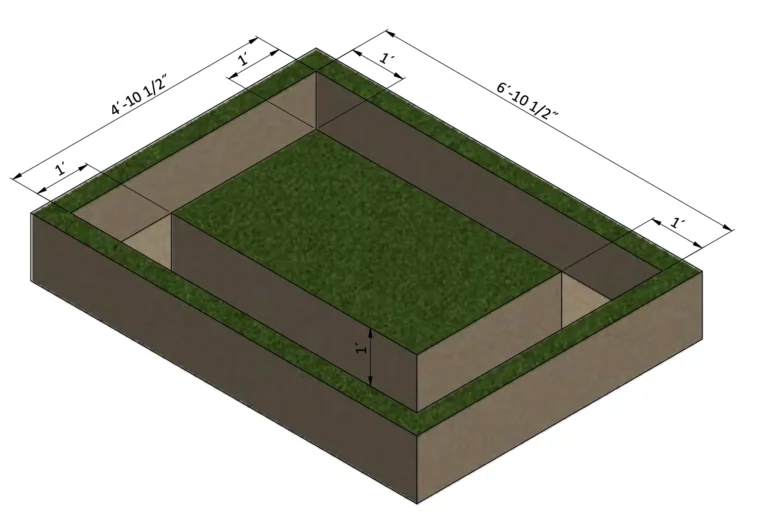
Step 2: Foundation Preparation
2.1 After excavating the trenches, fill them level with the ground with concrete. Allow the concrete to cure overnight.
2.2 Once the concrete has cured, mix up a batch of mortar and lay one layer of standard-sized bricks across the foundation. Trowel mortar between each brick, creating a ⅜-inch-wide mortar joint. You will need roughly 56 bricks for this step.

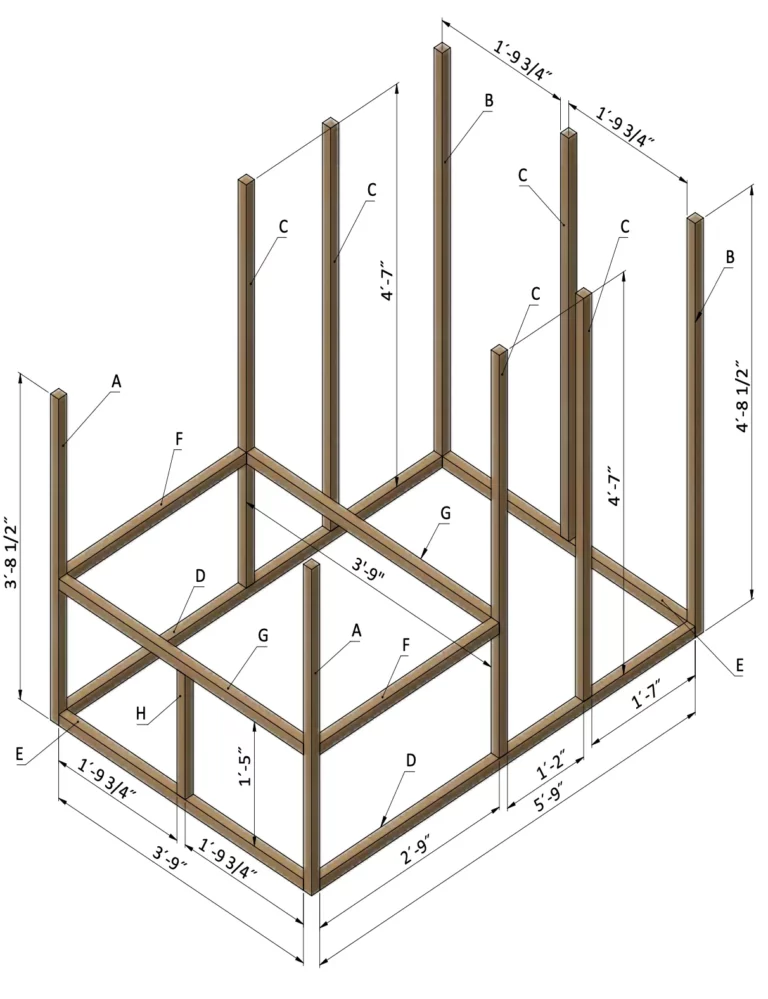
Step 3: Assemble the Main Frame
3.1 Frame the walls of the chicken coop out of 2×2 lumber, as shown in the drawing below. You will need five 2x2s cut to 4′-7′, two cut to 4′-8 1/2″ and two cut to 3′-8 1/2″; these will be with vertical wall studs. Frame the floor of the elevated nesting loft using two 2x2s cut to 3′-9″ and two more cut to 5′-9″. Also cut one 2×2 to 1′-5″, which will serve as a vertical cripple stud to support the loft floor. Then cut two 2x2s to 3′-9″ and two to 5′-9″ to serve as the bottom plates.
3.2 Secure the beams to the bottom rails with 3″ decking screws.
3.3 Using a speed square or carpenter’s framing square to ensure the corners are precisely 90°.
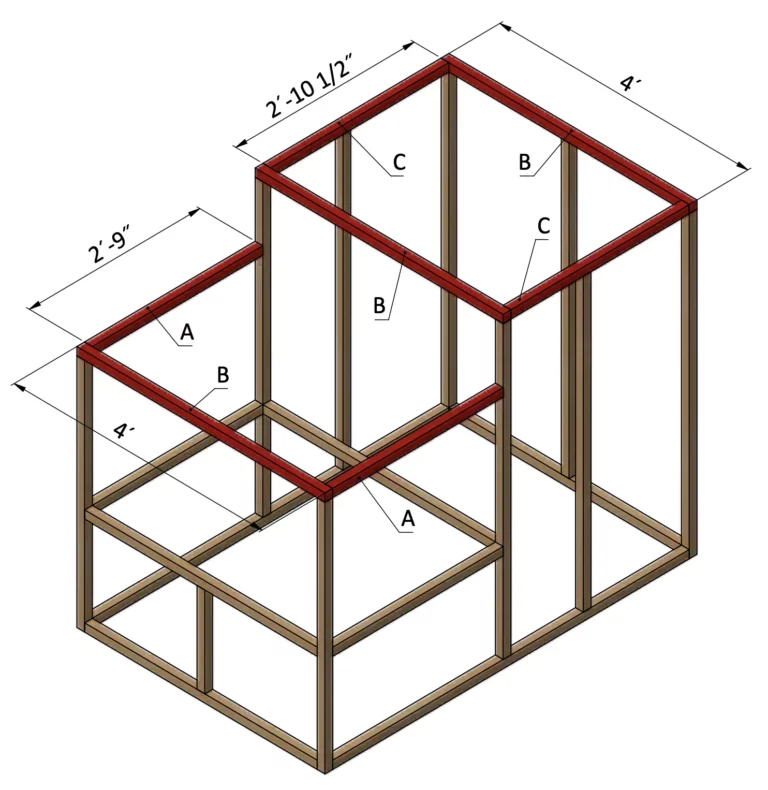
Step 4: Assemble The Top Plates
4.1 Build the top plates using 2×2 lumber. Cut two boards to 2′-9″, two boards cut to 2′- 10 1/2″ and three boards cut to 4′.
4.2 Connect the plates to the studs with 3″ screws.
4.3 Using a speed square or carpenter’s framing square, check the corners to make sure they are 90°.
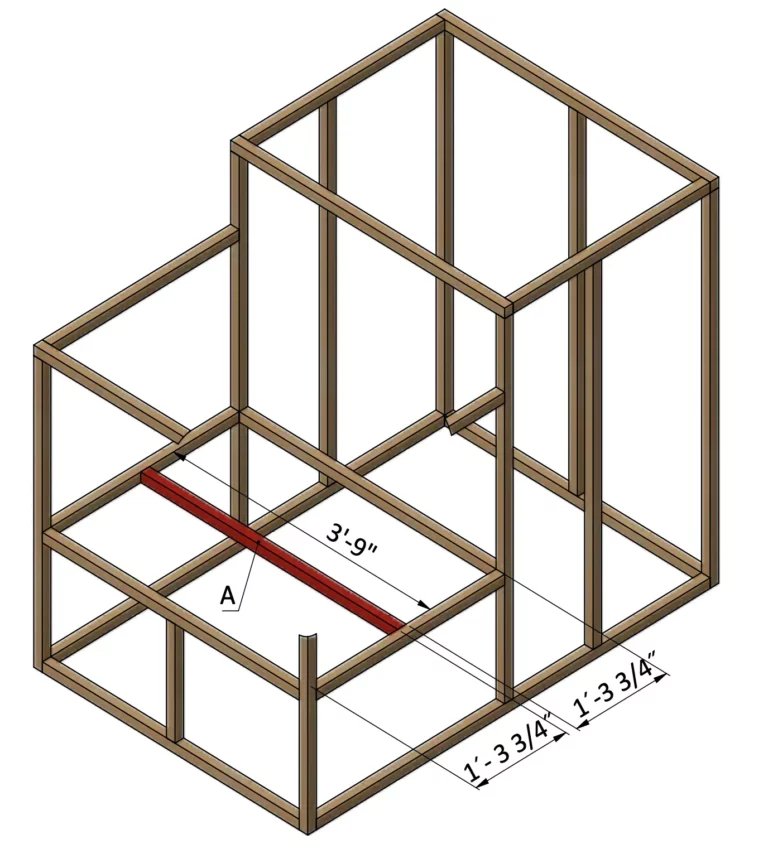
Step 5: Assemble The Loft Floor Frame
5.1 Cut one 2×2 to 3’-9” to act as a floor joist for the elevated nesting loft, as shown below.
5.2 Fasten the joist to the loft’s floor frame 3″ screws.
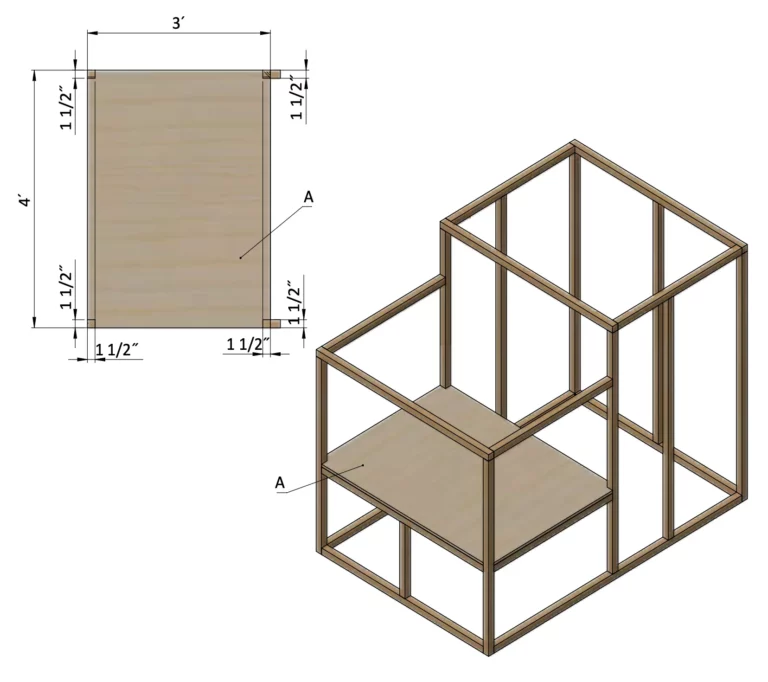
Step 6: Install the Plywood Floor
6.1 Cut 5/8″ plywood for the floor sheathing, as shown in the drawing below. Cut the plywood 3′ x 4′, then notch the corners to fit around the 2×2 wall studs.
6.2 Secure the plywood to the loft’s floor frame and joist with 2″ screws.
Step 7: Assemble Rear Wall Frame
7.1 Using 2×2 lumber, construct the rear wall frame, as shown in the drawing below. Cut two studs 2′ long for the right- and left-side rough opening for a window. Next, cut two 2x2s to 1’. long to serve as the rough sill and header in the window opening. Also cut one 2×2 to 10 1/2″ for a horizontal nailer.
7.2 Connect these 2x2s to the wall frame with 3″ screws.
7.3 Using a speed square or carpenter’s square, check the corners to make sure they are 90°.
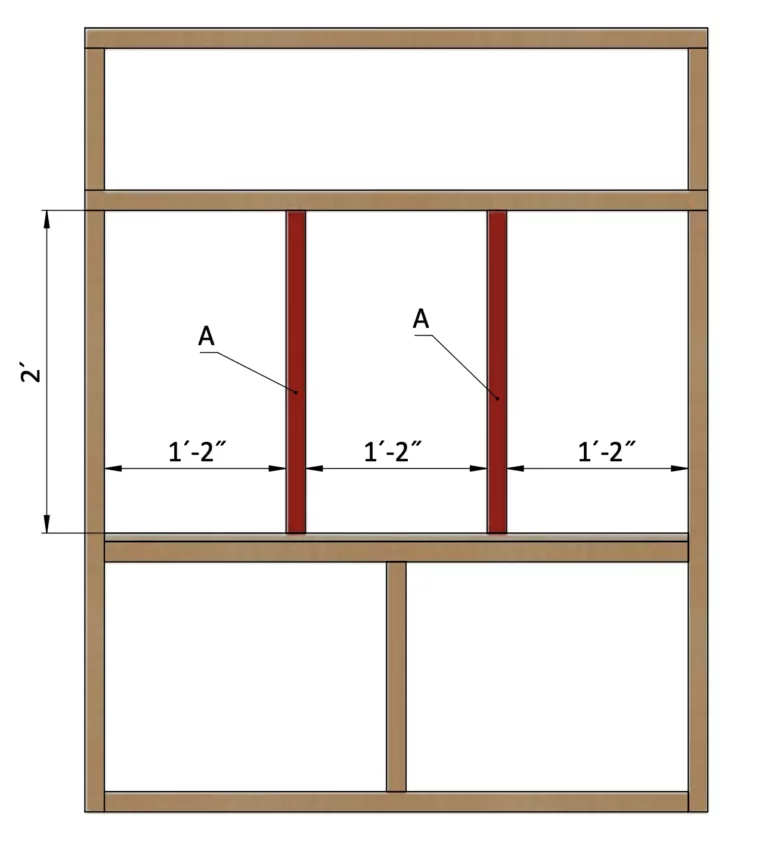
Step 8: Assemble Left Side Wall Frame
8.1 Using 2×2 lumber, construct the left side wall frame, using the drawing below as a reference. You will need two vertical studs cut to 2′.
8.2 Attach the studs with 3″ screws.
8.3 Using a speed square or carpenter’s square, check the corners to make sure they are 90°.
Step 9: Assemble Right Side Wall Frame
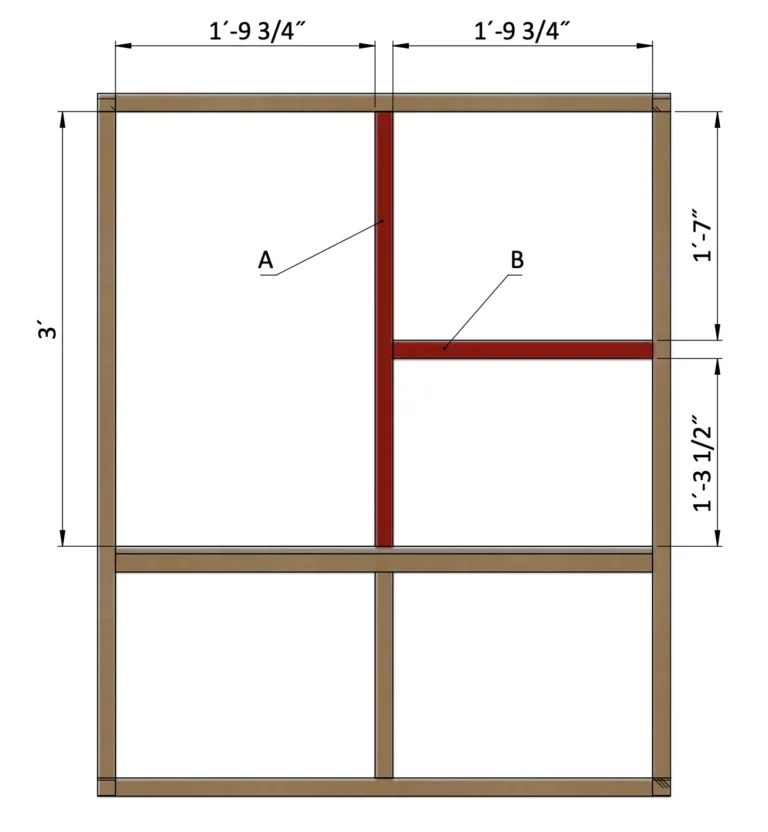
9.1 Using 2×2 lumber, build the right side wall frame, as shown below. Cut one 2×2 stud to 3′, and one 2×2 cut to 1′-9 3/4″, which will be the header over the chicken coop’s door.
9.2 Fasten the 2x2s with 3″ screws.
9.3 Using a speed square or carpenter’s square, check the corners to make sure they are 90°.
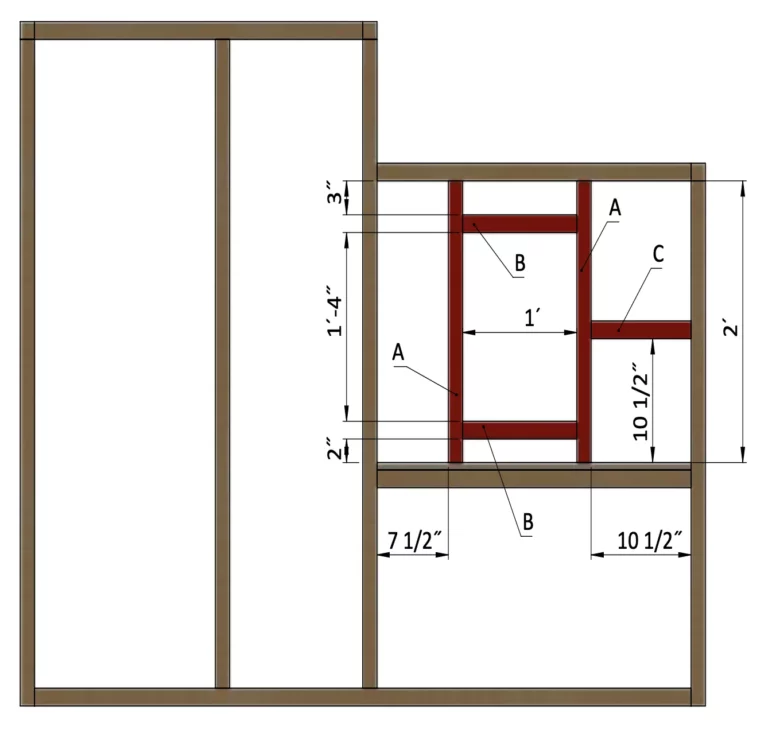
Step 10: Assemble Front Side Wall Frame
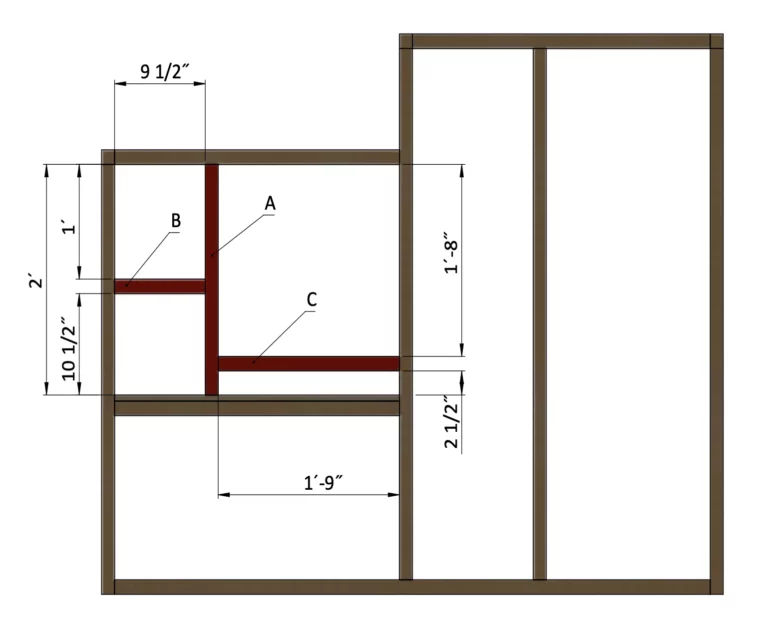
10.1 Using 2×2 lumber, construct the front side wall frame, using the drawing below as reference. You will need one 2×2 stud cut to 2′, one 2×2 cut to 1′-9″ to form the litter tray header, and one 2×2 cut to 9 1/2 ̋ that will be the horizontal top plate.
10.2 Connect the 2x2s with 3″ screws.
10.3 Using a speed square or carpenter’s square, check the corners to make sure they are 90°.
Step 11: Assemble the Roof Frame
11.1 Using 2×2 lumber, cut four rafters 2′ long and four rafters 5′ long according to the dimensions in the drawing below. Be sure to miter-cut one end of each rafter to 0 degrees to form the proper roof slope along the peak.
11.2 Also cut four 2×2 four collar ties to 1′-8″ long, which are used to support the rafters.
11.3 Then cut three 2×2s to 1′-2″ long to form the ridge board across the peak of the roof.
11.4 Connect the parts with 3″ screws.

Step 12: Nesting Box Frame Assembly
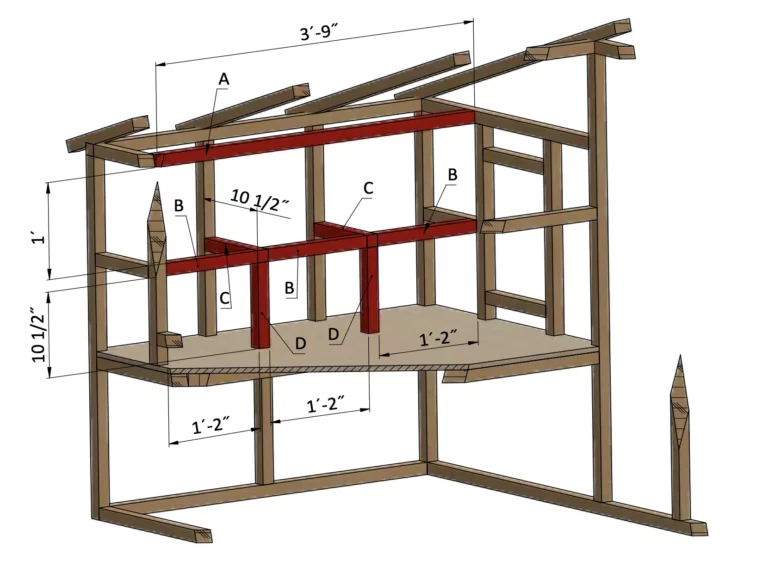
12.1 Using 2×2 lumber, assemble the frame for the nesting box, as shown below. Cut two 2×2 studs to 10 1/2″, two 2x2s 10 1/2″ to support the nesting box floor , three 2x2s to 1′-2″ to form the horizontal front edge of the box floor, and one 3′-9″ 2×2 for the top plate that runs across the top of box.
12.2 Make sure to provide opening for the door of the nesting box.
Step 13: Install Plywood for the Front Wall
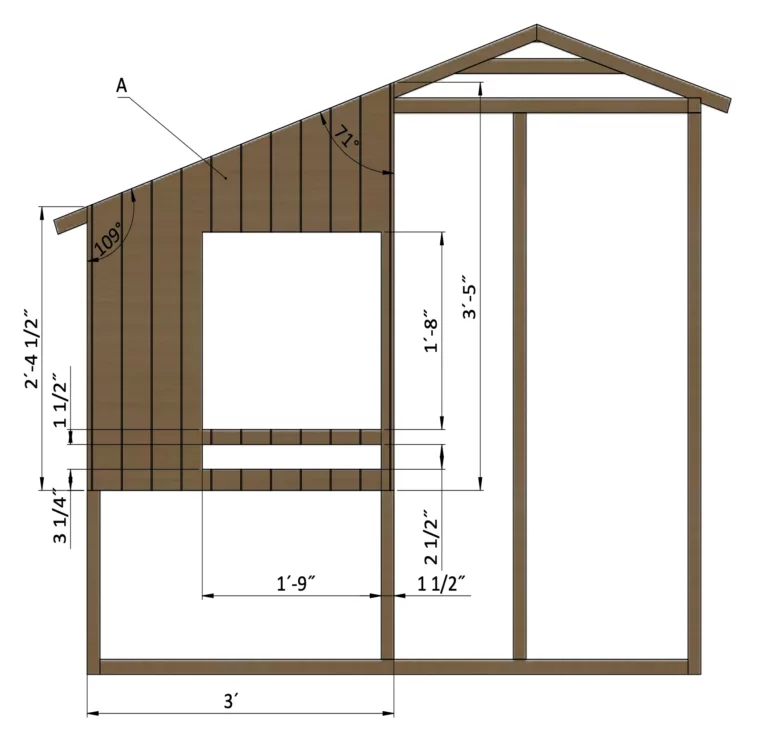
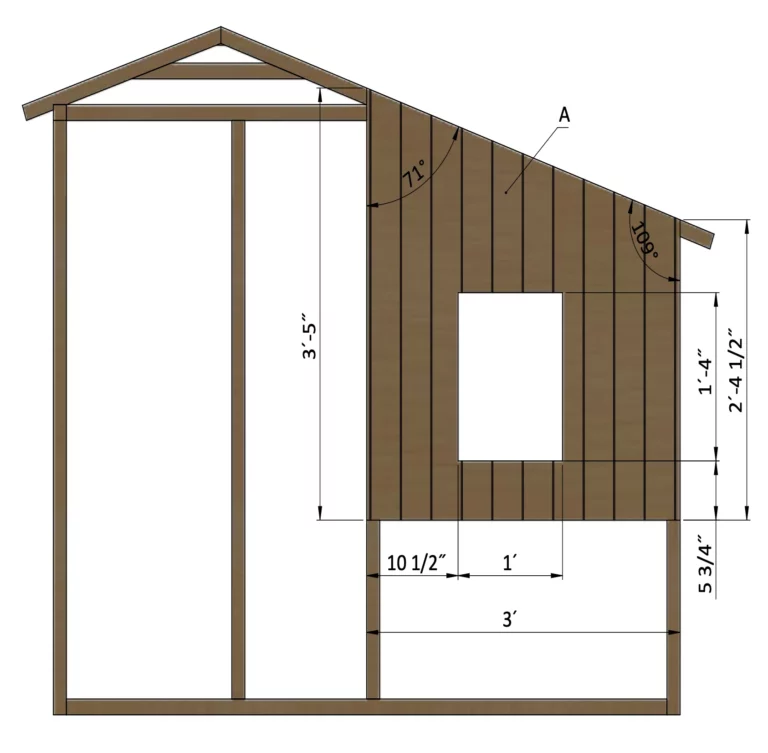
13.1 Cut sheets of 3/8″ plywood siding for the front wall sheathing using the drawing below as a guide. Cut one piece to 3′ x 3′-5″, then cut out the openings for the litter tray and front door.
13.2 Secure the plywood to the wall frame with 1¼″ screws.
Step 14: Install Plywood for the Back Wall
14.1 Cut sheet of 3/8″ plywood siding to 3′ x 3′-5″ for the back wall of the coop. Then, cut out the window opening.
14.2 Secure the plywood with 1¼″ screws.
Step 15: Install Plywood for the Left Wall
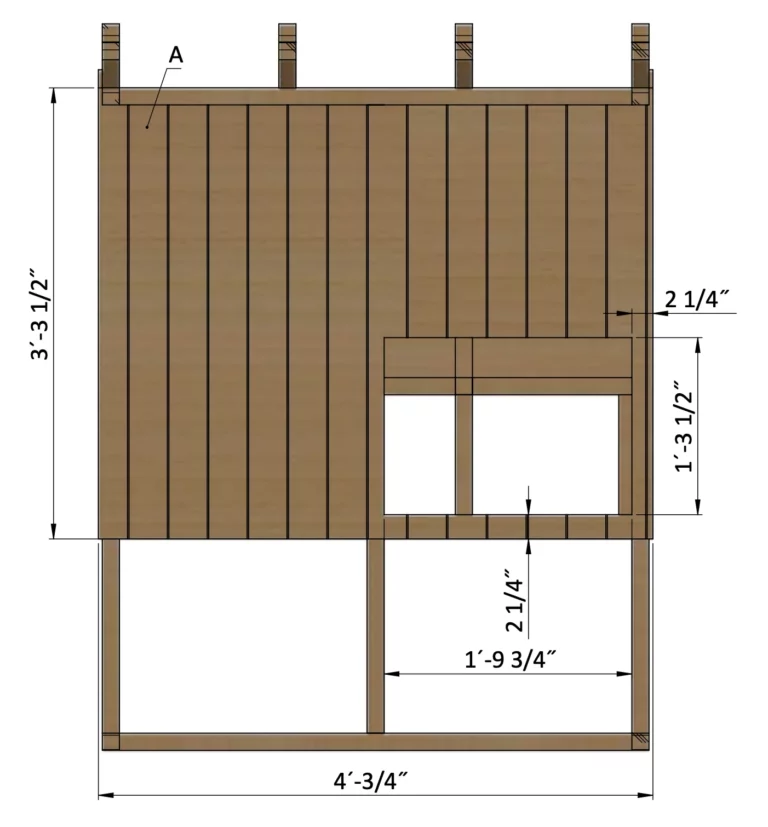
15.1 Cut 3/8″ plywood siding for the left wall sheathing using the drawing below as a guide. Cut the piece to 2′-3 1/2″ x 4′-3/4″, then saw out an opening for the nesting box.
15.2 Secure the plywood with 1¼″ screws.

Step 16: Install Plywood for the Right Wall
16.1 Cut sheet of 3/8″ plywood siding to 3′-3 1/2″ x 4′-3/4″ for the right wall sheathing using the drawing below as a guide. Then, cut out an opening for the coop’s main door.
16.2 Secure the plywood with 1¼″ screws.
Step 17: Install Plywood for the Nesting Box
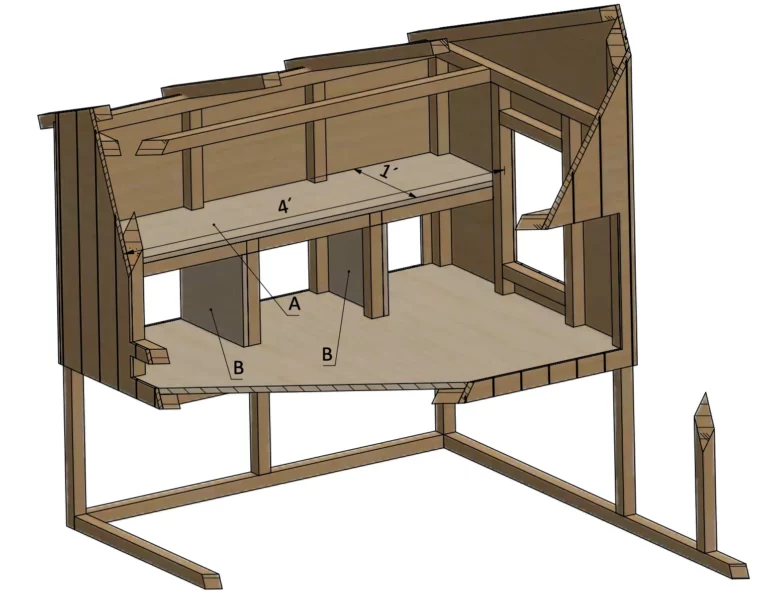
17.1 Cut 5/8″ plywood for the nesting box using the drawing below as a guide. Cut one 1′ x 4′ piece for the horizontal top of the box; notch the top to fit around the studs. Next, cut two 1′ x 1′ pieces of plywood for the inner vertical partitions.
17.2 Secure the plywood with 2″ screws.
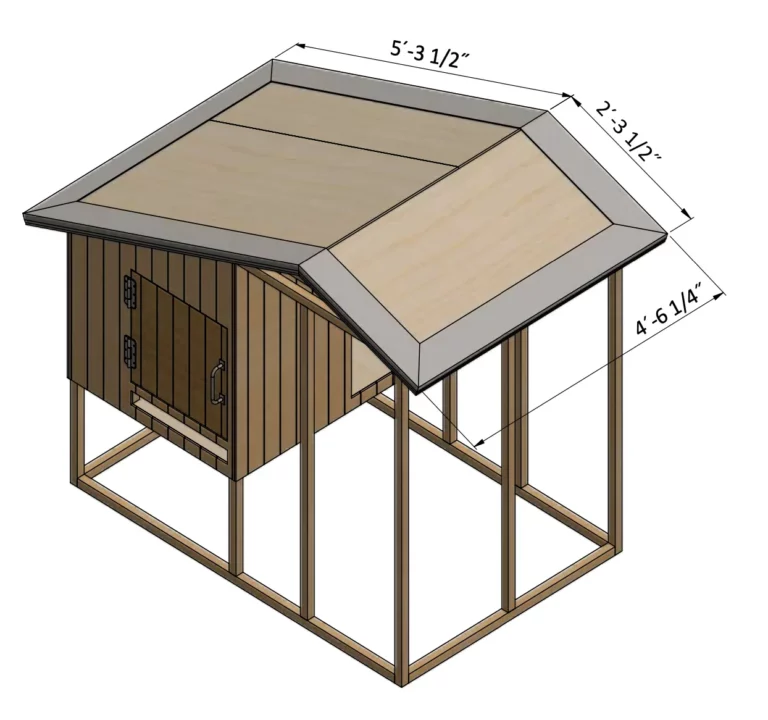
Step 18: Install Plywood for the Roof
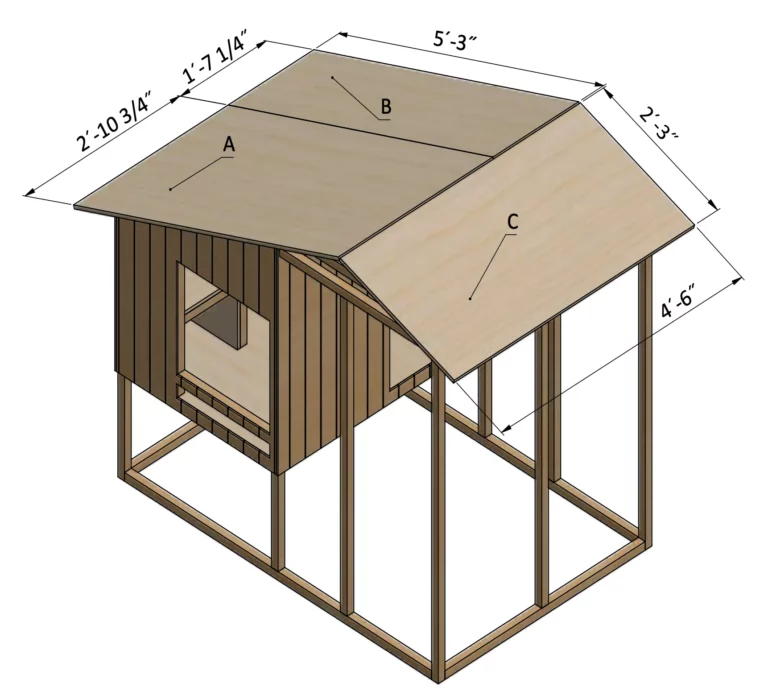
18.1 Cut 5/8″ plywood for the roof sheathing using the drawing below as a guide. Cut one piece to 2′-10 3/4″ x 5′-3″, one to 1′-7 1/4 ̋”x 5′-3″, and one to 2′-3″ x 4′-6″.
18.2 Secure the plywood with 2″ screws.
Step 19: Assemble and Install Front Door
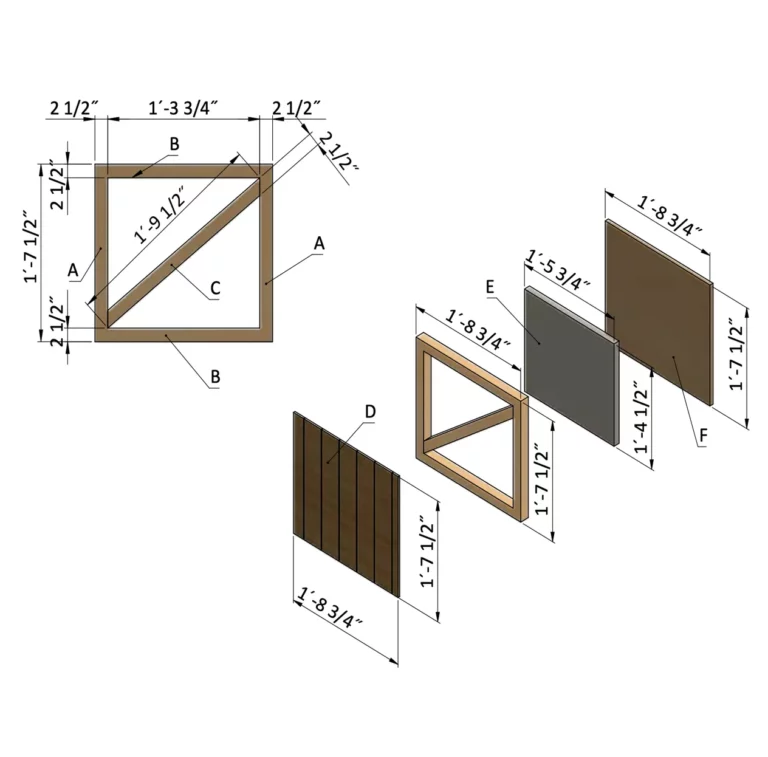
19.1 Build the frame of the chicken coop’s door using 2×2s. Cut two 2x2s to 1′-7 1/2″ for the vertical frame parts and two 2x2s to 1′-5 3/4″ for the horizontal parts. Also, cut a 2×2 cross brace to fit diagonally within the door frame, as shown in the drawing below. Fasten the parts together with 3″ screws.
19.2 Next, cut a piece of 3/8″ plywood siding to 1′-7 1/2″ x 1′-8 3/4″ and attach it to the door frame with 1 1⁄4 in. screws.
19.3 Cut two triangular pieces of 1” thick rigid foam board to fit within the door frame.
19.4 Then cut a piece of 5/8″ plywood to 1′-7 1/2″ x 1′-8 3/4″ and fasten it to the back of the door with 1 ¼ in. screws.
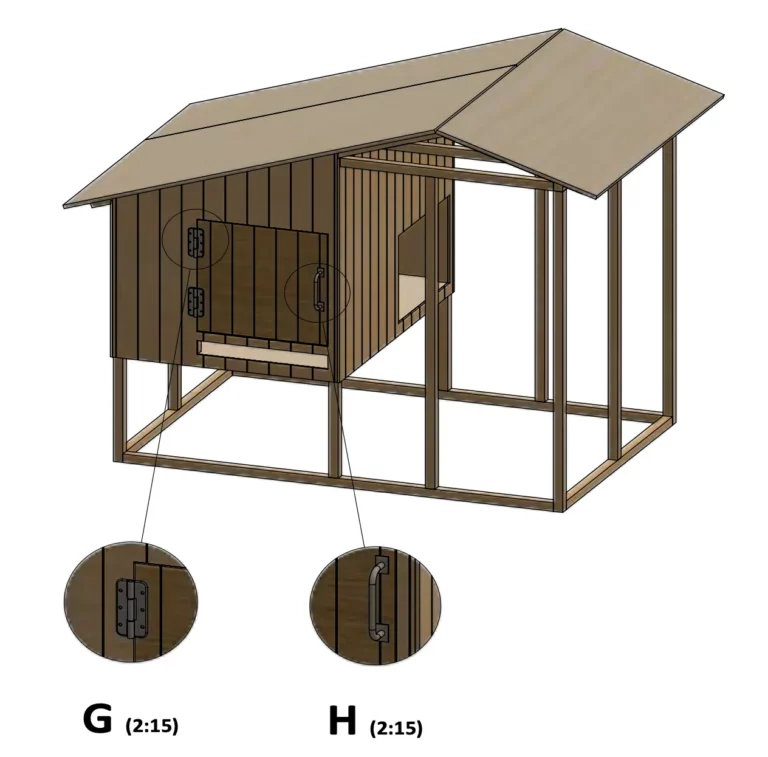
19.5 Install the door to the chicken coop with two hinges.
Then, attach an 8″ door pull (see nodes G, H).
Finish the doors installation by attaching 8″ door pull (see nodes G, H).
Step 20: Assemble and Install Window
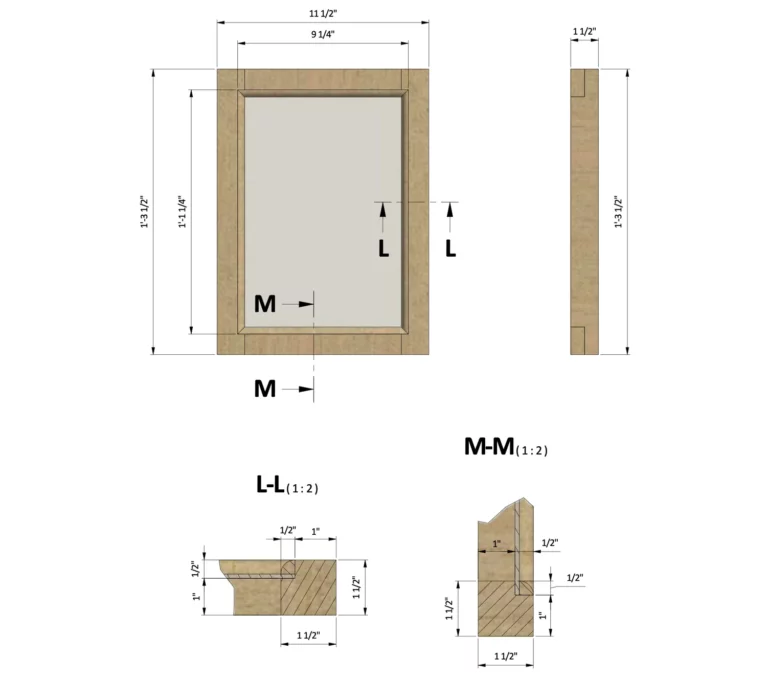
20.1 Using 2×2 lumber, assemble the outer frame for the window, as shown in the drawing below. Cut two 2x2s to 11 1/2″ for the horizontal parts and two 2x2s to 1′-3 1/2″ for the vertical parts. Cut half-lap corner joints into the frame parts and rout a rabbet into each part to receive the glass pane.
20.2 Glue and screw the window frame together, then set the glass pane into the rabbet and secure it with wood beading and 1/2″ galvanized nails.
20.3 Insert the window into the wall opening and fasten it with 3″ wood.

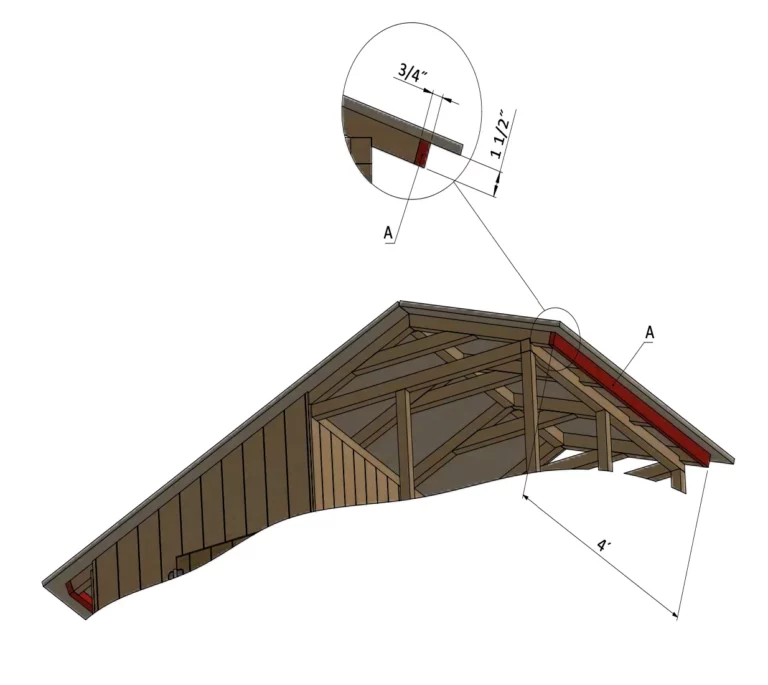
Step 21: Assemble the Fascia Boards
21.1 Using 1×2 lumber, cut two fascia boards to 4′ long and fasten them across the ends of the roof rafters with 2″ screws.
Step 22: Install the Drip-Edge Flashing
22.1 Use metal snips to cut aluminum drip-edge flashing to fit around the perimeter of the roof. You will need about 28′ to cover the entire roof.
22.2 Align the drip-edge flashing with the edge of the plywood roof sheathing, then fasten it with 1 1/2″ roofing nails.
Step 23: Install the Roof Shingles
23.1 You will need 34 Sq Ft of 15-lb.felt building paper and asphalt shingles to complete the roof of the coop.
23.2 Starting at the lowest edge of the roof, cover the plywood sheathing and drip edge with building paper, making sure to overlap the seams on subsequent pieces by at least 6”. Secure the paper with staples.
23.3 Next, use 1 ¼ roofing nails to install the asphalt roof shingles.

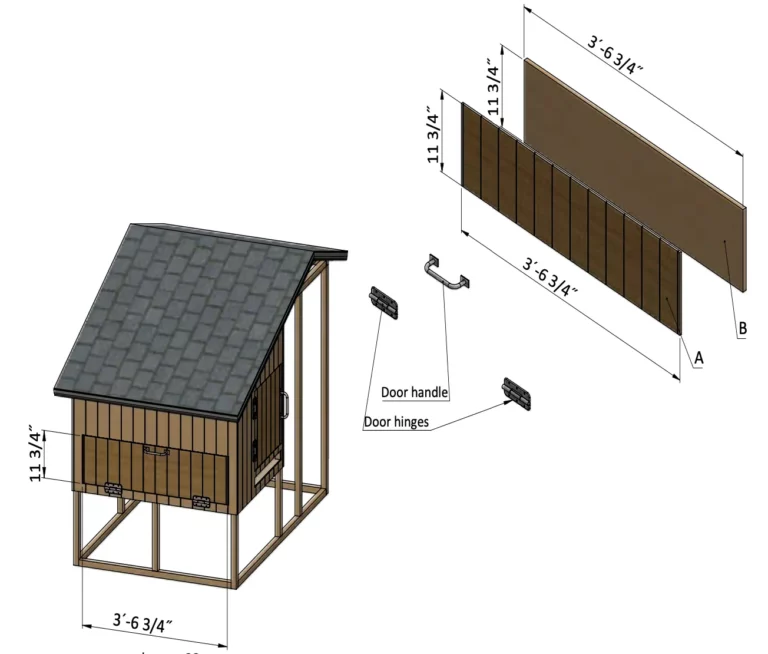
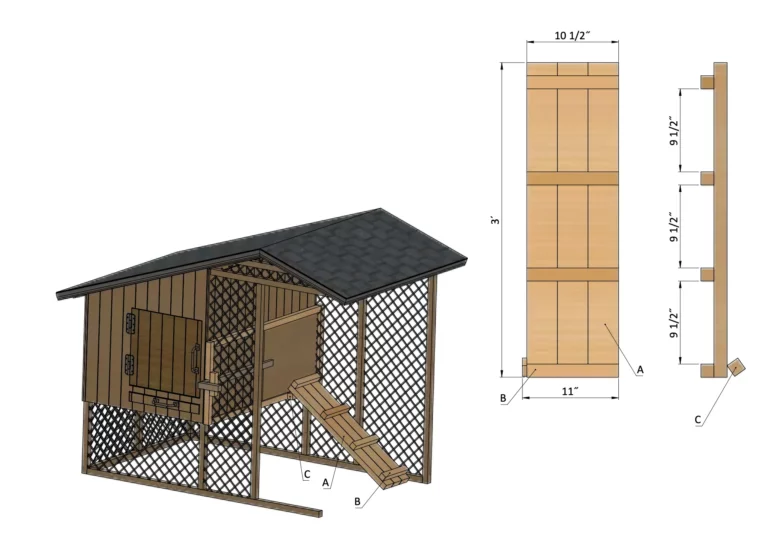
Step 24: Installing the Nesting Box Door
24.1 Cut a piece of 3/8″ plywood siding to 11 3/4″ x 3′-6 3/4″ for the nesting-box door, as shown below.
24.2 Then, cut a piece of 5/8″ plywood to the same size–11 3/4″ x 3′-6 3/4″–and fasten it to the rear of the plywood panel using glue and ¾” nails.
24.3 Hang the door in the opening with two hinges, and then attach an 8″ door pull.
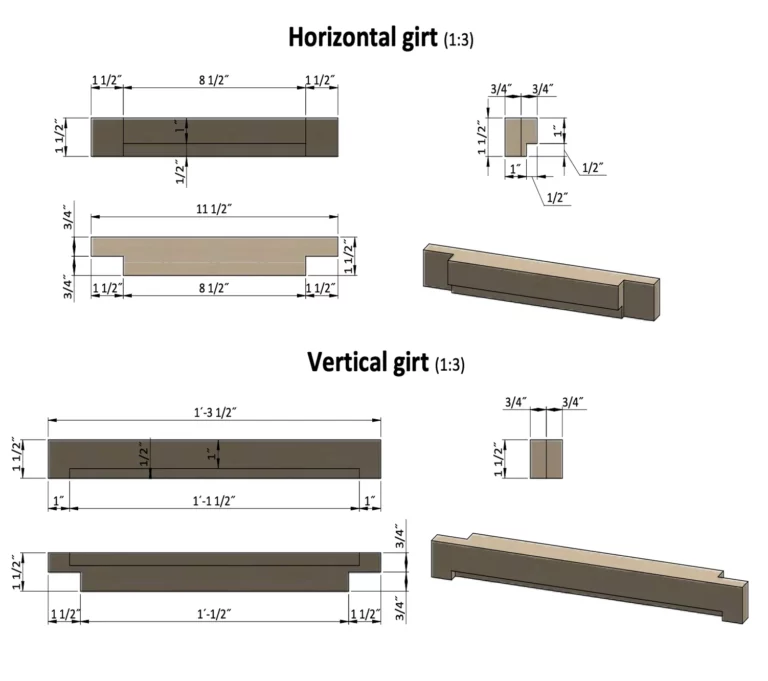
Step 25: Assemble the Chicken Door
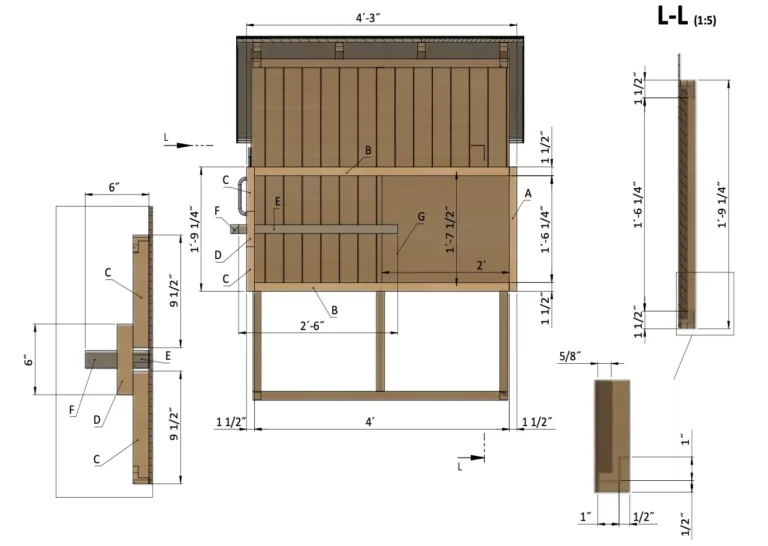
25.1 Cut a piece of 5/8″ plywood to 1′-7 1/2″ x 2′ for the chicken door panel, according to the drawing below.
25.2 Next, cut 2×2 trim pieces to fit around the perimeter of the plywood door panel. You will need two 2x2s cut to 4′ for the horizontal trim pieces, one 1′-9 1/4″ board, one 6″ board, and two 2x2s cut to 9 1/2″, which will be the vertical trim pieces. Cut another 2×2 to 2′-6″ for the lever and another cut to 6″ for the door handle. Cut the rabbets in the horizontal trim parts to allow the door to slide.
Step 26: Assemble and Install Aviary’s Door
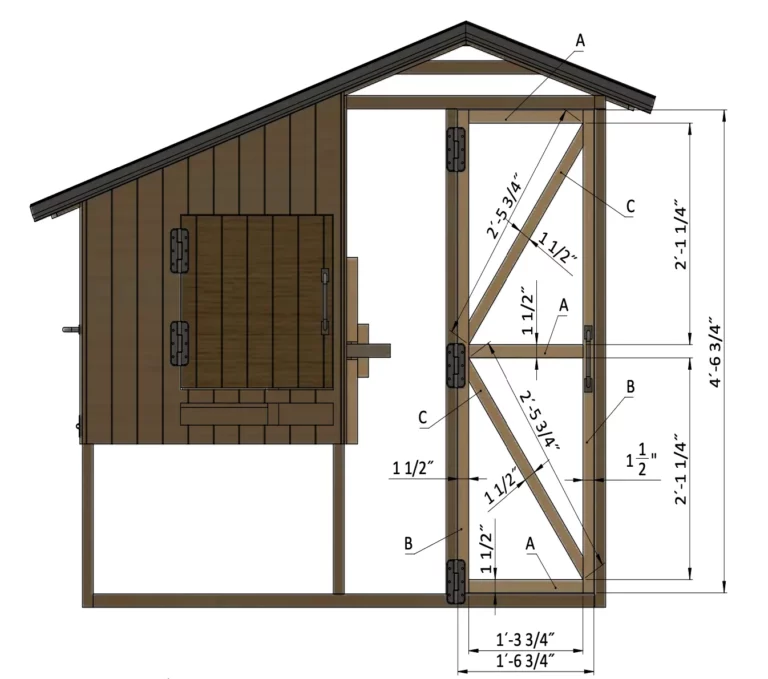
26.1 Build the door frame using 2×2s and secure the parts with 3″ screws. Cut two boards to 4′-6 3/4″ for the vertical stiles, three boards to 1′-3 3/4″ for the horizontal rails, and two to 2′-5 3/4″ for the cross braces.
26.2 Install three door hinges and then install an 8″ door pull.
Step 27: Chicken Wire Installation
27.1 Staple chicken wire (also called poultry netting) to the walls of the coop. You will need about 60 sq ft. of chicken wire.
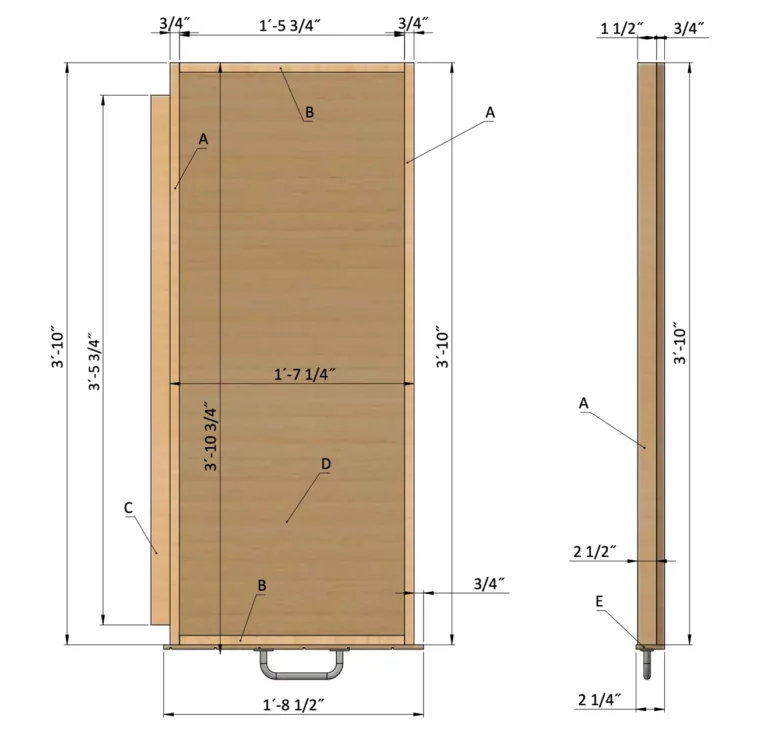
Step 28: Build The Litter Tray
28.1 Build a litter tray to catch the bird droppings. Cut two 1x2s to 3′-10″, and another two to 1′-5 3/4″ to form the rectangular frame of the tray. Then cut one 2×2 to 3′-5 3/4″ that serves as a guide for sliding the tray in and out. Assemble the 1×2 frame with 1 ⅝ in. screws, then cut a piece of ⅜ in. plywood siding to 1′-7 1/4″ x 3′-10″ plywood sheet. Glue and screw the plywood panel to the bottom of the frame. Next, cut a piece of plywood siding to 2 1/4″ x 1′-8 1/2″ and attach it to the front of the tray. Install a 6″ door pull to the front.
28.2. Fasten the 2×2 guide to the floor plywood with 2″ screws.
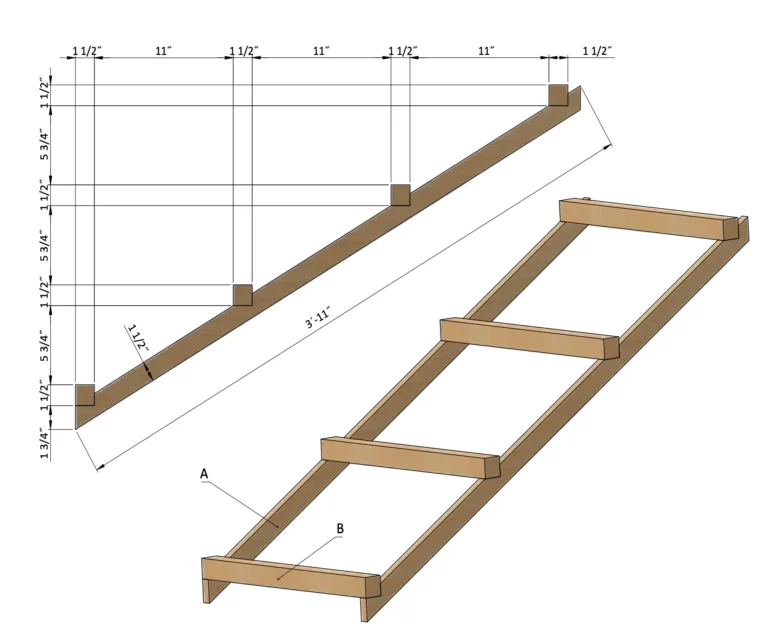
Step 29: Assemble The Resting Roost
29.1 Build a resting roost to provide a convenient, comfortable place for the chickens to sleep and take daytime naps. Cut two 1×2s to 3′-11″ and four 2x2s to 1′-9.
29.2 Saw four notches into each 1×2, as shown in the drawing below. Then set the 2x2s into the notches and secure them with 2″ screws.
29.3 Place the roost inside the coop and fasten in place with four 2″ screws.

Step 30: Build the Chicken Ramp
30.1 Cut three 1×4 boards to 3’, and four 2x2s cleats to 10 ½ in.
30.2 Fasten the cleats to the boards, as shown below, using 1 ⅝ in. screws.
30.3 Set the ramp in place in front of the door leading to the inside of the coop, and secure the ramp with 3 in. screws.
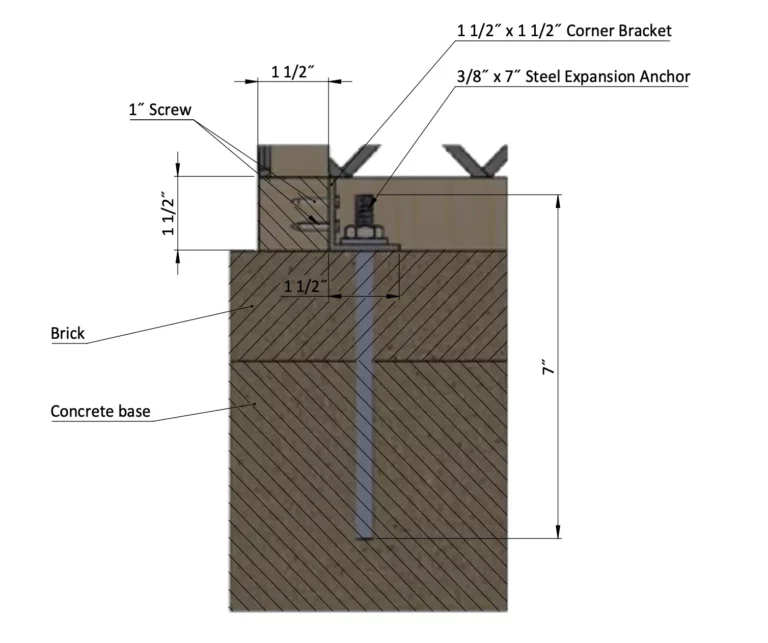
Step 31: Fasten the Coop to the Foundation
31.1 To attach the coop to the foundation with four 1 1/2″ x 1 1/2″ right-angle metal corner brackets. Before attaching the brackets, drill a ½ in. dia. hole through one leg of each bracket.
31.2 Fasten one bracket to each corner of the coop’s frame, making sure the ½ in. dia. hole faces down against the foundation.
31.3 Then, use a 3/8 in. dia. masonry drill bit to bore through each bracket and into the brick and concrete foundation. Insert a 3/8″ x 4′ expansion anchor into each hole and hammer it down into place.
31.4 Use a wrench to tighten the hex nut on each anchor to secure the coop.
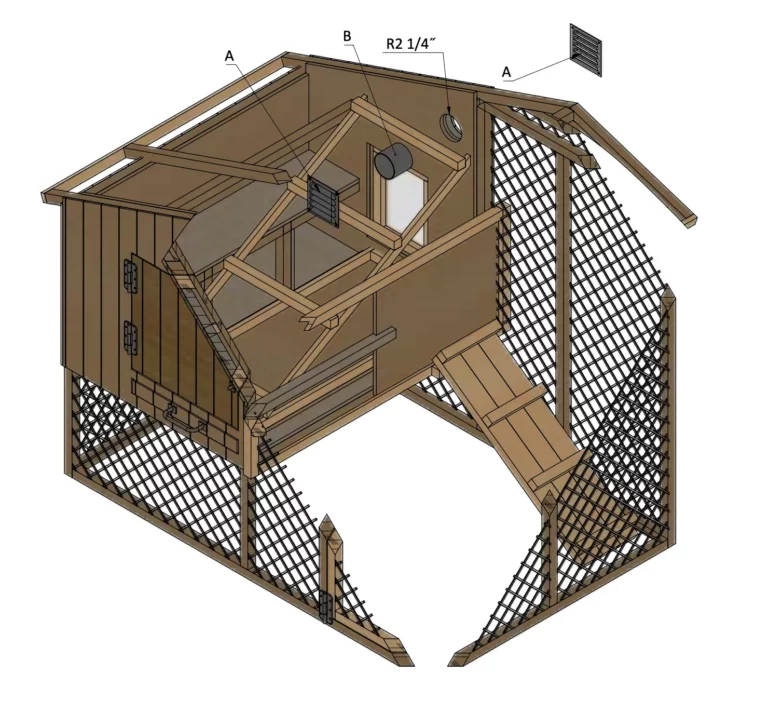
Step 32: Install the Louvered Vent
32.1 To install a louvered vent, cut a 4 1/2″ diameter hole in the top of the rear wall, Cut through the outer sheathing, insulation and inner sheathing.
32.2 Insert the 4″ ventilation pipe to isolate the inner space between walls.
32.3 Attach the vent to the outer and inner walls with ½ in. screws.
Step 32: Final Touches
Now that your chicken coop is all done, you are ready to finish it with your favorite paint, stain, or clear wood preservative.