Having a thriving garden year-round sounds a little bit like a myth, but thanks to unique structures, like a walipini greenhouse, you can keep plants thriving, even into colder seasons. No gardener enjoys seeing their garden die off every winter, and this underground, passive solar greenhouse could very easily be the low-cost, year-round solution you didn’t know you needed.
What Is a Walipini Greenhouse?
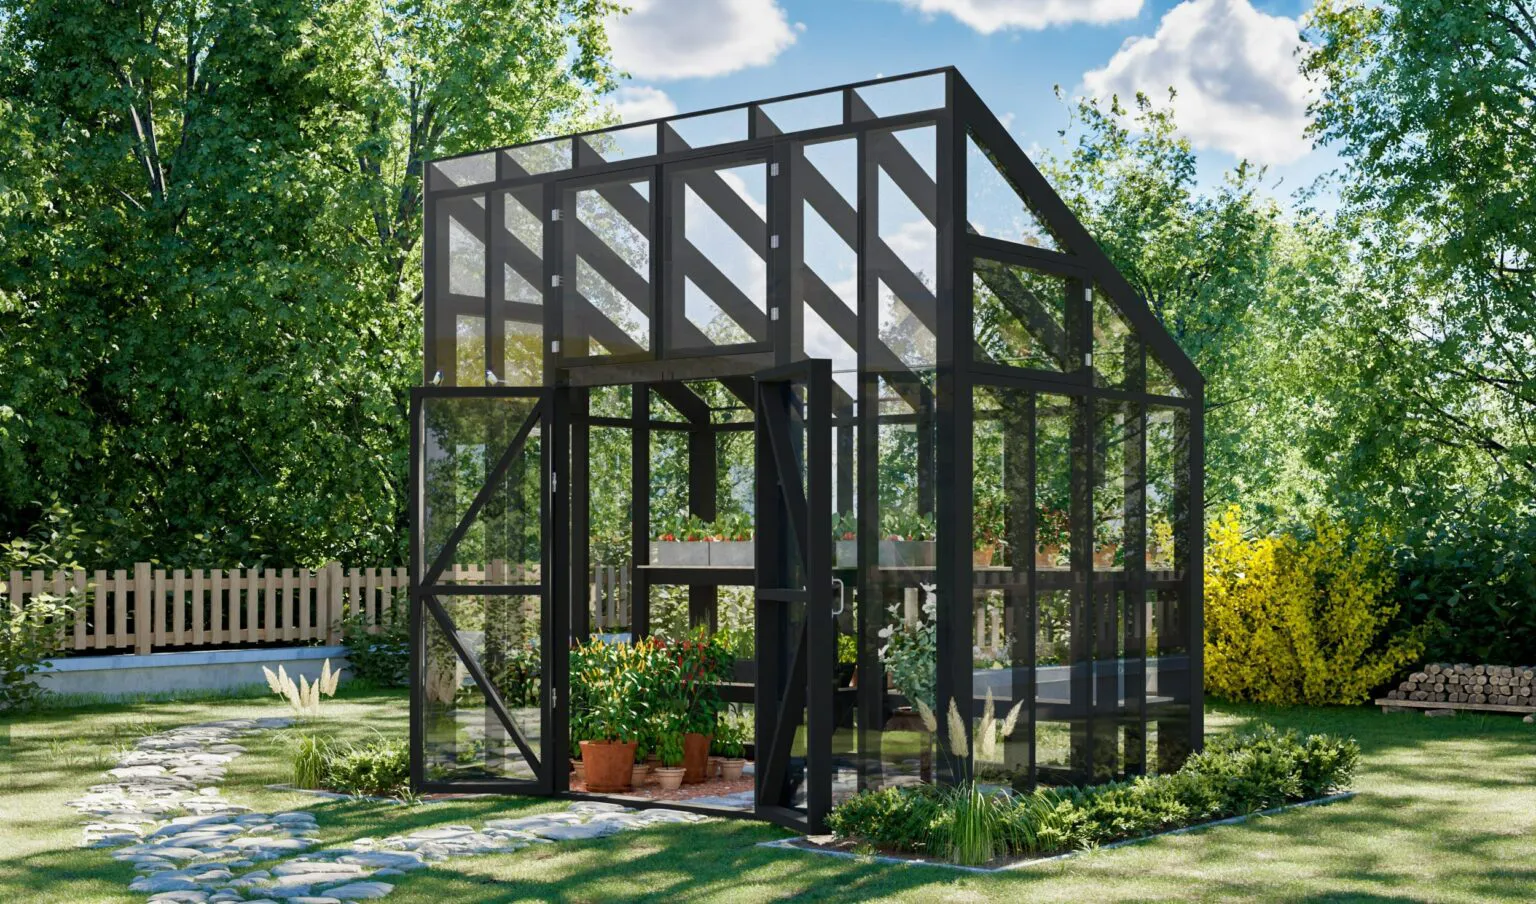
A walipini greenhouse is an underground passive greenhouse that uses both solar and geothermal to grow plants during the cold season. It’s able to maintain the right level of warmth, despite the chilly temp outside.
The earth-sheltered greenhouse is similar to the pineapple pits that existed in the Victorian era, which allowed people to grow exotic fruit in cold climates. Nowadays, you’ll find them used as a more eco-friendly and energy-efficient choice to extend your usual growing season.
As far as greenhouse ideas go, this is the perfect solution for gardeners who face cold temperatures in the fall and winter. The pit sits below the frost line, and it keeps a relatively constant temperature, even in freezing weather.
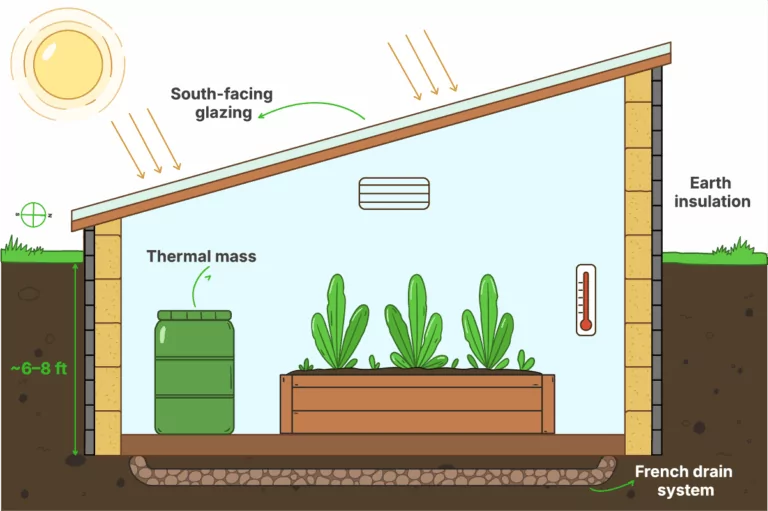
By having most of the structure submerged into the ground, it captures enough solar and geothermal heat to significantly reduce energy needs. This underground or sunken greenhouse is one potentially cost-effective and sustainable solution.
Pros and Cons of a Walipini Greenhouse
Any structure or tool that gives you the power to support plant life in the colder seasons is an exciting opportunity. That said, a walipini greenhouse might not be useful for your particular climate or zone.
If you live in a location with limited winter sunlight, you won’t get the same benefits with a sunken greenhouse. Without sufficient solar exposure, underground greenhouses struggle to maintain enough warmth and light for healthy plant growth. Soil temperature varies widely around the country, too, which will also impact how well a walipini works.
Here are a few benefits and disadvantages of walipini greenhouses that’ll help you determine if it’s the right move.
| Benefits | Drawbacks |
|---|---|
| Energy efficient and stable temperature regulation | Drainage and moisture management challenges |
| Year-round growing in USDA Zones 4-8 | Excavation difficulty and permitting requirements |
| Lower long-term heating costs | Limited sunlight in some regions |
| Protection from harsh weather and frost | Potential structural and maintenance concerns |
The walipini’s biggest strengths are energy efficiency, stable temperatures, and protection from harsh weather. This makes it ideal for cold climates. But poor drainage and excavation challenges, or the zone you live in, can make it less of a viable option.
If you live in a wet area, consider building with reinforced walls and advanced drainage. And be prepared for extra costs if your site requires permits or structural engineering.
Walipini vs. Traditional Greenhouses: A Side-by-Side Comparison
You might be weighing up a few different greenhouse options, and this chart will help you understand if a traditional greenhouse or walipini greenhouse will serve your garden best. Cost, heating requirements, light availability, and maintenance are all considerations that you should think of in order to make the most of a greenhouse’s purpose and main advantages.
| Feature | Walipini Greenhouse | Traditional Greenhouse |
|---|---|---|
| Cost Breakdown | Moderate upfront costs due to excavation, lower long-term heating due to geothermal and solar heat | Higher upfront costs in materials and structure, higher ongoing heating costs |
| Heating Expenses | Low heating expenses due to stable geothermal heat and solar heat | Moderate to high heating expenses because they rely on supplemental heating during the winter |
| Growing Conditions | Stable temperatures, high humidity, best in dry climates with good drainage, may have limited light in northern latitudes | Highly variable, temperature control depends on insulation and heating, good light if sited well (facing south) |
| Light Requirements | Lower: may need supplemental lighting in winter or at higher latitudes | Higher: transparent walls and roof maximize sunlight but risk overheating/scorching |
| Best Crops | Cool-weather crops, leafy greens, root vegetables, and heat-loving crops with care | Wide range, including tomatoes, peppers, flowers, and exotics, depending on heating |
| Lifespan | 10 to 15 years with maintenance, issues with water management can reduce the lifespan | 5 to 10 years, glass/metal structures can last longer with care |
| Maintenance | Moderate: monitor for drainage, structural integrity, and humidity | Moderate: ventilation, glazing replacement, heating and cooling system upkeep |
In short, a walipini greenhouse is ideal if you’re after energy efficiency and stable temperatures, especially if you’re growing in a region with mild, dry winters. A traditional greenhouse, on the other hand, offers more flexibility in crop choice and light but is often more expensive to heat and maintain, especially in colder climates.

Planning Your Underground Greenhouse: Climate, Site, and Soil
A successful in-ground greenhouse begins with thoughtful planning. Before you break ground, think about your local climate, where you’re planning to install it, and the soil type of your garden. This will help you avoid costly mistakes and allow you to get the most from your walipini year-round.
Climate Zones & Sunlight
Walipinis are best suited for USDA Zones 4 to 8, where the earth’s natural insulation provides a significant enough advantage to maintain stable growing temperatures. Be sure it’s also situated in a place where it can get at least 6 hours of full winter sun — ideally on a south-facing slope.
When choosing your location, monitor the site throughout the day and across seasons to assess sun exposure. Avoid shaded areas caused by buildings or trees, especially during the winter. It’s also a good idea to tailor the roof angle to your site’s latitude, as this will support it in getting the most sunlight in colder months.
Drainage & Soil
Walipinis rely on the earth to stabilize temperature and humidity, but that only works if your site drains well. Poor drainage can cause structural collapse, rot, or plant disease.
Before you settle on this greenhouse plan, run a simple drainage test. To do so, dig a 12-inch hole and check if it drains within 24 hours. If not, you’ll need to install a drainage system, like a French drain or gravel trench.
Another key part of having a successful walipini set up is knowing your soil type. Clay is more stable but drains poorly, while sandy soil drains well but may become too soft when wet. In either case, a drainage system is often necessary to prevent structural damage or root issues.
Common sites to avoid include:
- Areas with a high water table, which increases the risk of flooding.
- Sites prone to flooding, such as low-lying areas near bodies of water.
- Sites with compacted, poorly draining soils.
- Sites that have trees blocking sunlight.
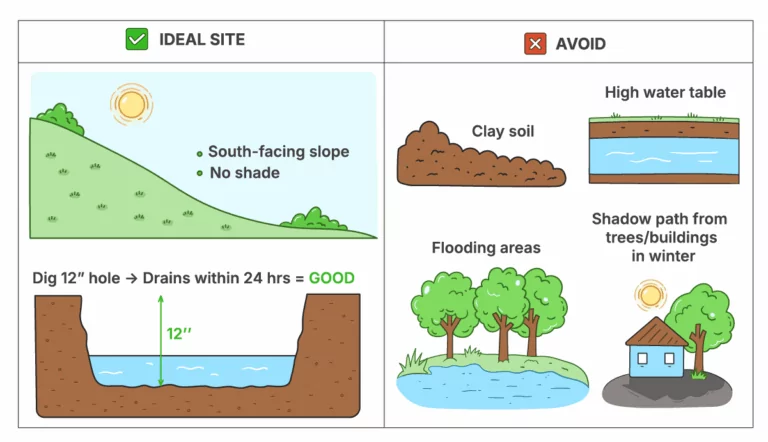
Choose a sunny, south-facing slope with good drainage. Avoid shade, clay soil, or flood-prone spots
Permits & Site Requirements
Before digging, you’ll want to check with your local zoning office to see whether building permits or soil testing are required. Reinforcement may also be necessary in wet regions.
This checklist will help you make sure your site is fit for a sunken greenhouse:
□ USDA Zone: 4–7 recommended
□ Winter Sunlight: At least 6 hours of full sun
□ Soil Drainage: 12-inch test hole should drain within 24 hours
□ Permits: Check local building codes
□ Budget: Estimate $15–$40 per square foot
Walipini Greenhouse Costs: What to Expect
When planning to bring a walipini into your garden, it’s smart to know the cost of a greenhouse and the kind of budget you’ll need from start to finish. Your costs can vary slightly, depending on where you live, contractors’ rates if you’re hiring, material costs if you’re DIYing, maintenance costs, and whether or not you need to pay for a permit.
As an example, a small 10×10 Walipini built with reclaimed materials and DIY labor may cost as little as $300–$500, excluding permits, drainage, and professional labor. Here are a few other average costs, which all vary based on your location:
- Permits and soil testing: Ranges from $100 to over $500 for building permits and $100 to $400 for basic soil testing.
- Materials and tools: Prices for a 12-foot by 20-foot build could range from a few hundred to $3,000+. Sometimes contractors include materials in their costs, or you may decide to use recycled materials.
- Labor and excavation: Skilled labor for excavation or installing a block wall could also cost $1,000 to $3,000 or more.
Are Underground Greenhouses Worth It?
A walipini is worth it if you have the right conditions for a sunken-style greenhouse. It can be highly cost-effective over time and is a sustainable solution with lower energy usage. However, the initial costs to build can be steep for some, and not every garden has the right soil, light, and drainage requirements.
The average cost of heating a traditional greenhouse is about $25 per square foot, while a Walipini can cost $6 to $12 per square foot to heat, according to BTL Liners.
The break-even time depends on how much you have invested in the greenhouse, how much you plant, and whether you take advantage of rotating crops.
How to Build a Walipini Greenhouse (Step-by-Step)
This guide to building a walipini greenhouse will kickstart the process for DIYers. First, here’s what you’ll need:
Tools and Materials:
- Excavation tools (a digger for large greenhouses or manual tools)
- Insulation, such as concrete blocks, straw bales, foam board, or compacted earth
- Gravel for French drain system
- PVC pipes
- PE or PC panels
- Plastic sheeting or membrane
- Greenhouse lighting
- Interior features, such as raised beds and planters
- Humidity guage
Safety First: Always call a utility marking service before digging, and check with your zoning office about local permit requirements.
Step 1: Mark and Excavate the Site
Mark the dimensions of the walipini. Walipinis are typically 10 to 12 feet wide, but you can extend the length as needed. Then, excavate your walipini to a depth of 6 to 8 feet to allow room for drainage gravel and topsoil.
Slightly slope the floor toward your planned drainage area.

Step 2: Build Berms
Using the excavated soil, you can build berms along the outer perimeter, especially on the north side. Berms act as natural insulation and windbreaks, improving, reducing heat loss.
Step 3: Reinforce Walls
You can use a variety of insulation types for the interior walls, such as concrete blocks, wood framing, or rammed earth. For extra insulation on the north wall, line it with straw bales, foam board, or compacted earth. Wrap any exposed wood in plastic or waterproof sheeting to prevent rot. Install doors and entry points, sealing them well to minimize heat loss.

Step 4: Install Drainage and Waterproofing
Install a walipini perimeter drainage system, such as a French drain or a gravel trench, to prevent water infiltration and manage runoff. You can also line the interior walls with waterproof membranes and add a humidity gauge for easy management.

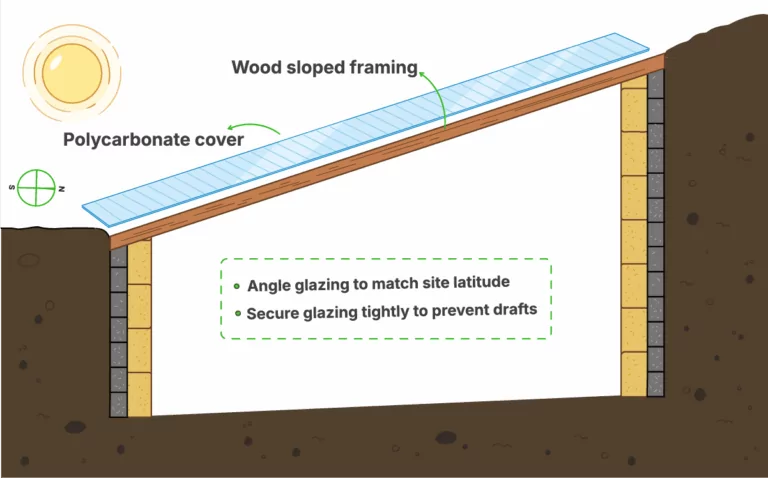
Step 5: Frame and Cover the Roof
Once the drainage and waterproofing are complete, move on to framing the roof. Construct a sloped roof using metal rods, PVC pipes, or lumber, ensuring you orient the slope to maximize winter sun exposure. Cover the frame with UV-resistant polyethylene plastic or polycarbonate panels, securing all edges to prevent drafts and heat loss.
Step 6: Add Ventilation and Final Touches
Install vents or sliding windows on both ends of the roof or both end walls for temperature and humidity control. Add interior features like raised beds or water barrels to stabilize temperature, and test the climate with a thermometer and humidity gauge.

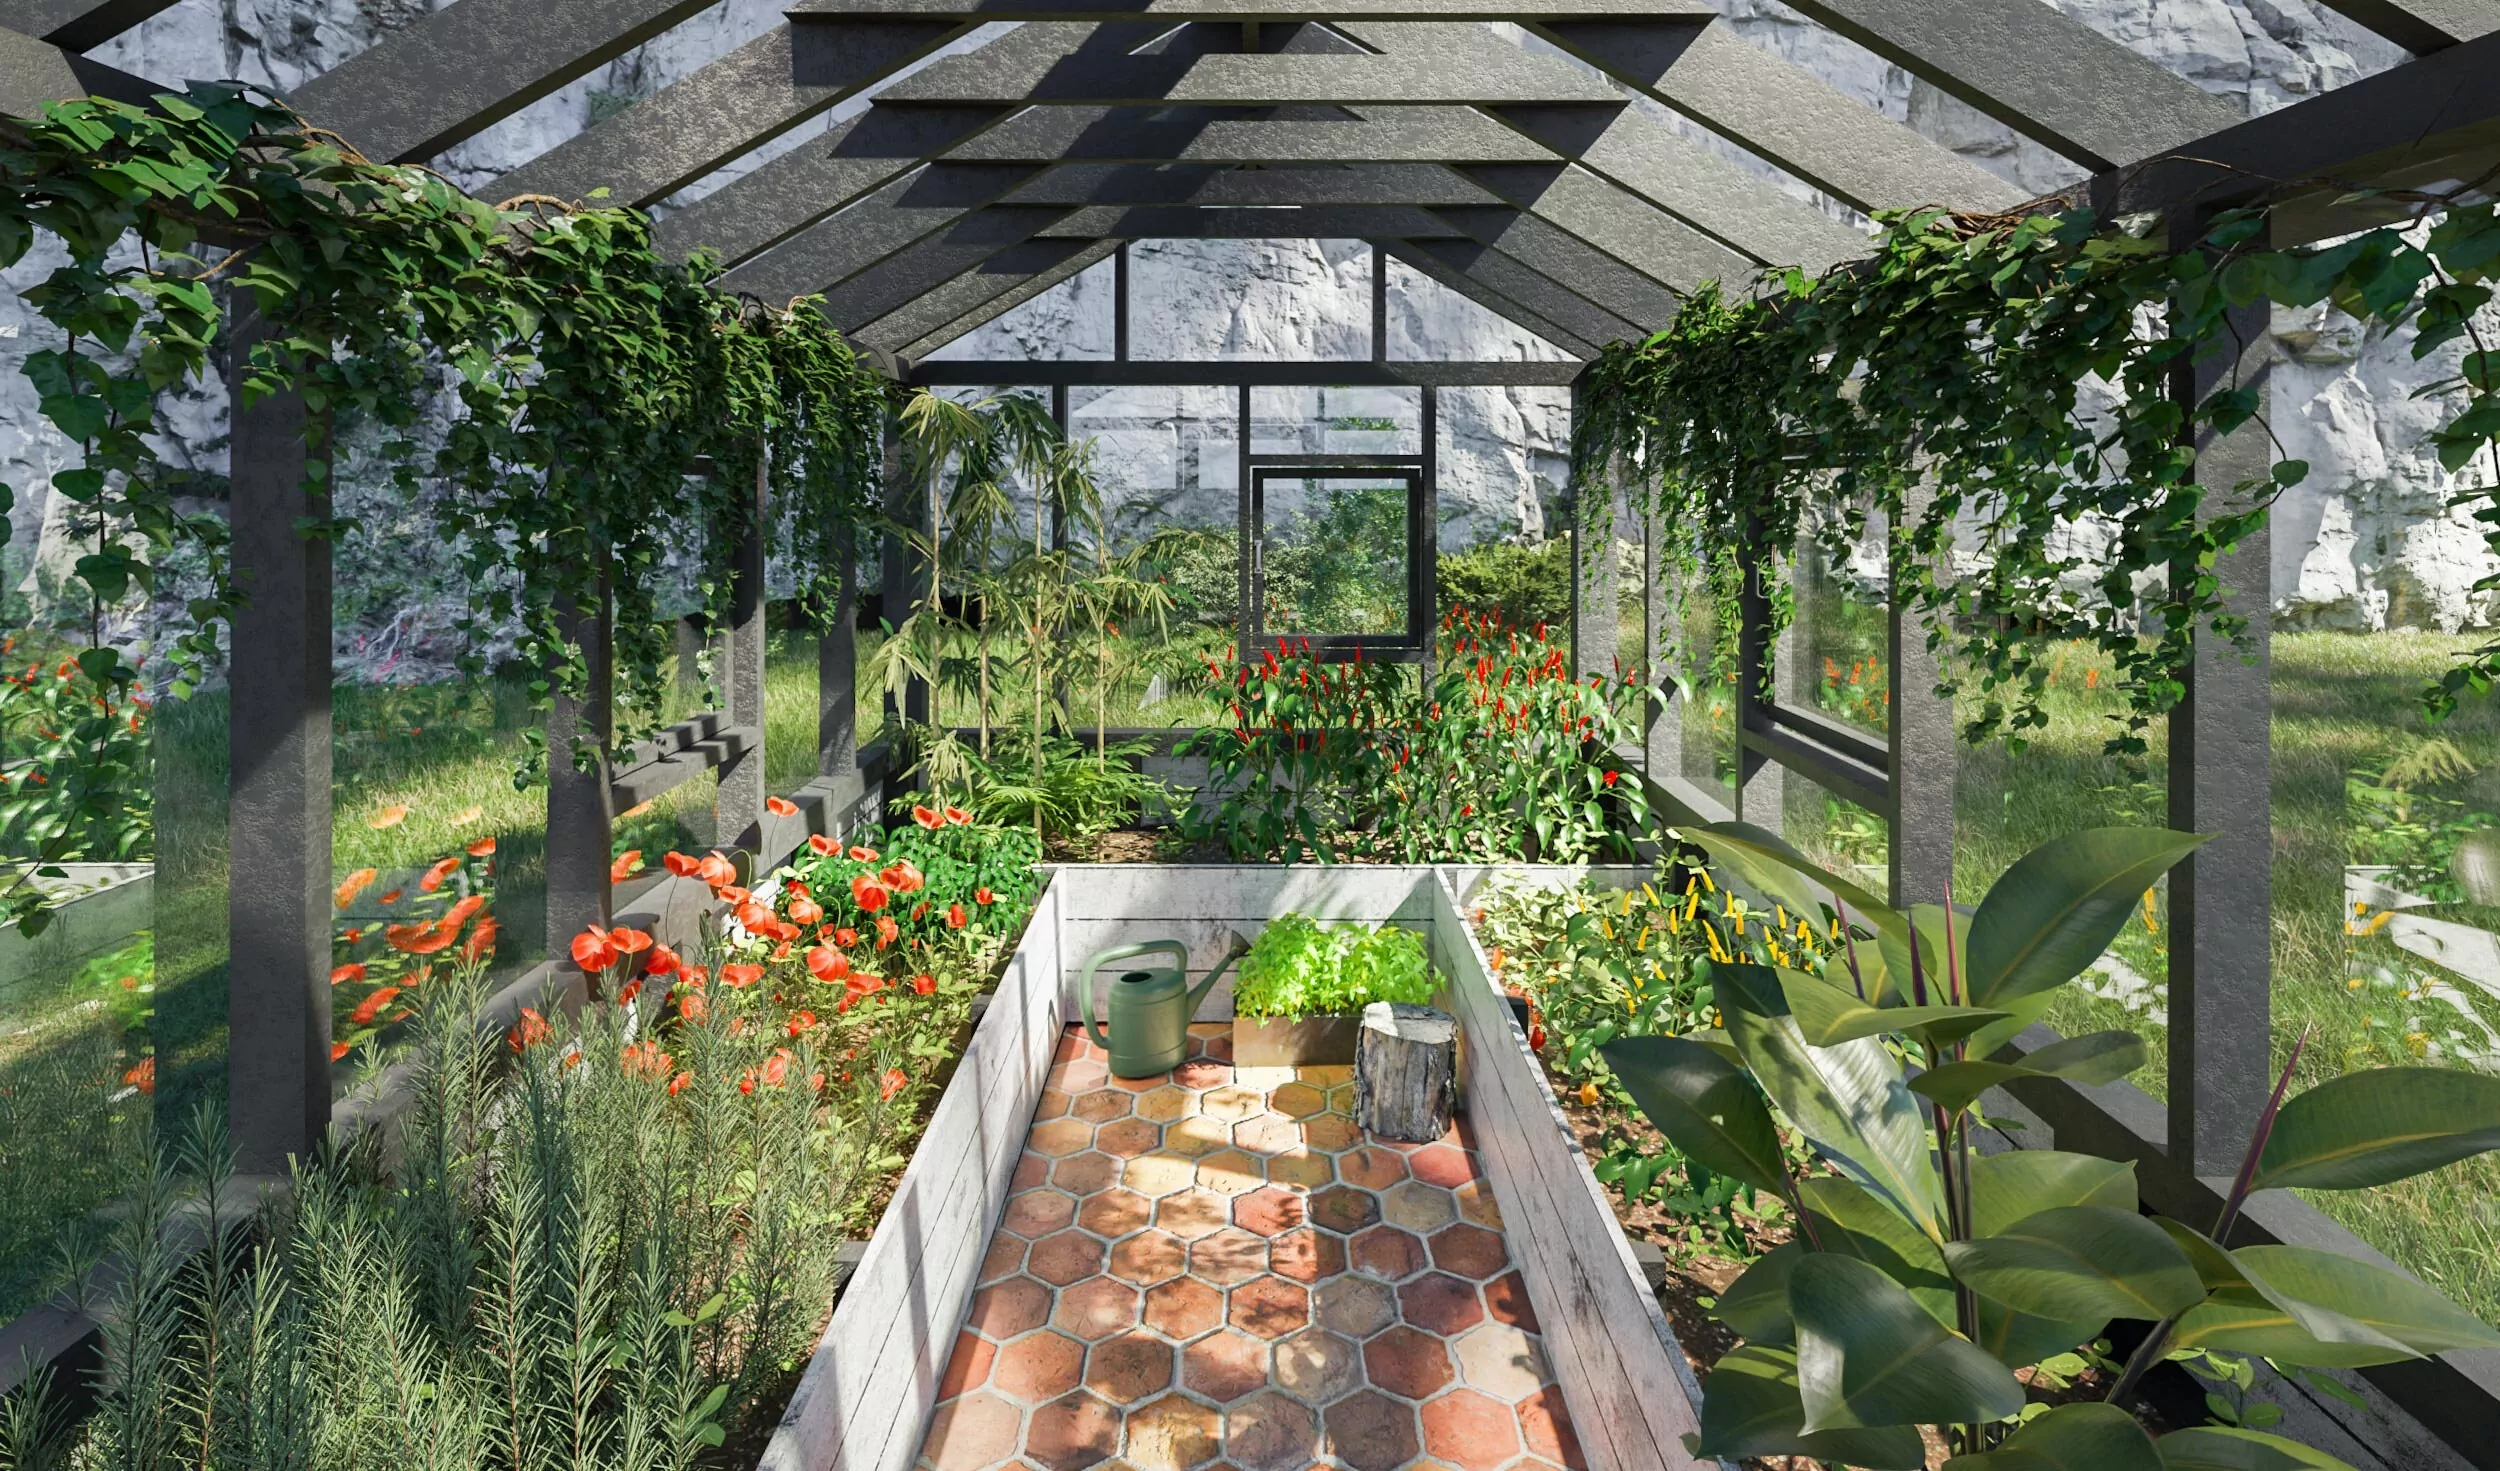
What Can You Grow in a Walipini?
Walipini greenhouses offer so much potential for gardening, especially when it comes to vegetables, such as leafy greens and root vegetables. Although cool-season crops usually do better in this style of greenhouse, it’s possible to grow crops depending on the temperature and humidity. Here are some of the best:
- Leafy greens, such as lettuce, spinach, and kale
- Herbs, such as cilantro, parsley, and chives
- Root vegetables, such as carrots, beets, and radishes
- Fruits and vegetables, such as tomatoes, peppers, cucumbers, and strawberries
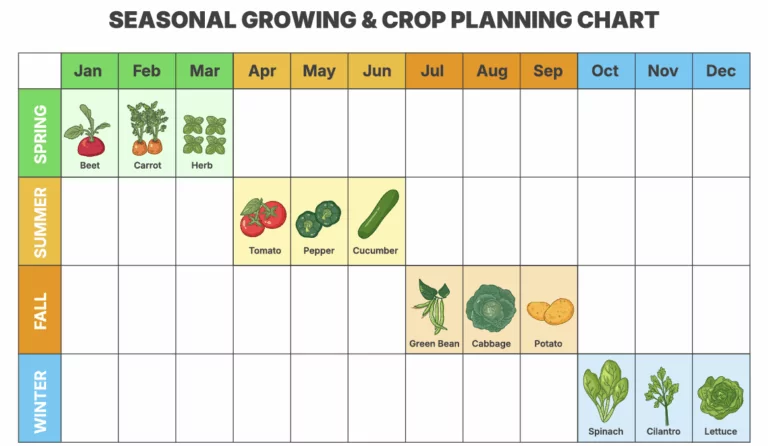
Use this planting chart to rotate crops throughout the year and make the most of your Walipini
Routine Maintenance and Common Issues
To keep your waplini in great condition, here are a few maintenance tips and solutions to common issues:
- Inspect and clear all drains and sumps each month, especially before and after heavy rainfall.
- Use small background heaters or an underground heat exchange system if it gets extremely cold.
- Do monthly checks for water flooding, pooling, or erosion and fix right away if you spot any.
- Clean gutters and roof glazing monthly, especially after storms. Make sure water flows away from the structure.
- Inspect and maintain drainage systems regularly to prevent flooding and root diseases. Check for condensation, mold, or pests as well.
- During the winter, you can supplement the lack of sunlight with LED grow lights. Check on bulbs seasonally to make sure they’re working.
Common Walipini Mistakes to Avoid
Gardeners can reap so many benefits from walipini greenhouses, as long as they avoid these common mistakes.
- Don’t build in a shady location. Plants need plenty of sunlight, and so does this type of greenhouse to stay warm.
- Add passive ventilation. This prevents excess humidity and heat stress.
- Always insulate the north wall. Opt for good-quality glazing to lessen the chances of heat loss when it’s cold.
- Design the roof glazing for your specific latitude. A shallow angle won’t capture enough sunlight in higher latitudes, leading to your plants sitting in deep shade during the winter.
- Reinforce the walls. These will reduce the chances of damage, flooding, and erosion.
Walipini Greenhouse FAQs
Do Walipini Greenhouses Flood?
Yes, flooding is a real risk for walipini greenhouses, especially when the greenhouse is built near a high water table or in a place with poor soil drainage. It’s best to build it away from these areas and construct a drainage system to prevent this.
How Do You Keep Water Out of a Walipini Greenhouse?
To keep water out of a walipini greenhouse, it’s best to build a drainage system and have the slope of the floor lead to this point. This could be a gravel bed beneath it or a French drain around the perimeter. You can also use a sump pump at the lowest point of the greenhouse.
Final Thoughts: Is a Walipini Right for You?
With the wide range of greenhouse options out there, walipinis are another example of how you can keep your garden happy and healthy all year-round. If an in-ground or sunken greenhouse style such as this matches up with your budget, zone, and gardening needs, you’ll get plenty of use out of one.