3×10 Garden Bed Plans
In this article, we are going to guide you through the process of building a practical and attractive 3×10 garden bed that will provide a perfect space for your plants to thrive. This step-by-step plan is designed to be easy to follow, even for those with limited carpentry experience.
| Unit | Qty | Size | Note | |
| Pressure-treated lumber (1˝x 4˝) | pcs | 7 | 6´ | Studs, Top plates |
| Pressure-treated lumber (2˝x 6˝) | pcs | 11 | 12´ | Joists |
| Pressure-treated lumber (2˝x 8˝) | pcs | 7 | 8´ | Seat elements |
| Pressure-treated lumber (3˝x 3˝) | pcs | 5 | 8´ | Studs, Joists |
| Landscape fabric | sq.ft. | 35 | ||
| Wood screws (2˝) | pcs | 110 | ||
| Wood screws (3˝) | pcs | 60 | ||
| Wood screws (5˝) | pcs | 120 | ||
| Galvanizated nails (2˝) | pcs | 200 |
| Garden Bed Main Frame | Unit | Qty | Size | Note |
| Pressure-treated lumber (2 1/2˝ x 2 1/2˝) | pcs | 4 | 1´-10˝ | Studs |
| Pressure-treated lumber (1 1/2˝ x 5 1/2˝) | pcs | 8 | 10´ | Joists |
| Pressure-treated lumber (1 1/2˝ x 5 1/2˝) | pcs | 8 | 3´-3˝ | Joists |
| Pressure-treated lumber (3/4˝ x 3 1/2˝) | pcs | 6 | 1´-10˝ | Studs |
| Pressure-treated lumber (3/4˝ x 3 1/2˝) | pcs | 4 | 3´-8˝ | Top plates |
| Pressure-treated lumber (3/4˝ x 3 1/2˝) | pcs | 2 | 3´-4˝ | Top plates |
| Landscape fabric | sq.ft. | 35 | ||
| Bench | Unit | Qty | Size | Note |
| Pressure-treated lumber (1 1/2˝ x 7 1/4˝) | pcs | 10 | 2´-2˝ | Seat elements |
| Pressure-treated lumber (1 1/2˝ x 7 1/4˝) | pcs | 5 | 3´-11˝ | Seat elements |
| Pressure-treated lumber (2 1/2˝ x 2 1/2˝) | pcs | 7 | 2´-7˝ | Joists |
| Pressure-treated lumber (2 1/2˝ x 2 1/2˝) | pcs | 2 | 3´-3˝ | Joists |
| Pressure-treated lumber (2 1/2˝ x 2 1/2˝) | pcs | 4 | 2´-1/2˝ | Studs |
| Fasteners & Hardware | Unit | Qty | Size | Note |
| Wood screws (2˝) | pcs | 110 | ||
| Wood screws (3˝) | pcs | 60 | ||
| Wood screws (5˝) | pcs | 120 | ||
| Galvanizated nails (2˝) | pcs | 200 |
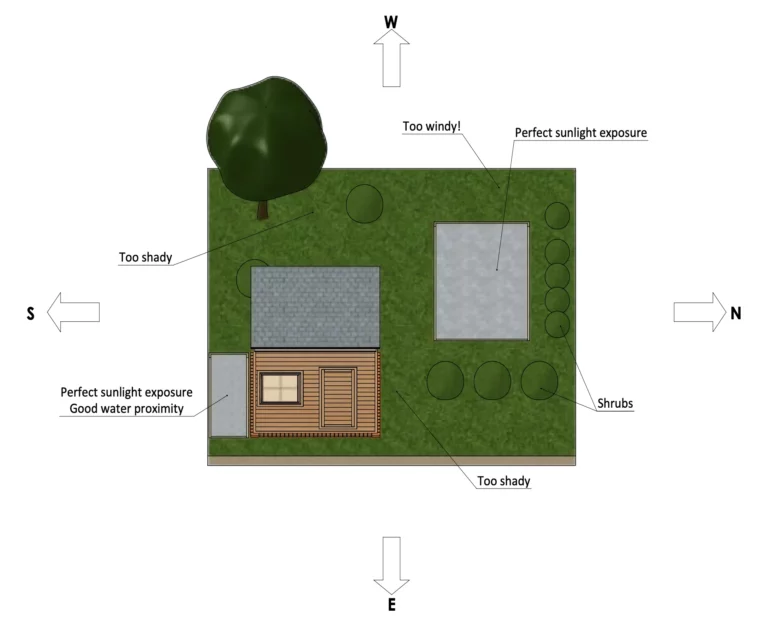
Step 1: Choose and Prepare Location for Garden Bed
1.1. A good option for raised garden beds is building them on the south side of the structure – there will be enough sun and place on walls if you decide to fasten a few additional special hanging garden beds. Another choice is to place it on the north side of your backyard; make sure the chosen area is not too shady.
Consider these factors:
- Sun exposure
- Easiness to reach
- Water proximity
- Drainage
- Wind directions.
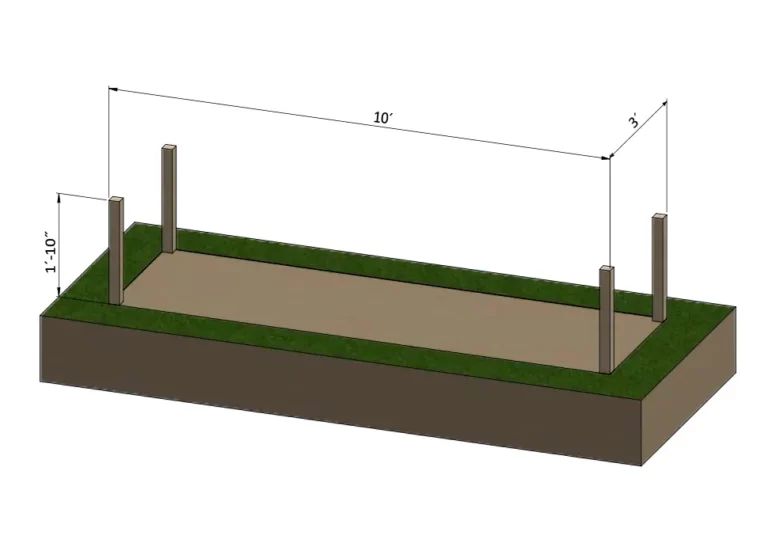
Step 2: Assemble the Main Frame
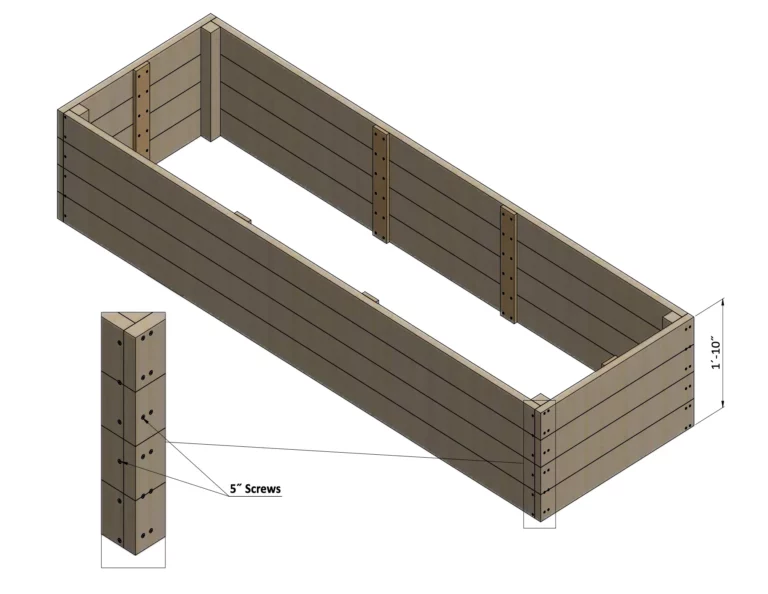
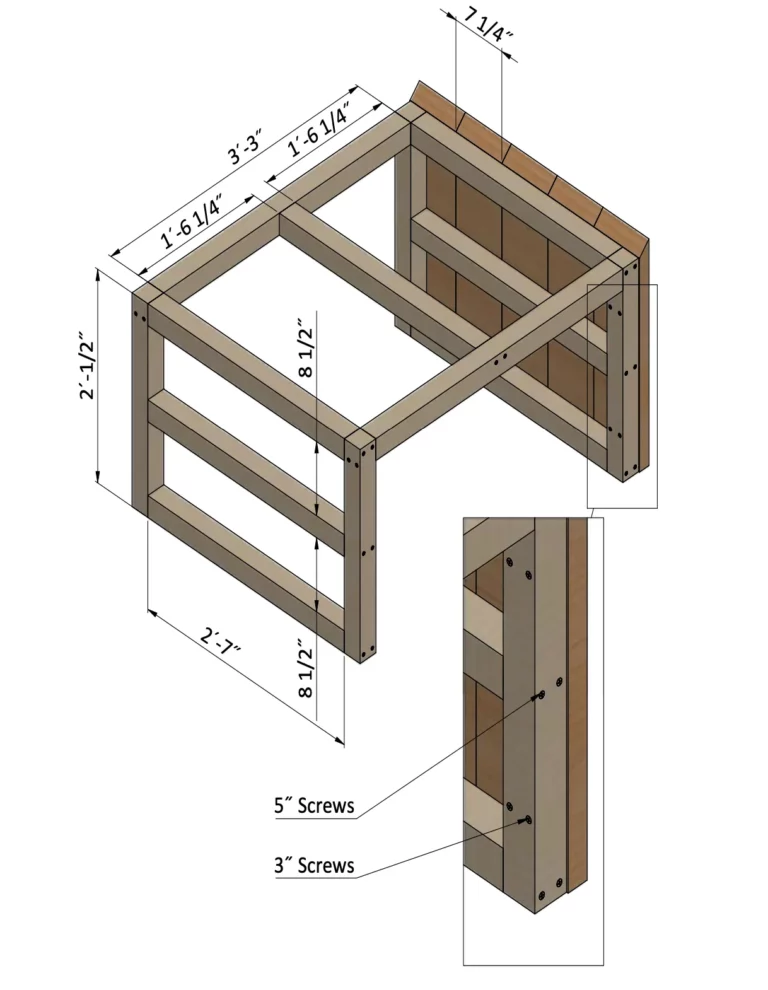
2.1. Assemble the main frame using 2 1/2″ x 2 1/2″ pressure-treated lumber. You will need four boards cut to 1′-10″ that will be the studs.
2.2. WWUsing a speed square or carpenter’s square, check the corners to make sure they are 90°.
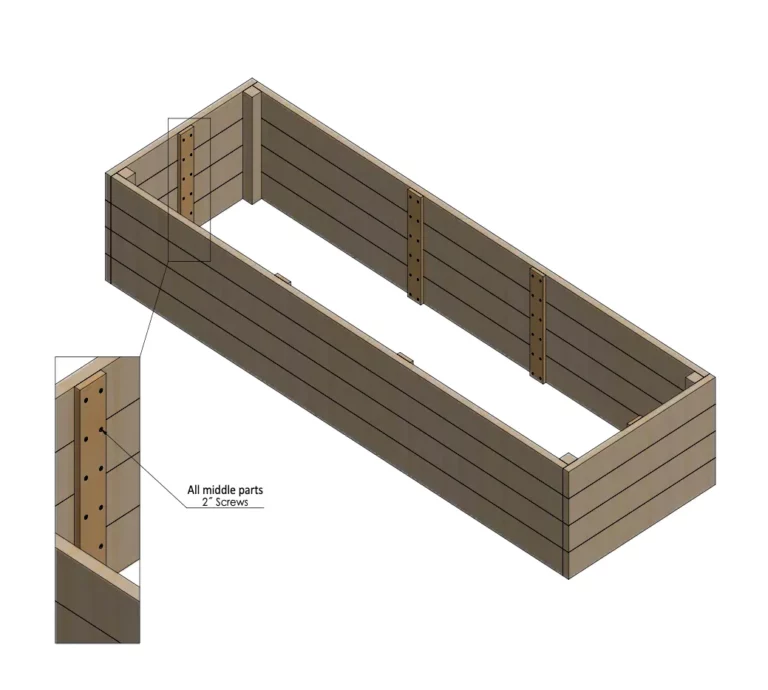
Step 3: Assemble the Walls
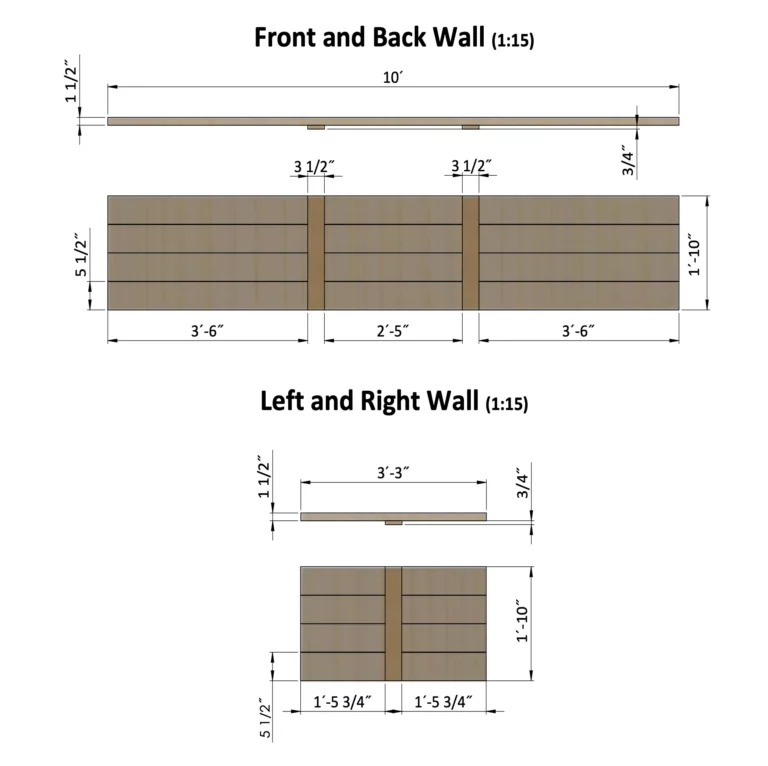
3.1. Assemble the walls using 1 1/2″ x 5 1/2″ and 3/4″ x 3 1/2″ pressure-treated lumber. You will need eight boards cut to 10′ and eight boards cut to 3′-3″ that will be the joists and six boards cut to 1′-10″ that will be studs.
3.2. Secure the beams with 18 x 5″ and 12 x 2″ wood screws.
3.3. Using a speed square or carpenter’s square, check the corners to make sure they are 90°.
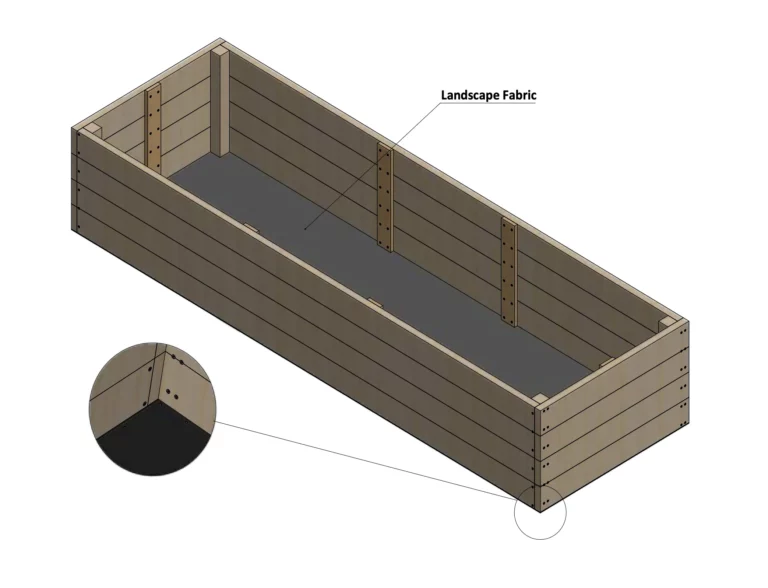
Step 4: Install Landscape Fabric
4.1. Cover the bottom of garden bed with landscape fabric. You will need 35 sq. ft. 4.2. Fasten landscape fabric for bottom with galvanized nails 2″.
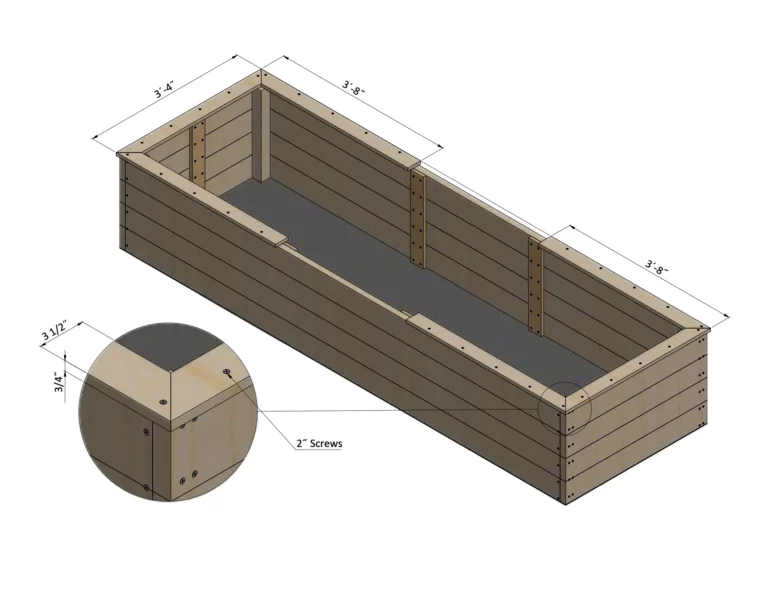
Step 5: Assemble the Top Plates
5.1. Assemble the top plates using 3/4″ x 3 1/2″ pressure-treated lumber. You will need four boards cut to 3′-8″ and two boards cut to 3′-4″.
5.2. Connect the beams with 2″ wood screws.
5.3. Using a speed square or carpenter’s square, check the corners to make sure they are 90°.
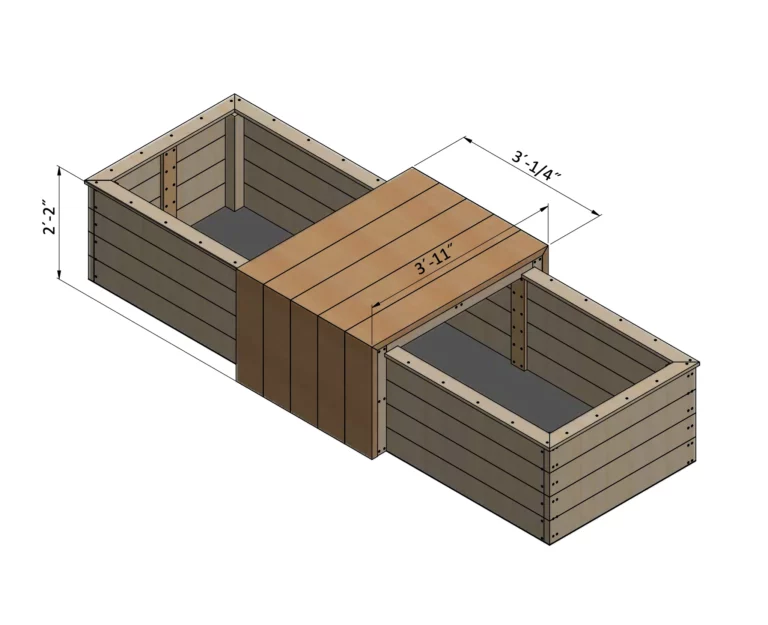
Step 6: Assemble the Bench
6.1. Assemble the bench using 2 1/2″ x 2 1/2″ and 1 1/2″ x 7 1/4″ pressure-treated lumber. You will need ten boards cut to 2′-2″ and five boards cut to 3′-11″ that will be the seat elements, seven boards cut to 2′-7″ and two boards cut to 3′-3″ that will be the joists and four boards cut to 2′-1/2″ that will be studs.
6.2. Connect the beams with 3″ and 5″ wood screws.
6.3. Using a speed square or carpenter’s square, check the corners to make sure they are 90°.
About the Author
Craftcamp
Your go-to author for expertly crafted DIY plans, promoting sustainability and self-sufficiency in every project.