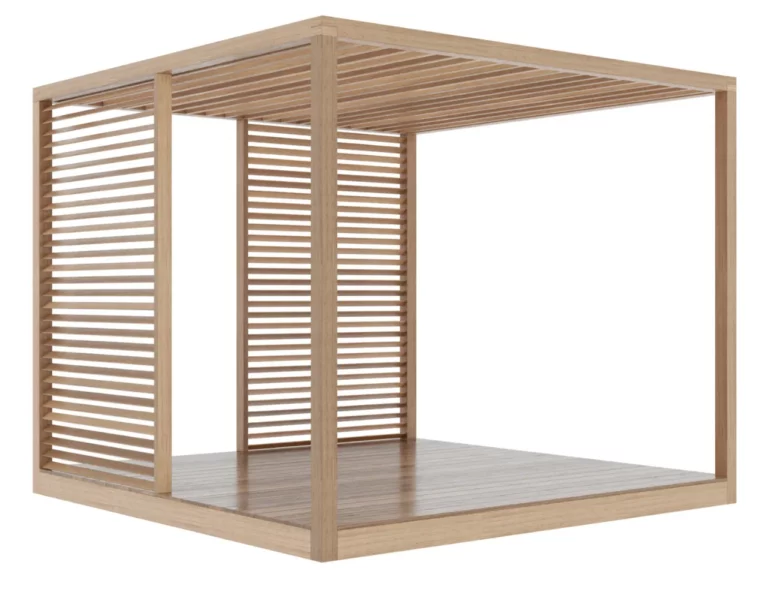
10×10 Pergola Plans
In this article, we are going to guide you through the process of building a beautiful 10×10 pergola that will enhance your outdoor living space. Our step-by-step plan is designed to help you construct a sturdy and attractive pergola, even if you have limited carpentry experience.
| 10’x10′ pergola shopping list | ||||
| Main Frame | Unit | Qty | Size | Note |
| Lumber (1/4 x 3 ) | pcs | 58 | 4′ | |
| Lumber (1 x 6 ) | pcs | 22 | 10′ | |
| Lumber (2 x 4 ) | pcs | 2 | 8′ | |
| Lumber (2 x 4 ) | pcs | 19 | 10′ | |
| Lumber (2 x 6 ) | pcs | 11 | 10′ | |
| Lumber (4 x 4 ) | pcs | 4 | 8′ | |
| Lumber (4 x 4 ) | pcs | 5 | 10′ | |
| Fasteners & Hardware | Unit | Qty | Size | Note |
| Face-Mount Joist Hanger, 2×8 | pcs | 22 | ||
| Wood screws (1″) | pcs | 150 | ||
| Wood screws (2″) | pcs | 250 | ||
| Wood screws (3″) | pcs | 160 | ||
| Wood screws (5″) | pcs | 90 |
| 10’x10′ pergola cutting list | ||||
| Main Frame | Unit | Qty | Size | Note |
| Lumber (1/4 x 3 ) | pcs | 58 | 4′ | Blind bar |
| Lumber (1 x 6 ) | pcs | 22 | 10′ | Decking board |
| Lumber (2 x 4 ) | pcs | 2 | 7′-5 3/4″ | Stud |
| Lumber (2 x 4 ) | pcs | 19 | 9′-5″ | Top joist |
| Lumber (2 x 6 ) | pcs | 4 | 9′-5″ | Rim joist |
| Lumber (2 x 6 ) | pcs | 7 | 9′-9″ | Joist |
| Lumber (4 x 4 ) | pcs | 5 | 1′-8 1/2″ | Stud |
| Lumber (4 x 4 ) | pcs | 4 | 8′ | Stud |
| Lumber (4 x 4 ) | pcs | 4 | 10′ | Top beam |
| Fasteners & Hardware | Unit | Qty | Size | Note |
| Face-Mount Joist Hanger, 2×8 | pcs | 22 | ||
| Wood screws (1″) | pcs | 150 | ||
| Wood screws (2″) | pcs | 220 | ||
| Wood screws (3″) | pcs | 120 | ||
| Wood screws (5″) | pcs | 40 |
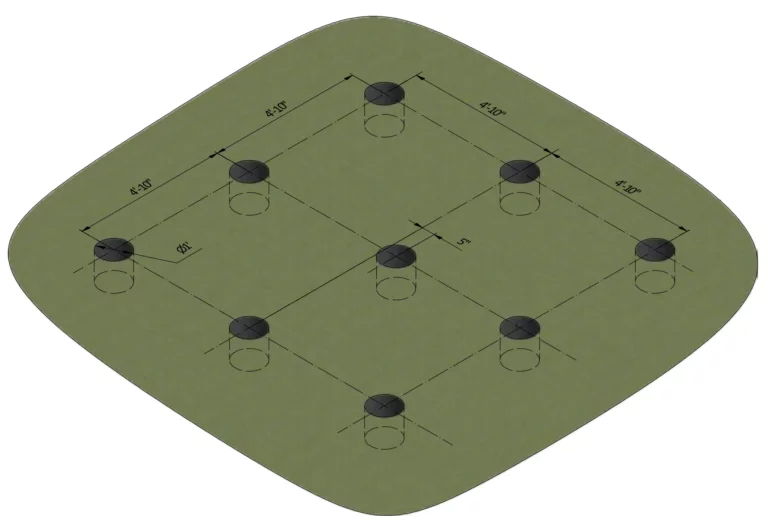
Step 1: Ground Works
1.1 Clear the area where you want to build the pergola and layout for the foundation. Use the below illustration as a guide.
1.2 For the foundation dig pits 1 ft dip each and 1ft diameter.
1.3 Treat the marked area with a Herbicide Lawn Weed Killer for the ravage of weeds.
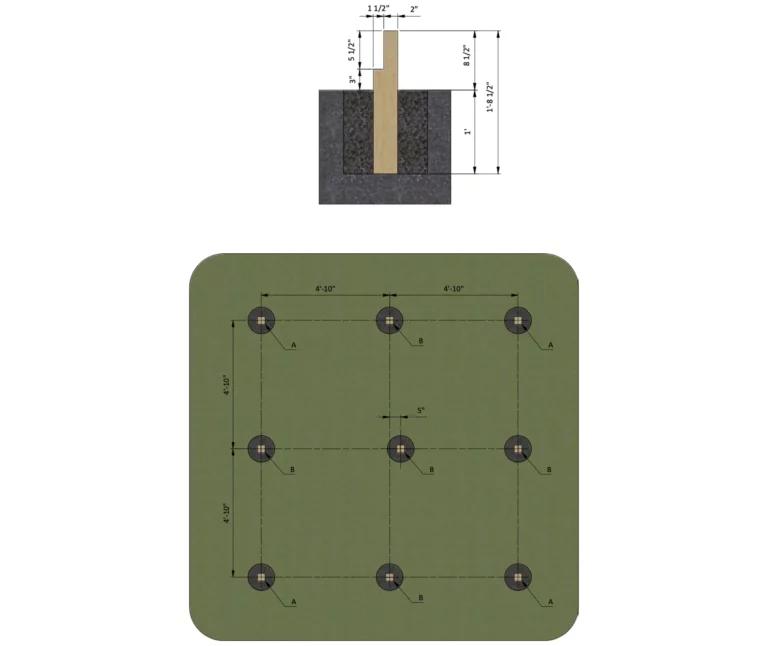
Step 2: Foundation Preparation
2.1 Using 4 x 4 pressure-treated lumber, prepare studs using the drawing below as a reference. You will need four boards cut to 9′-3″ and five boards cut to 1′-8 1/2″.
2.2 Cut the recess for splicing connection with joists. When placing the deck on uneven terrain, the height of some of the supports can be varied to ensure the same level with the others.
2.3 Insert studs into the pits and fill them to ground level with concrete and let cure, or harden. Since curing times vary between brands, read the packaging for recommended curing times.

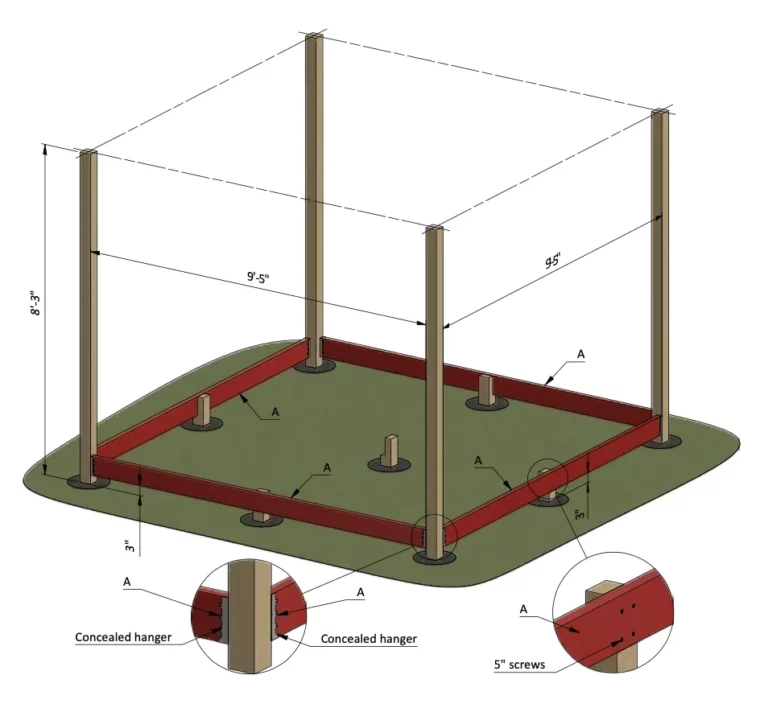
Step 3: Assemble the Floor Frame
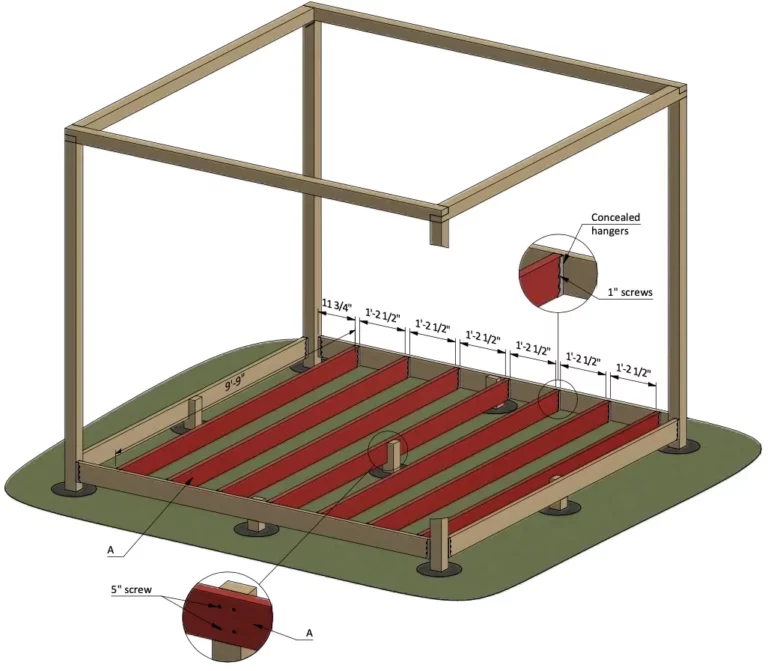
3.1 Use 2×6 lumber to cut and install the floor frame. Use the illustration below as a reference. You will need four boards cut to 9′-5″ that will be rim joist.
3.2 Secure the beams with concealed hangers and 1″ wood screws to the corner posts and 5″ screws to the short posts.
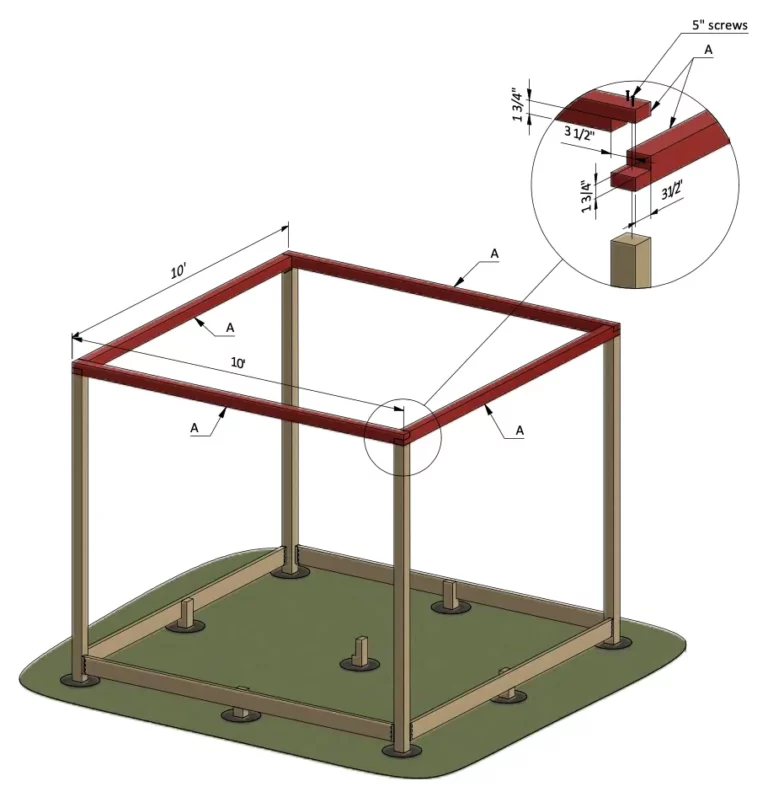
Step 4: Assemble the Top Beams
4.1 Assemble the top beams using 4×4 lumber. You will need to cut four 10′ beams. To connect other top beams between themselves use half lap connection.
4.2 Connect the beams with 5″ wood screws.
4.3 Using a speed square or carpenter’s square, check the corners to make sure they are 90°.
Step 5: Framing the Pergola's Floor
5.1 Assemble the frame using 2×6 lumber. You will need seven boards cut to 9′-9″ that will be the joist.
5.2 Secure the boards with concealed hangers and 1″ wood screws to the rim joist and 5″ screws to the short post.
5.3 Using a speed square or carpenter’s square, check the corners to make sure they are 90°.
Step 6: Install the Deck Floor
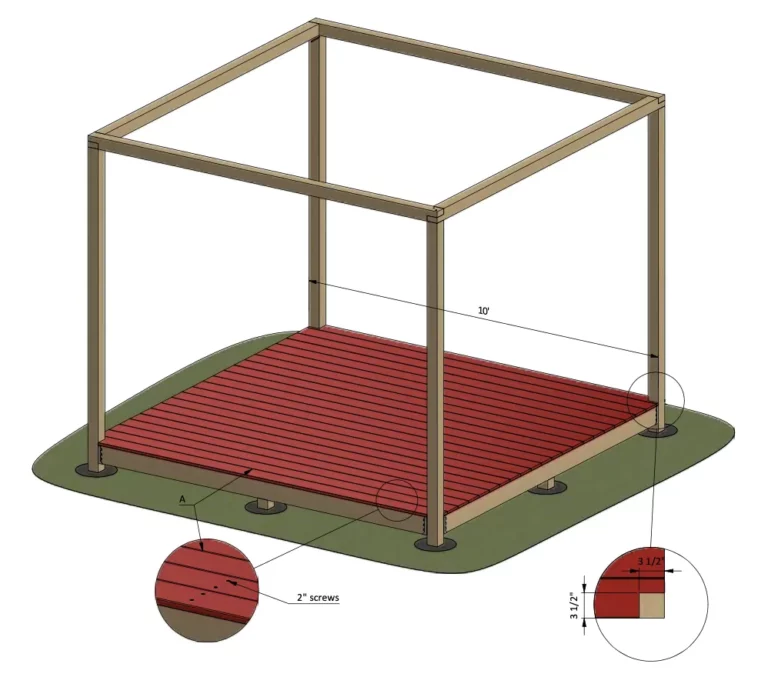
6.1 Prepare the 1×6 decking board for the floor sheathing according to the drawing. You will need to cut twenty two boards 10′ long. Provide cuttings for connection with studs.
6.2 Secure the boards with 2″ wood screws or specialized fasteners.
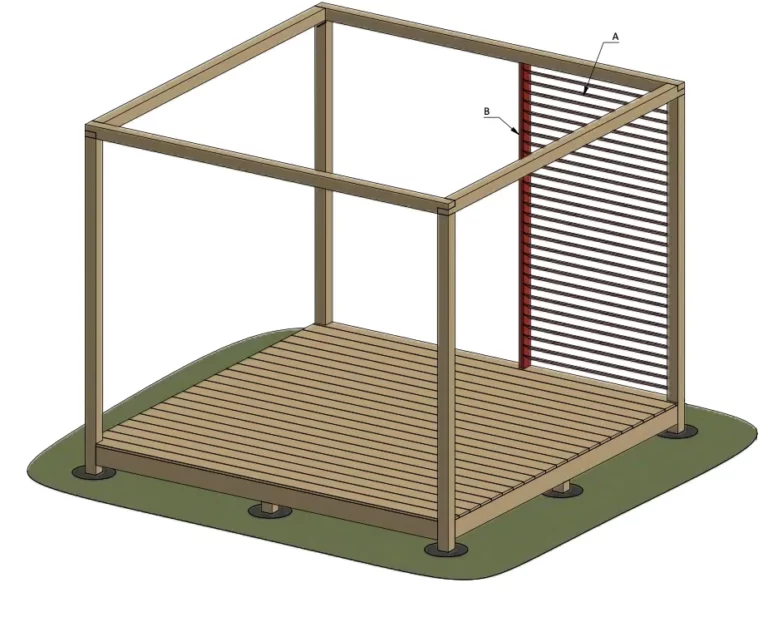
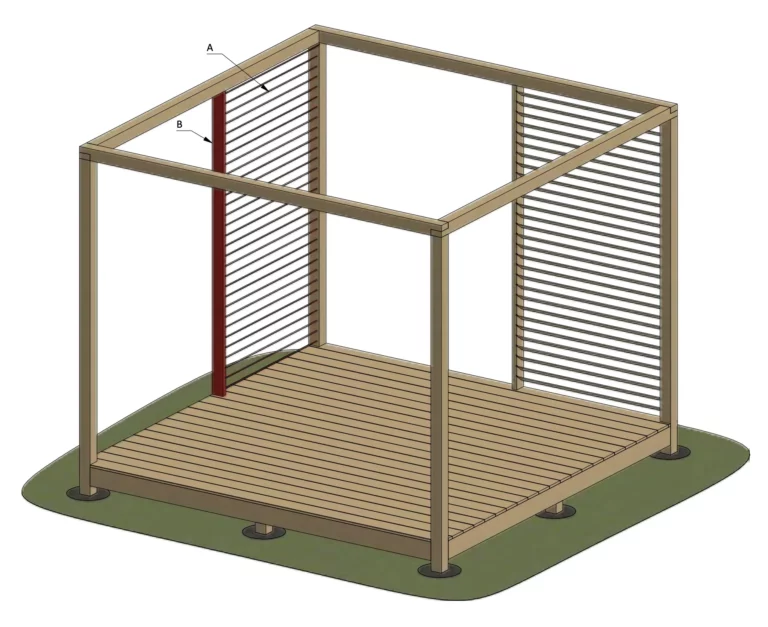
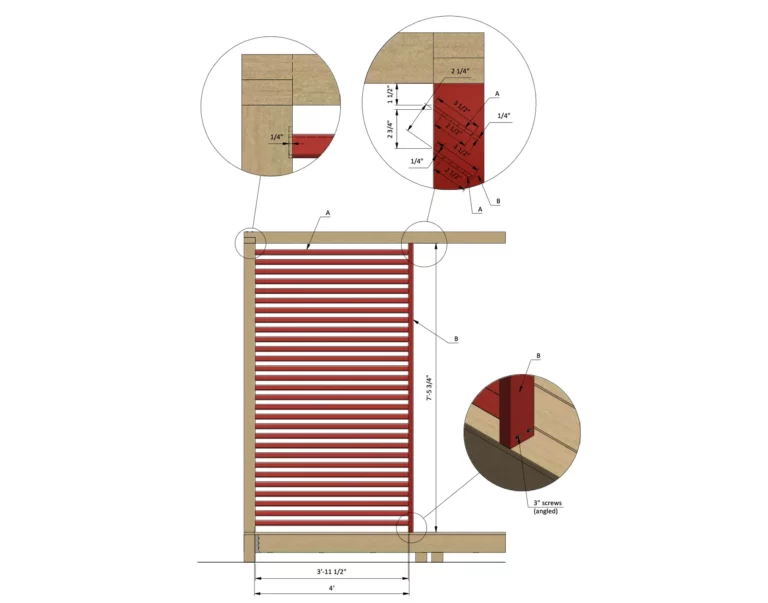
Step 7: Assemble the Back Wall Frame
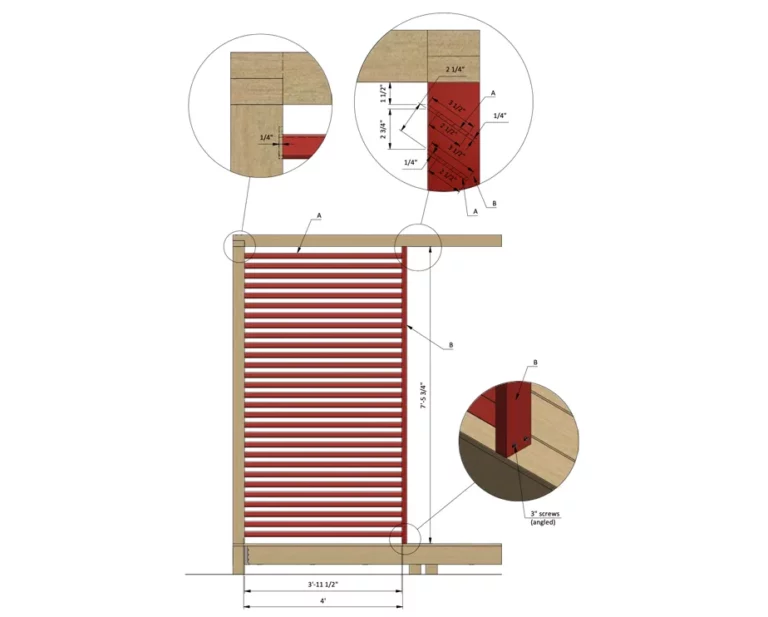
7.1 Using 2 x 4 lumber, cut one stud 7′-5 3/4″ long according to the dimensions in drawing below. 7.2 Using 1/4 x 3 board, provide twenty nine blind bars 4′ long. To install them, make 1/4″ deep oblique cuts in the vertical surfaces of the studs.
7.3 Fix stud with 3″ wood screws at an angle.
Using a speed square or carpenter’s square, check the corners to make sure they are 90°.
Step 8: Assemble the Left Wall Frame
8.1 Using 2×4 lumber, cut one stud 7′-5 3/4″ long according to the dimensions in drawing below. 8.2 Using 1/4 x 3 board, provide twenty nine blind bars 4′ long. To install them, make 1/4″ deep oblique cuts in the vertical surfaces of the studs.
8.3 Connect the stud with 3″ and 5″ wood screws. Using a speed square or carpenter’s square, check the corners to make sure they are 90°.
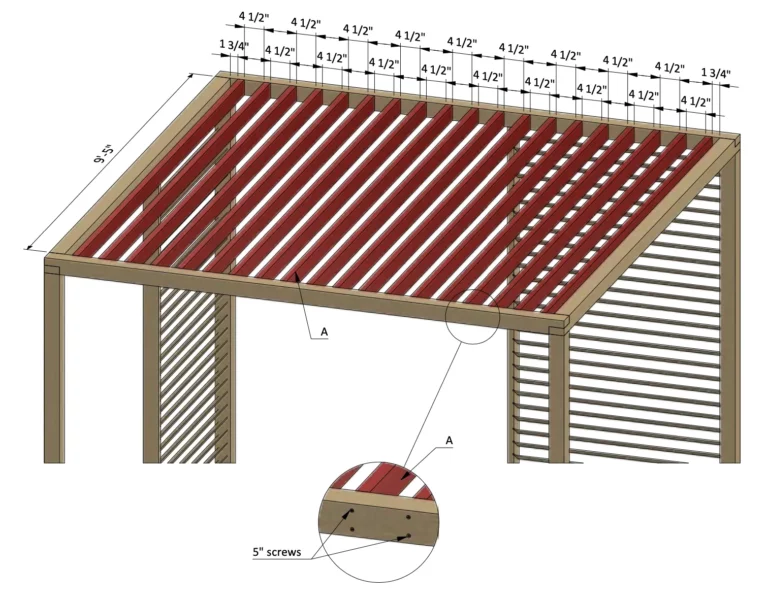
Step 9: Assemble the Top Joists
9.1 Assemble the beams using 2×4 pressure-treated lumber. You will need nineteen boards cut to 9′-5″.
9.2 Connect the beams with 5mm wood screws.
9.3 Using a speed square or carpenter’s square, check the corners to make sure they are 90°.
Step 10: Thank You
Now that your pergola is all done, you are ready to decorate it any way you want using your favorite paint, stain, or preservative.
About the Author
Craftcamp
Your go-to author for expertly crafted DIY plans, promoting sustainability and self-sufficiency in every project.